
1. Introduction
This instruction manual provides detailed guidance for assembling your ROBOTIME 3D Puzzle Wooden Craft Kits, which include the Five-Storied Pagoda and Vintage Car models. These kits are designed for self-assembly, offering an engaging experience in constructing intricate wooden models. Please read all instructions carefully before beginning assembly.

Image 1.1: The completed Five-Storied Pagoda and Vintage Car models. This image displays both finished wooden models side-by-side, showcasing their intricate details and natural wood finish.
2. Safety Precautions
- Keep small parts away from young children to prevent choking hazards.
- Handle wooden pieces carefully to avoid splinters.
- Do not force pieces together; if a piece does not fit, re-check the instructions and ensure correct orientation.
- Assemble in a well-lit area with a clean, flat workspace.
3. Package Contents
Before starting assembly, verify that all components are present:
- Pre-cut wooden sheets for Five-Storied Pagoda model.
- Pre-cut wooden sheets for Vintage Car model.
- Instruction manual (this document).
4. General Assembly Guidelines
These models are designed for tool-free and glue-free assembly. Follow these general tips for a smooth building process:
- Identify Parts: Carefully detach each piece from the wooden sheets. Refer to the diagrams in the specific model sections to identify parts by their designated numbers or shapes.
- Gentle Handling: Use gentle pressure when detaching and connecting pieces.
- Interlocking Design: Pieces are designed to interlock. Ensure proper alignment before pressing them together.
- No Tools or Glue: This kit does not require external tools or adhesives for assembly.

Image 4.1: Illustration of the kit's key features: easy assembly, no tools, and no glue required. The image shows a simplified diagram of the pagoda's base structure and individual components, emphasizing the interlocking design.
5. Five-Storied Pagoda Assembly
5.1. Overview
The Five-Storied Pagoda model consists of 275 wooden pieces and has an estimated assembly time of 1.5 hours. Follow the sequential steps provided in the diagrams.

Image 5.1: A pair of hands carefully assembling the base structure of the Five-Storied Pagoda. Various detached wooden pieces are scattered around the workspace, illustrating the initial stages of construction.
5.2. Detailed Steps
- Base Construction: Begin by identifying and assembling the foundational pieces for the pagoda's base. Ensure all interlocking tabs are securely fitted.
- Layered Structure: Proceed to build the five distinct stories, working from the bottom up. Each story involves assembling walls, roofs, and decorative elements.
- Roof Details: Pay close attention to the intricate roof designs for each level. These often involve multiple smaller pieces that fit together to form the eaves.
- Central Spire: Once the main body is complete, assemble and attach the central spire at the very top of the pagoda.
- Decorative Elements: Attach any remaining decorative railings, stairs, or other small details as indicated in the diagrams.

Image 5.2: A collage of four close-up images highlighting the intricate details of the Five-Storied Pagoda. These include the stairs, railings, roof eaves, and the top spire, demonstrating the precision of the wooden components.
6. Vintage Car Assembly
6.1. Overview
The Vintage Car model consists of 164 wooden pieces. Refer to the provided diagrams for step-by-step assembly.
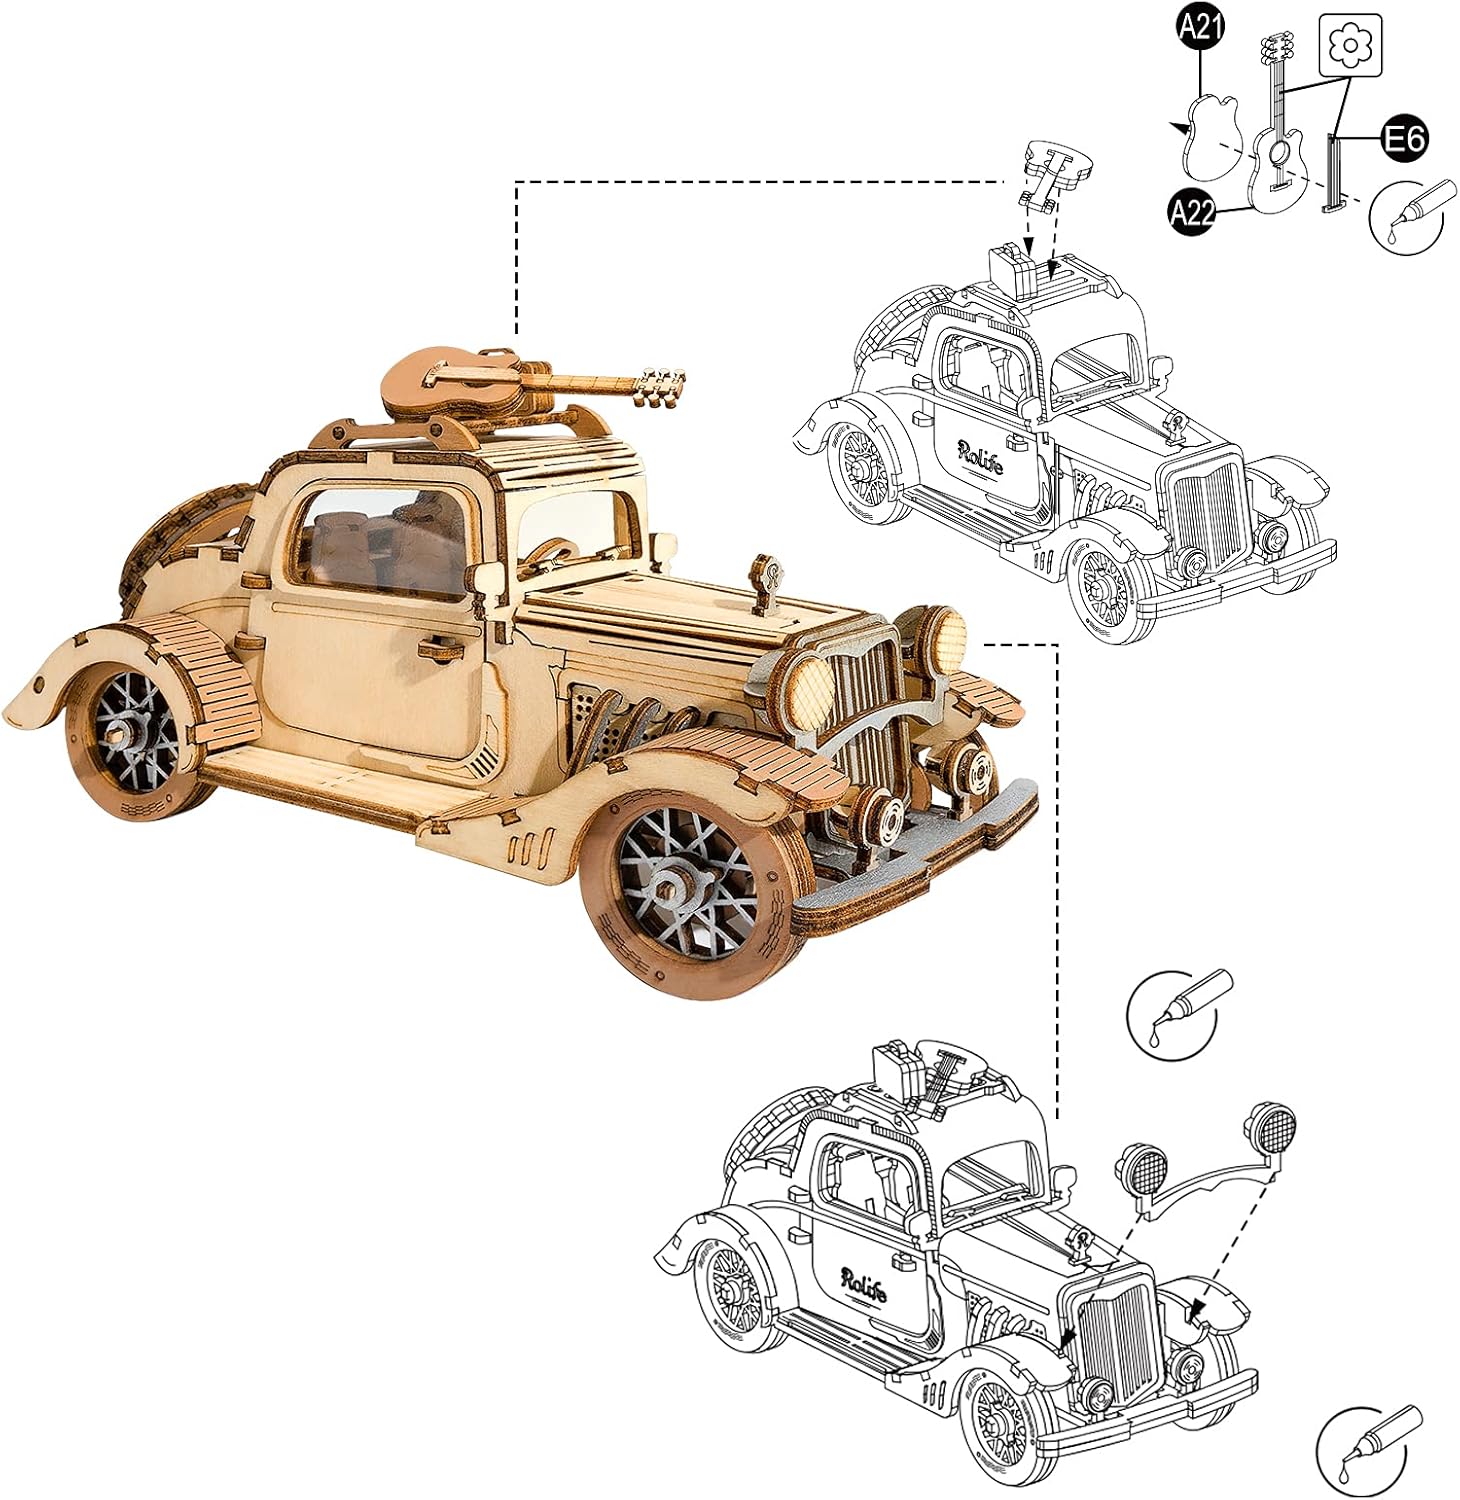
Image 6.1: An assembly diagram for the Vintage Car model. It shows the main body of the car with dotted lines indicating where additional components like headlights and a roof-mounted guitar are attached, along with corresponding part labels.
6.2. Detailed Steps
- Chassis and Body: Begin by constructing the main chassis and the core body of the car. Ensure all foundational pieces are firmly connected.
- Engine Hood and Fenders: Attach the engine hood, front, and rear fenders, paying attention to their curved shapes and alignment.
- Wheels: Assemble the individual wheel components and attach them to the car's axles. Ensure they can rotate freely if designed to do so.
- Interior Details: Add any interior elements such as seats or steering wheel, if applicable.
- Exterior Accessories: Attach headlights, grille, spare tire, and any roof-mounted accessories like the guitar, as shown in the diagrams.
7. Care and Display
- Cleaning: Dust the models gently with a soft, dry cloth or a soft brush. Avoid using water or chemical cleaners, as these can damage the wood.
- Display: Place your finished models on a stable, flat surface away from direct sunlight, excessive humidity, or extreme temperature changes to prevent warping or fading.
- Handling: Handle the models by their sturdy bases to avoid putting stress on delicate parts.

Image 7.1: The fully assembled Five-Storied Pagoda model displayed on a dark surface, highlighting its architectural beauty and intricate details. Gears are visible in the background, suggesting a mechanical theme.

Image 7.2: The fully assembled Vintage Car model displayed on top of a book, showcasing its retro design and detailed wooden construction. The image emphasizes its suitability as a decorative item.
8. Troubleshooting
- Pieces Don't Fit: Double-check the part number and orientation against the instruction diagrams. Ensure no excess wood dust or debris is blocking the connection points. Do not force pieces.
- Broken Piece: If a piece breaks during detachment or assembly, a small amount of wood glue can be used for repair, though the kit is designed to be glue-free. Contact customer support if a critical piece is damaged beyond repair.
- Missing Piece: Carefully check all wooden sheets and packaging. If a piece is genuinely missing, contact ROBOTIME customer support.
9. Specifications
9.1. Five-Storied Pagoda
- Wooden Pieces: 275 pieces
- Approximate Assembly Time: 1.5 hours
- Assembled Dimensions (L x W x H): Approximately 6.3 x 6.3 x 12.6 inches

Image 9.1: Specifications for the Five-Storied Pagoda, including its product name, 275 wooden pieces, and an estimated assembly time of 1.5 hours. The image also shows the assembled pagoda with its dimensions: 12.6 inches height and 6.3 inches width/depth.
9.2. Vintage Car
- Wooden Pieces: 164 pieces
- Assembled Dimensions (L x W x H): Approximately 6.29 x 2.75 x 3.15 inches

Image 9.2: Specifications for the Vintage Car model, including its product name (TG504), 164 wooden pieces, and assembled dimensions of 6.29 x 2.75 x 3.15 inches. A difficulty rating is also indicated.
10. Customer Support
For further assistance, missing parts, or inquiries regarding your ROBOTIME 3D Puzzle Wooden Craft Kits, please contact ROBOTIME customer support through their official website or the retailer where the product was purchased. Please have your product model information (Five-Storied Pagoda & Vintage Car) and ASIN (B0DB211WC7) ready when contacting support.