
Product Overview
The Prichor RC-82T Ceiling Fan Remote Control Kit is designed to provide convenient control over your 3-speed AC ceiling fan and its lighting. This universal kit includes a remote control and a receiver, allowing for easy adjustment of fan speed and light dimming (for incandescent bulbs).

Image: The remote control and receiver, highlighting wind speed control (low/med/high), light control (on/off/dimming), and a blue indicator light.
Key Features:
- 3-Speed Fan Control: Adjust fan speed to Low, Medium, or High.
- Light Dimmer Function: Controls light brightness for incandescent bulbs. For LED bulbs, it provides on/off functionality only.
- Universal Compatibility: Designed to replace most 3-speed AC ceiling fans from various brands.
- Durable Receiver: Includes a robust receiver unit for reliable operation.
- Easy Setup: Pre-configured settings for direct use; includes a learn button for re-matching if needed.
Package Contents
Verify that all items are present in your package:

Image: Contents of the Prichor RC-82T kit, including the receiver, remote, wall mount holder, user manual, screws, and plastic wire connectors.
- Receiver (1)
- Remote Control (1)
- Wall Mount Holder (1)
- User Manual (1)
- Screws (2)
- Plastic Wire Connectors (6)
Specifications
| Feature | Detail |
|---|---|
| Brand | Prichor |
| Model Name | RC-82T&RC-82R |
| Special Feature | 3 speed, Universal, light dimmer |
| Color | White |
| Max Number of Supported Devices | 10 |
| Compatible Devices | Fan |
| Connectivity Technology | Radio Frequency |
| Controller Type | Wireless |
| Maximum Range | 60 Feet |
| Battery Type | 3V battery |
| Item Dimensions (L x W x H) | 4.5"L x 1.65"W x 0.86"H |
Compatibility
This universal remote control kit is compatible with most 3-speed AC ceiling fans, including many models from Hampton Bay, Harbor Breeze, and Hunter. Ensure your ceiling fan's canopy has sufficient space to accommodate the receiver unit.

Image: Visual guide showing compatibility with most downrod style fans and incandescent/halogen lamps. Not recommended for wall-mounted or exhaust fans. Dimmable LED/CFL lamps are compatible, but non-dimmable LED/CFL lamps only support ON/OFF.
Light Bulb Compatibility:
- Incandescent Bulbs: Full dimming control.
- Dimmable LED/CFL Bulbs: Full dimming control.
- Standard LED/CFL Bulbs: On/Off control only (no dimming).
Note: Not recommended for use with wall-mounted fans or exhaust-type fans.
Installation Guide
WARNING: HIGH VOLTAGE! Disconnect power by removing the fuse or switching off the circuit breaker before installation. Do not use with solid state fans. All electrical wiring must meet local and national electrical code requirements. Supply for fan must be 110/120 Volt, 60Hz. Maximum fan motor amps: 1.0. Maximum light watts: 300 dimmable LED or incandescent only. Otherwise, power can cause serious injury or death.
Step-by-Step Installation:
- Prepare the Fan: Disconnect power to the ceiling fan at the circuit breaker. Remove the fan canopy to access the wiring. If an existing receiver is present, carefully remove it.
- Identify Wires: You will typically find 3 wires from the ceiling (Hot, Neutral, Ground) and 3 wires from the fan (Light, Motor, Neutral, and Ground). There will also be 3 green ground wires from the ceiling, fan, and bracket.
- Insert New Receiver: Carefully insert the new Prichor receiver into the fan bracket. Ensure it fits securely within the canopy space.
- Wire Connections (Refer to Diagram):
- Connect the Black wire from the receiver to the Red/Black wire from the ceiling (Hot).
- Connect the White wire from the receiver to the White wire from the ceiling and the White wire from the fan (Neutral).
- Connect the Blue wire from the receiver to the Blue wire from the fan (Light).
- Connect the Yellow wire from the receiver to the Black wire from the fan (Motor).
- Finally, connect all Green ground wires (from ceiling, fan, and bracket) together.
- Secure Connections: Use the provided plastic wire connectors to secure all connections. Ensure they are tight and insulated.
- Reattach Canopy: Carefully reattach the fan canopy, ensuring no wires are pinched.
- Restore Power: Restore power at the circuit breaker.
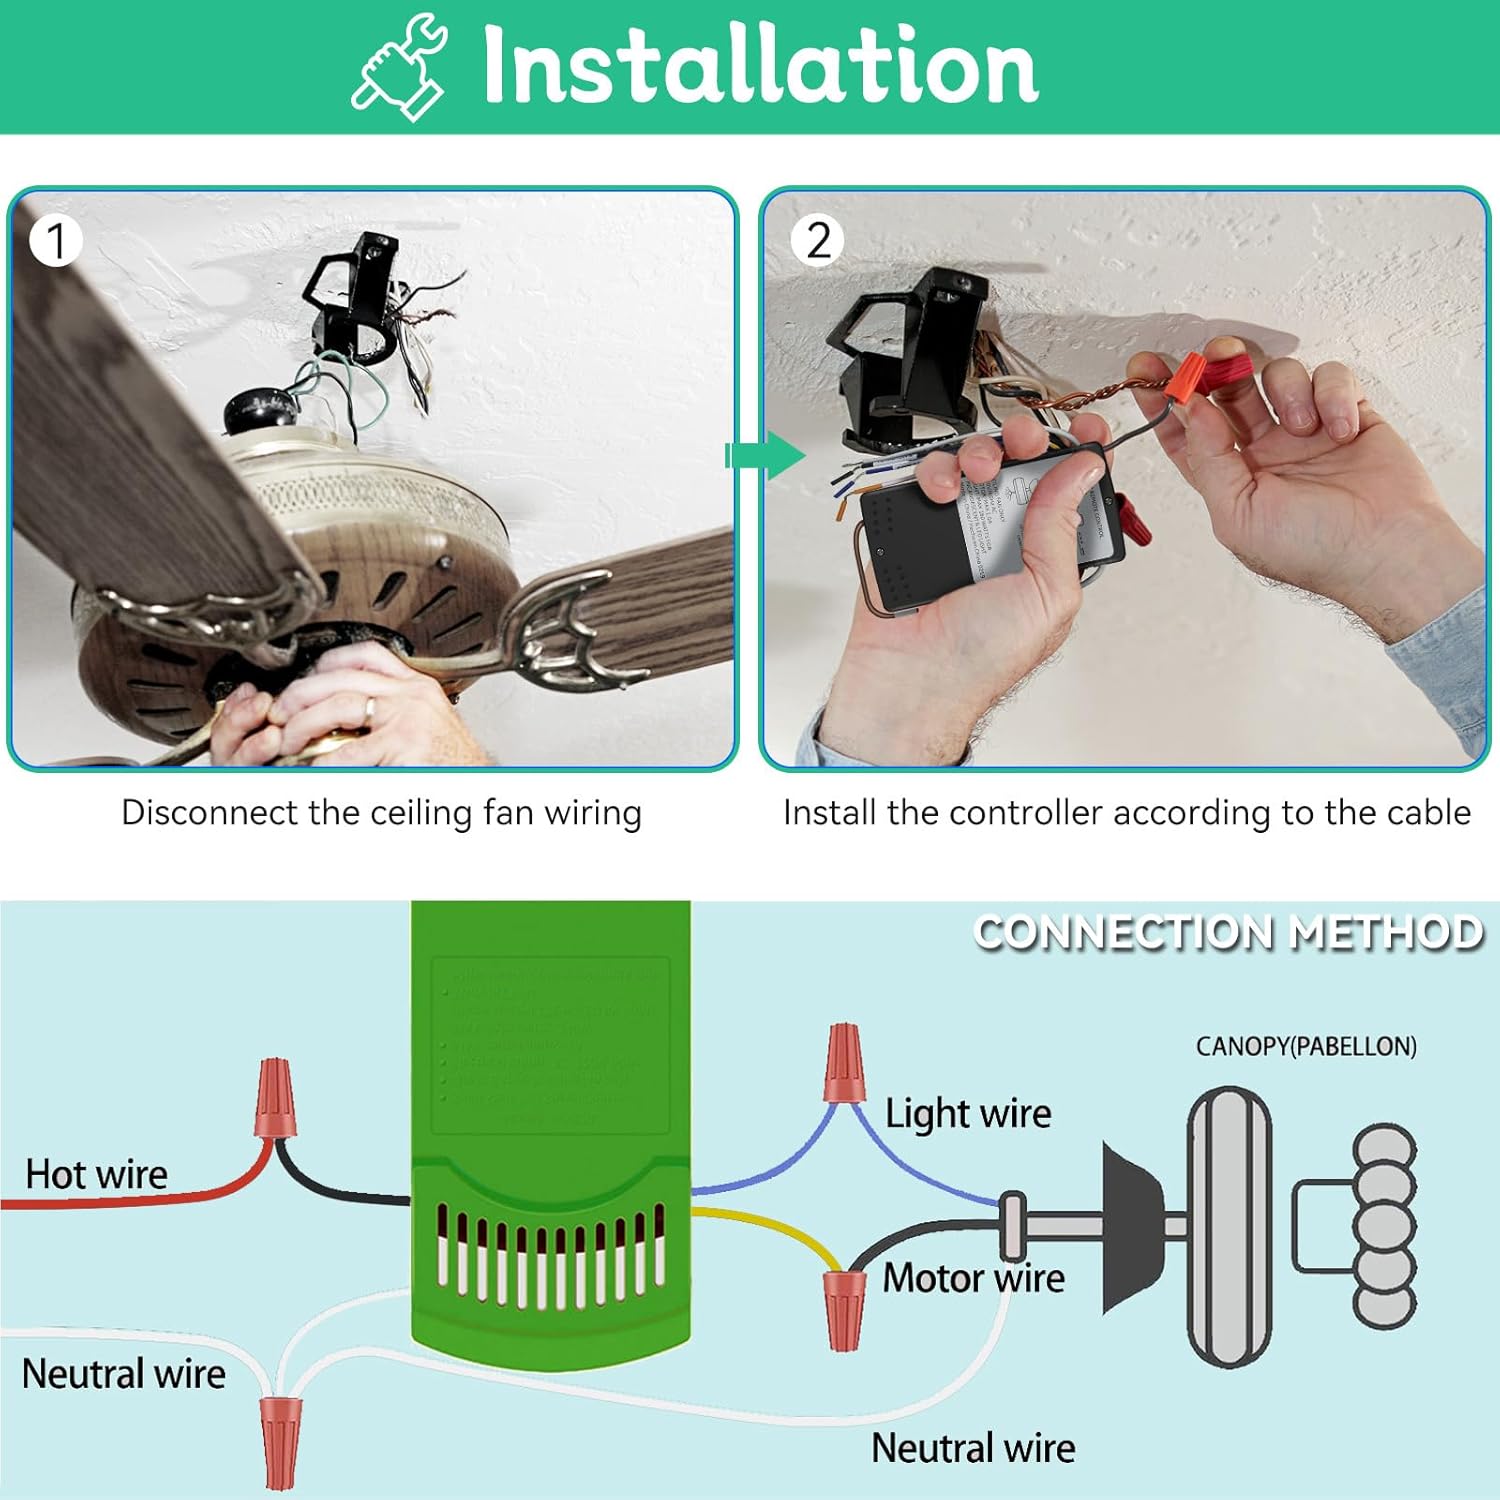
Image: Step-by-step visual guide for installation, showing disconnection of wiring, installation of the controller, and a detailed wiring diagram.
Installation Video:
Video: A detailed guide on how to install the receiver for the Prichor Ceiling Fan Remote Control Kit.
Operating Instructions
Once the receiver is installed and power is restored, you can operate your ceiling fan and light using the remote control.

Image: A hand pressing a button on the Prichor RC-82T remote control, with a ceiling fan in the background, demonstrating control.
Remote Control Functions:
- Light Button (Bulb Icon): Press to turn the light ON or OFF. Hold down to dim the light (for compatible bulbs).
- Fan ON/OFF Button (Fan Icon): Press to turn the fan ON or OFF.
- Fan Speed Up Button (Up Arrow): Increases fan speed (Low → Medium → High).
- Fan Speed Down Button (Down Arrow): Decreases fan speed (High → Medium → Low).
- Learn Button: Located inside the battery compartment. Used to re-match the remote with the receiver if communication is lost.
Initial Setup / Re-matching:
The kit is pre-configured for direct use. If the remote does not control the fan after installation or if you replace the remote, you may need to re-match it:
- Ensure power is supplied to the fan.
- Locate the 'Learn' button inside the remote's battery compartment.
- Press and hold the 'Learn' button for approximately 3 seconds. The fan light should blink or the fan should respond, indicating successful pairing.
Maintenance
- Cleaning: Wipe the remote control with a soft, dry cloth. Do not use abrasive cleaners or solvents.
- Battery Replacement: Replace the 3V battery in the remote control when its performance diminishes. Ensure correct polarity.
- Receiver: The receiver unit is designed for maintenance-free operation once installed. Ensure it remains dry and free from obstructions.
Troubleshooting
| Problem | Possible Cause | Solution |
|---|---|---|
| Fan/Light does not respond to remote. | No power to receiver, remote battery low/dead, remote not paired, incorrect wiring. | Check circuit breaker. Replace remote battery. Re-pair remote with receiver using the 'Learn' button. Verify wiring connections. |
| Light does not dim. | Non-dimmable bulbs installed. | Ensure incandescent or dimmable LED/CFL bulbs are used. Standard LED/CFL bulbs will only turn on/off. |
| Fan operates but light does not. | Bulb faulty, light wire connection loose. | Check/replace light bulb. Verify the blue wire connection for the light. |
| Remote range is poor. | Obstructions, interference, low battery. | Ensure clear line of sight. Replace remote battery. |
Warranty and Support
This Prichor product comes with a 1-year guarantee from the date of purchase. This warranty covers defects in materials and workmanship under normal use.
What is Covered:
- Defects in materials.
- Defects in workmanship.
What is Not Covered:
- Damage caused by improper installation or misuse.
- Damage caused by accidents, abuse, or unauthorized modifications.
- Normal wear and tear.
For warranty claims or technical support, please contact Prichor customer service through the retailer where the product was purchased or visit the official Prichor store online.