
1. Important Safety Instructions
Please read all safety instructions carefully before using the Preciva 935 Wood Burning Kit. Failure to follow these instructions may result in electric shock, fire, or serious injury.
- Always work in a well-ventilated area to avoid inhaling fumes from burning materials.
- The pyrography pens and nibs reach very high temperatures. Avoid direct contact with skin to prevent burns.
- Use the included pen holder to safely rest hot pens when not in use.
- Ensure the power switch is off and the unit is unplugged before changing nibs or performing maintenance. Allow nibs to cool completely before handling.
- Do not use the kit near flammable liquids or gases.
- Keep out of reach of children and pets.
- Only use the provided power adapter and components with this kit.
- Inspect the power cord and unit for any damage before each use. Do not operate if damaged.
- Wear appropriate safety glasses to protect your eyes from sparks or debris.
2. Package Contents
The Preciva 935 Dual Handle Wood Burning Kit includes the following items:
- 1 x Wood Burning Station (Preciva 935)
- 2 x Pyrography Pens (Handles)
- 20 x Specialty Wire Nibs (Assorted shapes)
- 1 x Pen Holder with cleaning sponge
- 1 x Power Cord
3. Product Overview
Familiarize yourself with the main components of your Preciva 935 Wood Burning Kit.

Image: Overview of the Preciva 935 Wood Burning Kit, showing the main unit, two connected pens, and the pen holder. Labels indicate the temperature adjustment knob, pen selection switch, pen joints, and the pen holder.
- Main Station: Houses the power supply, temperature control, and pen selection switch.
- Pyrography Pens: Two lightweight handles designed for comfortable use.
- Wire Nibs: Interchangeable tips for various burning effects.
- Pen Holder: Provides a safe place to rest hot pens and includes a cleaning sponge.
4. Setup Instructions
-
Insert the Nib: Select the desired wire nib. Loosen the screws on the pyrography pen's tip holder. Insert the nib fully into the two brass terminals and tighten the screws securely. Ensure the nib is firmly seated to ensure proper heat transfer.

Image: A close-up view of a hand inserting a wire nib into the brass terminals of a pyrography pen and tightening the screws. This is step 1 of the "How To Use" image.
-
Connect to the Station: Plug the pyrography pen's connector into one of the "TOOL" ports on the main station. Ensure it clicks into place.
Image: A hand connecting the cable of a pyrography pen to the "TOOL" port on the main station. This is step 2 of the "How To Use" image.
-
Place Pen in Holder: Place the connected pen into the pen holder.

Image: A pyrography pen resting securely in its metal coil holder, next to the main station.
- Power Connection: Plug the power cord into the main station and then into a suitable electrical outlet.
5. Operating Instructions
-
Turn On: Flip the main power switch on the side of the unit to the "ON" position. The operating indicator light on the front panel will illuminate.
Image: A hand flipping the power switch on the side of the Preciva 935 unit to the 'on' position. This is step 3 of the "How To Use" image.
-
Select Handle: If two pens are connected, use the A/B toggle switch on the front panel to select the pen you wish to use.
Image: A hand moving the toggle switch on the front panel to select between Tool A and Tool B. This is step 4 of the "How To Use" image.
-
Adjust Temperature: Rotate the temperature control knob to set the desired heat level. The temperature range is 482-1382°F (250-750°C). Allow a few minutes for the nib to reach the set temperature. The nib will glow red when hot.

Image: A close-up of the temperature adjustment dial on the Preciva 935 unit, showing settings from 1 to 6 and the temperature range of 250-750°C / 482-1382°F.
-
Begin Pyrography: Once the nib is hot, carefully remove the pen from the holder and begin burning your design onto the chosen material (wood, leather, etc.). Apply gentle, consistent pressure.

Image: A person's hand holding a pyrography pen, actively burning a detailed pattern onto a wooden surface. This is step 6 of the "How To Use" image.
-
Dual-Pen Workflow: The dual-pen feature allows you to have two different nibs or temperature settings ready. Simply switch between "TOOL A" and "TOOL B" using the toggle switch without needing to change nibs or wait for cooling.

Image: The Preciva 935 station with two pens connected, illustrating the "Quickly Switch Between A And B" feature, highlighting the toggle switch for seamless pen selection.
- When Finished: Turn the temperature knob to the lowest setting, then flip the main power switch to "OFF". Allow the pens and nibs to cool completely in the pen holder before storing.
6. Nib Installation and Replacement
The kit includes 20 specialized wire nibs for various effects. Follow these steps to change nibs:
- Ensure the unit is unplugged and the pen is completely cool.
- Using a small screwdriver, carefully loosen the two screws on the tip holder of the pyrography pen.
- Remove the old nib.
- Insert the new nib fully into the two brass terminals.
- Tighten the screws firmly to secure the nib. Do not overtighten.
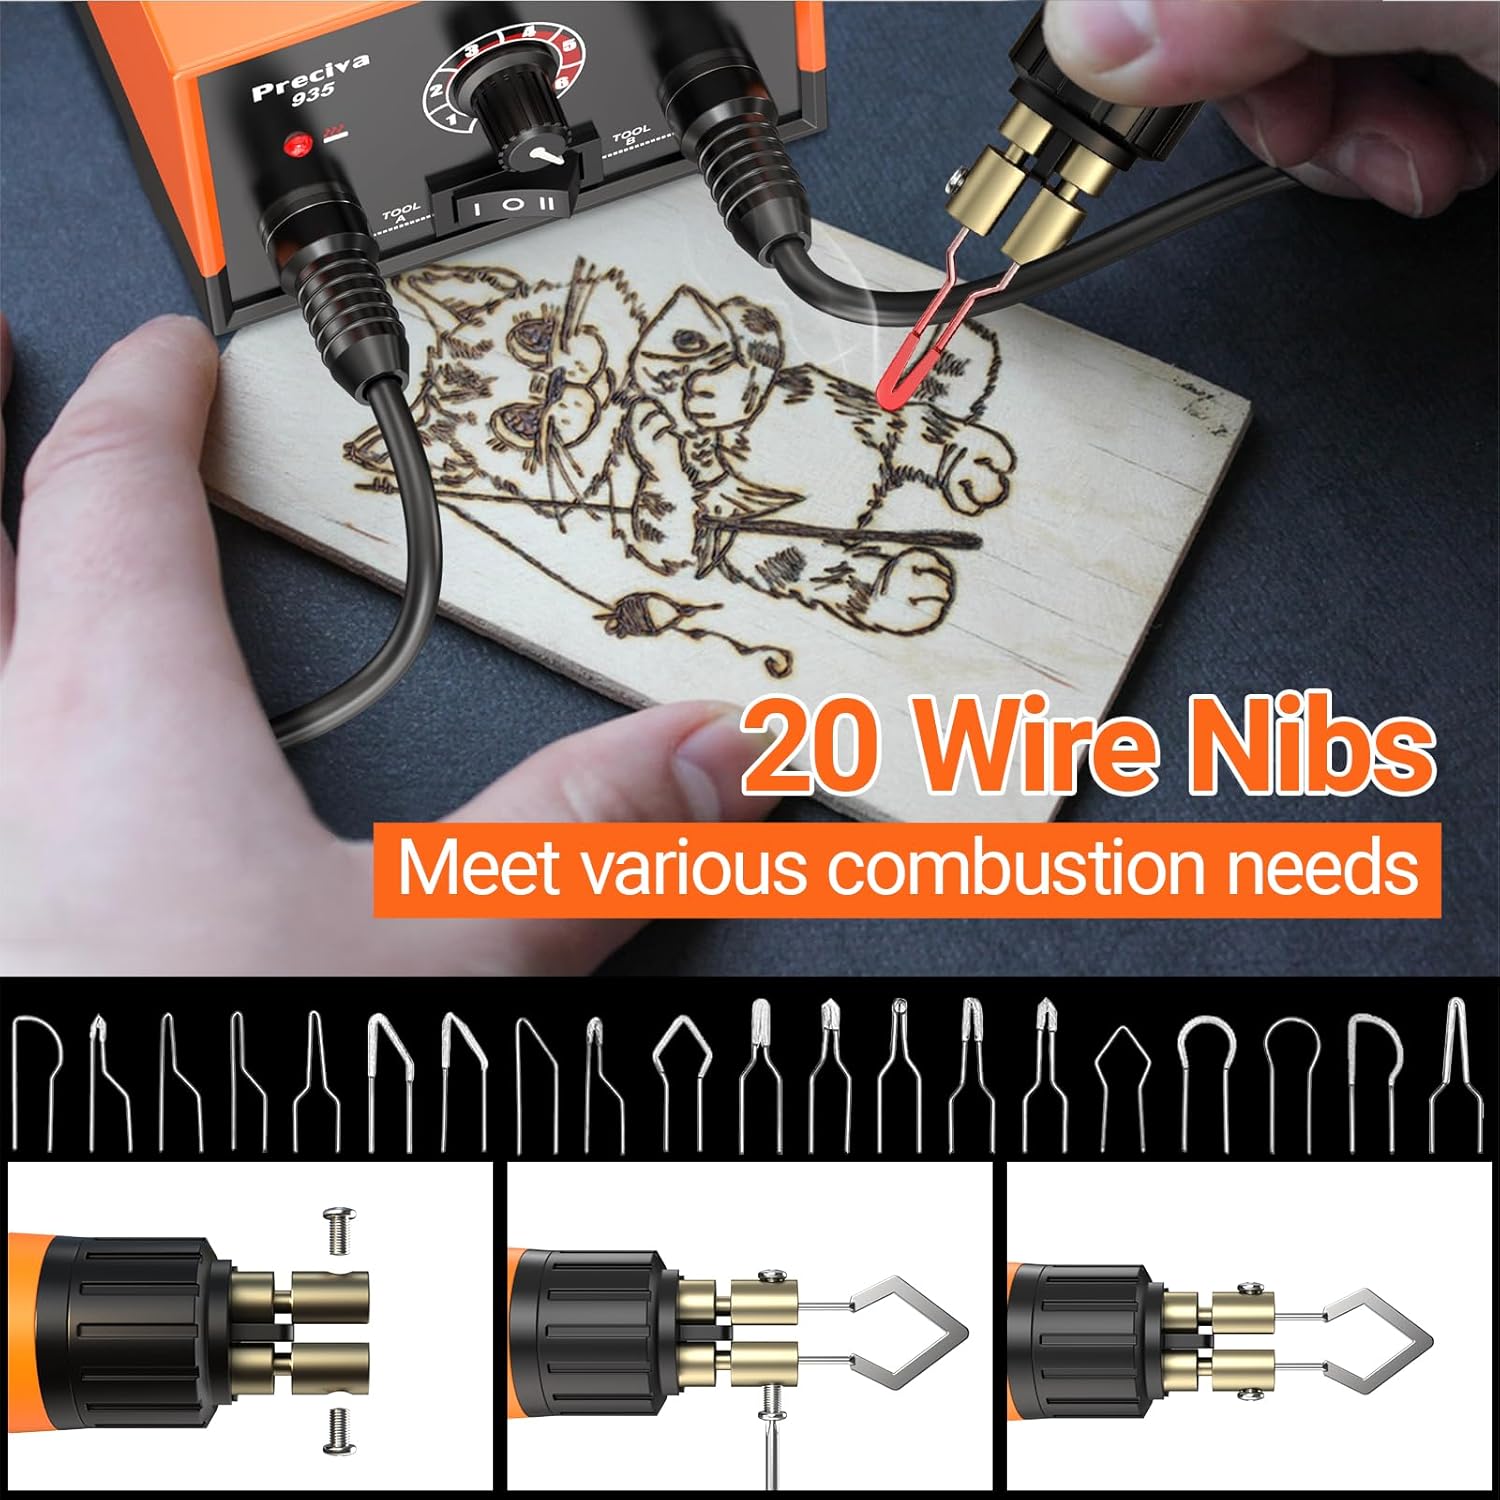
Image: A display of 20 different wire nib shapes, alongside a three-step visual guide demonstrating how to properly install a nib into the pyrography pen by loosening screws, inserting the nib, and tightening the screws.
7. Maintenance
- Cleaning Nibs: Use the cleaning sponge provided in the pen holder to gently wipe off carbon buildup from the nibs while they are warm (but not glowing red). This helps maintain optimal performance.
- Storage: Store the kit in a dry, cool place, away from direct sunlight and moisture. Ensure all components are cool before storing.
- General Cleaning: Wipe the main station and pens with a soft, dry cloth. Do not use abrasive cleaners or solvents.
8. Troubleshooting
| Problem | Possible Cause | Solution |
|---|---|---|
| Pen not heating up. |
|
|
| Inconsistent burning results. |
|
|
| Unit not powering on. |
|
|
9. Specifications
| Feature | Detail |
|---|---|
| Model | Preciva 935 |
| Temperature Range | 482-1382°F (250-750°C) |
| Number of Pens | 2 (Dual Handle) |
| Included Nibs | 20 Specialty Wire Nibs |
| Power Source | Corded Electric |
| Manufacturer | Preciva |
10. Product Video Guide
Watch this official video for a visual guide on setting up and using your Preciva 935 Wood Burning Kit.
Video: An instructional video demonstrating the setup, operation, and features of the Preciva 935 Pyrography Station Kit, including nib installation, temperature adjustment, and dual-pen switching.
11. Warranty and Customer Support
Preciva products are designed for quality and reliability. For any questions, concerns, or warranty information regarding your Preciva 935 Wood Burning Kit, please contact our customer support team.
Contact information can typically be found on the product packaging or the official Preciva website. Please have your model number (935) and purchase details ready when contacting support.