
1. Introduction
This manual provides essential information for the proper setup, operation, and maintenance of your HPE ProLiant DL380 Gen11 2U Rack Server. The DL380 Gen11 is designed for hybrid environments, offering an intuitive operating experience, robust security features, and optimized performance for diverse virtualized workloads. It features dual Xeon Gold 6430 processors, 1TB DDR5 memory, and 30.72TB of Enterprise SAS 12Gb/s SSD storage, making it suitable for demanding business applications.
2. Safety Information
Always observe the following safety precautions to prevent injury and damage to the equipment:
- Ensure proper grounding for all electrical connections.
- Do not operate the server with covers removed unless performing maintenance as instructed.
- The server is heavy; use appropriate lifting techniques or assistance when moving or installing.
- Maintain adequate ventilation around the server to prevent overheating.
- Disconnect all power cords before performing any internal maintenance or component installation.
3. Package Contents
Verify that all components are present in your package:
- HPE ProLiant DL380 Gen11 Server Unit
- Rail Kit for rack mounting
- Power Cords (quantity may vary)
- Integrated Lights-Out 6 (iLO 6) Standard with Intelligent Provisioning (embedded)
- Hard drives and memory upgrades (included separately, require installation)
4. Setup
4.1. Rack Installation
The HPE ProLiant DL380 Gen11 is designed for 2U rack mounting. Follow these steps to install the server into a standard server rack:
- Install the Rail Kit: Attach the provided rail kit to your server rack according to the instructions included with the rail kit. Ensure the rails are securely fastened and level.
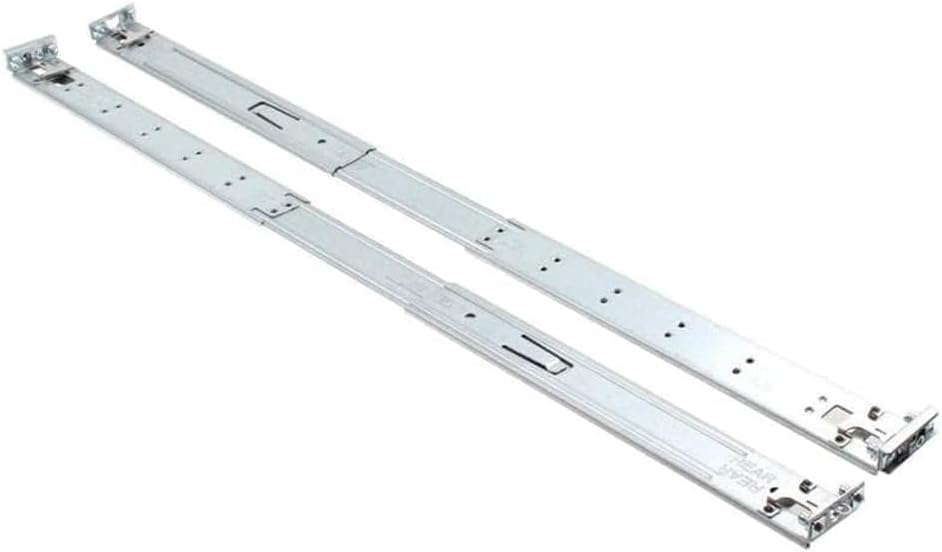
Figure 4.1: The rack rail kit for mounting the server into a standard server rack.
- Mount the Server: Carefully slide the server onto the installed rails until it locks into place. Secure the server to the rack using the provided screws or latches.

Figure 4.2: Angled front view of the HPE ProLiant DL380 Gen11 server, showing its rack-mountable design.
4.2. Component Installation (Memory and Storage)
Your server bundle includes memory and storage components that require installation. Refer to the internal layout for component locations.
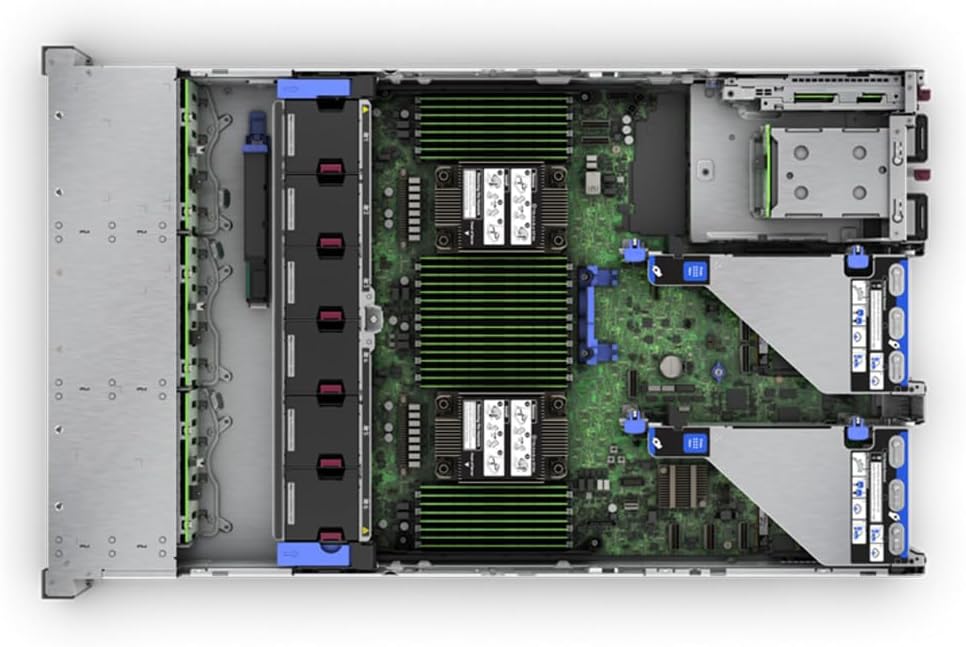
Figure 4.3: Top-down internal view of the HPE ProLiant DL380 Gen11 server, showing CPU sockets, memory slots, and expansion bays.
- Memory Installation: Open the server cover. Locate the DDR5 memory slots. Align the memory modules with the slots and press firmly until the retention clips engage. Ensure all 16 x 64GB modules are correctly seated.
- Storage Installation: Locate the 2.5-inch drive bays. Insert the 8 x 3.84TB Enterprise SAS SSDs into the drive bays. Ensure they are securely latched.
4.3. Connecting Peripherals
Connect power, network, and other necessary cables to the server's rear panel.

Figure 4.4: Rear view of the HPE ProLiant DL380 Gen11 server, highlighting power supply bays, network ports, and other I/O connections.
- Power: Connect both redundant power supply units to separate power sources for redundancy.
- Network: Connect network cables to the embedded 4-Port 1GbE Ethernet OCP3 adapter.
- Video: If a local display is needed, connect a monitor to the VGA, HDMI, or DisplayPort output.
- USB: Connect any required USB devices.
4.4. Initial Power On
Once all connections are secure, press the power button on the front panel of the server. Observe the boot sequence and system status indicators.
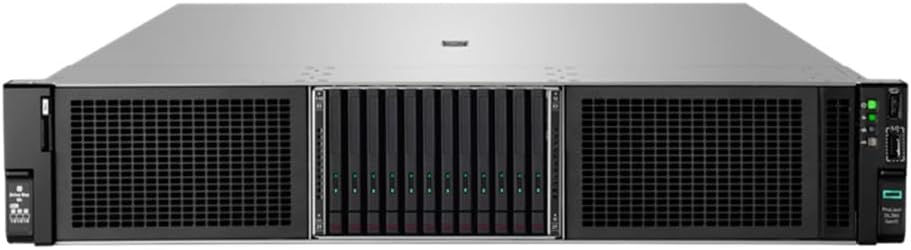
Figure 4.5: Front view of the HPE ProLiant DL380 Gen11 server, showing drive bays, control panel, and power button.
5. Operating
5.1. Integrated Lights-Out (iLO 6) Management
iLO 6 provides remote server management capabilities. You can access iLO through a web browser using the dedicated iLO network port. Refer to the HPE iLO documentation for detailed configuration and usage instructions.
5.2. Operating System Installation
To install an operating system, boot the server from your chosen installation media (USB, DVD, or network boot). Follow the on-screen prompts for OS installation. Ensure all necessary drivers for the HPE ProLiant DL380 Gen11 are installed after the OS is set up.
5.3. RAID Configuration
The server is equipped with an MR408i-o Gen11 x8 Lanes 4GB Cache OCP SPDM Storage Controller. Before installing an operating system, configure your desired RAID levels for the SAS SSDs using the controller's utility, typically accessible during server boot-up.
6. Maintenance
6.1. Firmware Updates
Regularly update the server's firmware (BIOS, iLO, RAID controller, network adapters) to ensure optimal performance, stability, and security. Visit the Hewlett Packard Enterprise support website for the latest firmware releases and update procedures.
6.2. Component Replacement
The server features hot-swappable power supplies, allowing replacement without powering down the server. For other components like memory or SSDs, ensure the server is powered off and disconnected from power before replacement. Always use genuine HPE replacement parts.
6.3. Cleaning
Periodically inspect the server for dust accumulation, especially around fans and ventilation grilles. Use compressed air to gently clean dust from internal components to maintain proper airflow and cooling.
7. Troubleshooting
7.1. Power Issues
- No Power: Verify power cords are securely connected to both the server and the power source. Check power supply status LEDs.
- Intermittent Power: Ensure power sources are stable and not overloaded. Check for loose connections.
7.2. Boot Issues
- Server Not Booting: Check for any error messages on the console or iLO. Reseat memory modules and expansion cards.
- POST Errors: Note any beep codes or on-screen error messages. Consult the HPE documentation for specific error code meanings.
7.3. Network Connectivity
- No Network Access: Verify network cables are properly connected to the server and network switch. Check network adapter status in the operating system.
7.4. iLO Access Issues
- Cannot Access iLO: Ensure the iLO network port is connected and configured with a valid IP address. Check network settings and firewall rules.
8. Specifications
| Feature | Specification |
|---|---|
| Brand | Hewlett Packard Enterprise |
| Model Name | ProLiant DL380 Gen11 |
| CPU Model | Dual Xeon Gold 6430 (32-Core, 2.1 GHz, 60MB Cache) |
| RAM Memory Installed Size | 1 TB DDR5-4800MHz PC5-38400 ECC Buffered Memory |
| Memory Storage Capacity | 30.72 TB (8 x 3.84TB Enterprise 2.5” SAS 12Gb/s SSDs) |
| Network Controller | Embedded 4-Port 1GbE Ethernet OCP3 adapter |
| Storage Controller | MR408i-o Gen11 x8 Lanes 4GB Cache OCP SPDM Storage Controller |
| Remote Management | Integrated Lights-Out 6 (iLO 6) Standard |
| Power | Redundant Power Supply |
| Item Dimensions (L x W x H) | 26 x 10 x 20 inches |
| Included Components | iLO 6 |
9. Warranty and Support
For detailed warranty information, technical support, and additional resources, please visit the official Hewlett Packard Enterprise website. Keep your product's serial number and purchase information readily available when contacting support.
You can find more information and support at the Hewlett Packard Enterprise Store.


