1. Introduction
This manual provides detailed instructions for the installation, operation, and maintenance of your Aprilboy 12 Inch Triple Channel Mirror Dash Cam. Please read this manual thoroughly before using the device to ensure proper functionality and to maximize your user experience. Keep this manual for future reference.
2. Product Overview
2.1 Key Features
- Triple Channel Recording: Simultaneous recording from Front (4K), Inside (1080P), and Rear (1080P) cameras.
- Wide Angle Lenses: Front 170°, Inside 150°, Rear 150° for comprehensive coverage.
- Built-in 5.8GHz WiFi: Fast wireless connectivity for viewing, playback, and management via the "viidure" app on iOS/Android devices.
- WDR & HDR Technology: Enhanced image quality in varying light conditions, including night vision, with F1.7 aperture and 6-layer optical lens.
- 24H Parking Monitor: Continuous surveillance when parked (requires optional ACC hardwire kit, ASIN: B0DLBH2CB8).
- Emergency Lock (G-Sensor): Automatically locks and saves video footage upon sudden impact or collision.
- Loop Recording: Overwrites oldest files when the memory card is full, ensuring continuous recording.
- Included 64GB SD Card: Ready for immediate use.
- Type-C Connectivity: Modern and reliable power connection.
2.2 Package Contents
Verify that all items listed below are included in your package:
- 1 x 3 Channel Mirror Dash Cam
- 1 x Car Charger
- 1 x Rear Camera
- 1 x IR Internal Lens Camera
- 1 x 33ft Rear Camera Cable
- 1 x 64G SD Card
- 1 x User Manual
- 1 x Car Reader
- 2 x Straps
- 1 x 3M Adhesive Pad
- 1 x Mount Tool
- 1 x Card Pin
- 5 x Wiring Loops
- Note: GPS module is not included and must be purchased separately (ASIN: B0DXPCLJ1B).

Image: Contents of the Aprilboy 12 Inch Triple Channel Mirror Dash Cam package, including the main mirror unit, cameras, cables, charger, and accessories.
3. Setup and Installation
3.1 Component Identification

Image: The main mirror dash cam unit, showing the integrated front camera, the separate inside camera, and the rear camera, along with the car charger and SD card.
The main unit functions as a rearview mirror and houses the primary display and front camera. The inside camera is typically attached to the main unit, and the rear camera is installed externally on the vehicle's rear.
3.2 Mounting the Dash Cam
- Main Unit: Secure the mirror dash cam over your existing rearview mirror using the provided straps. Ensure it is firmly attached and does not obstruct your view.
- Inside Camera: Attach the IR internal lens camera to the main unit or a suitable interior location using the 3M adhesive pad, ensuring it has a clear view of the vehicle's interior.
- Rear Camera: Mount the rear camera on the exterior rear of your vehicle, typically above the license plate. Use the provided screws or adhesive. Ensure the camera is positioned to capture a clear view of the road behind.
3.3 Wiring Diagram
Connect the components as illustrated in the diagram below. Route cables carefully to avoid interference with vehicle operation and to maintain a tidy interior.

Image: A schematic diagram showing the connections for the Aprilboy dash cam, including power, rear camera, inside camera, and optional GPS module.
- Insert the 64GB SD card into the main unit's TF card slot.
- Connect the car charger to the main unit's Type-C power input and plug the other end into your vehicle's 12V power outlet.
- Connect the rear camera cable to the main unit and route it to the rear camera.
- Connect the IR internal lens camera to its designated port on the main unit.
- If using an optional GPS module, connect it to the dedicated GPS port.
4. Operating Instructions
4.1 Powering On/Off
The dash cam will automatically power on and begin recording when your vehicle's ignition is turned on. It will power off automatically when the ignition is turned off.
4.2 Basic Recording
Upon powering on, the dash cam will automatically start recording. The recording will be saved to the inserted SD card.

Image: A visual representation of the circular recording feature, showing how older files are overwritten to ensure continuous recording.
Loop Recording: When the memory card reaches its storage limit, the dash cam will automatically overwrite the oldest recordings to make space for new footage, ensuring continuous operation without manual intervention.
4.3 Display Modes
The dash cam supports various display modes, allowing you to view footage from different cameras simultaneously or individually on the 12-inch screen.
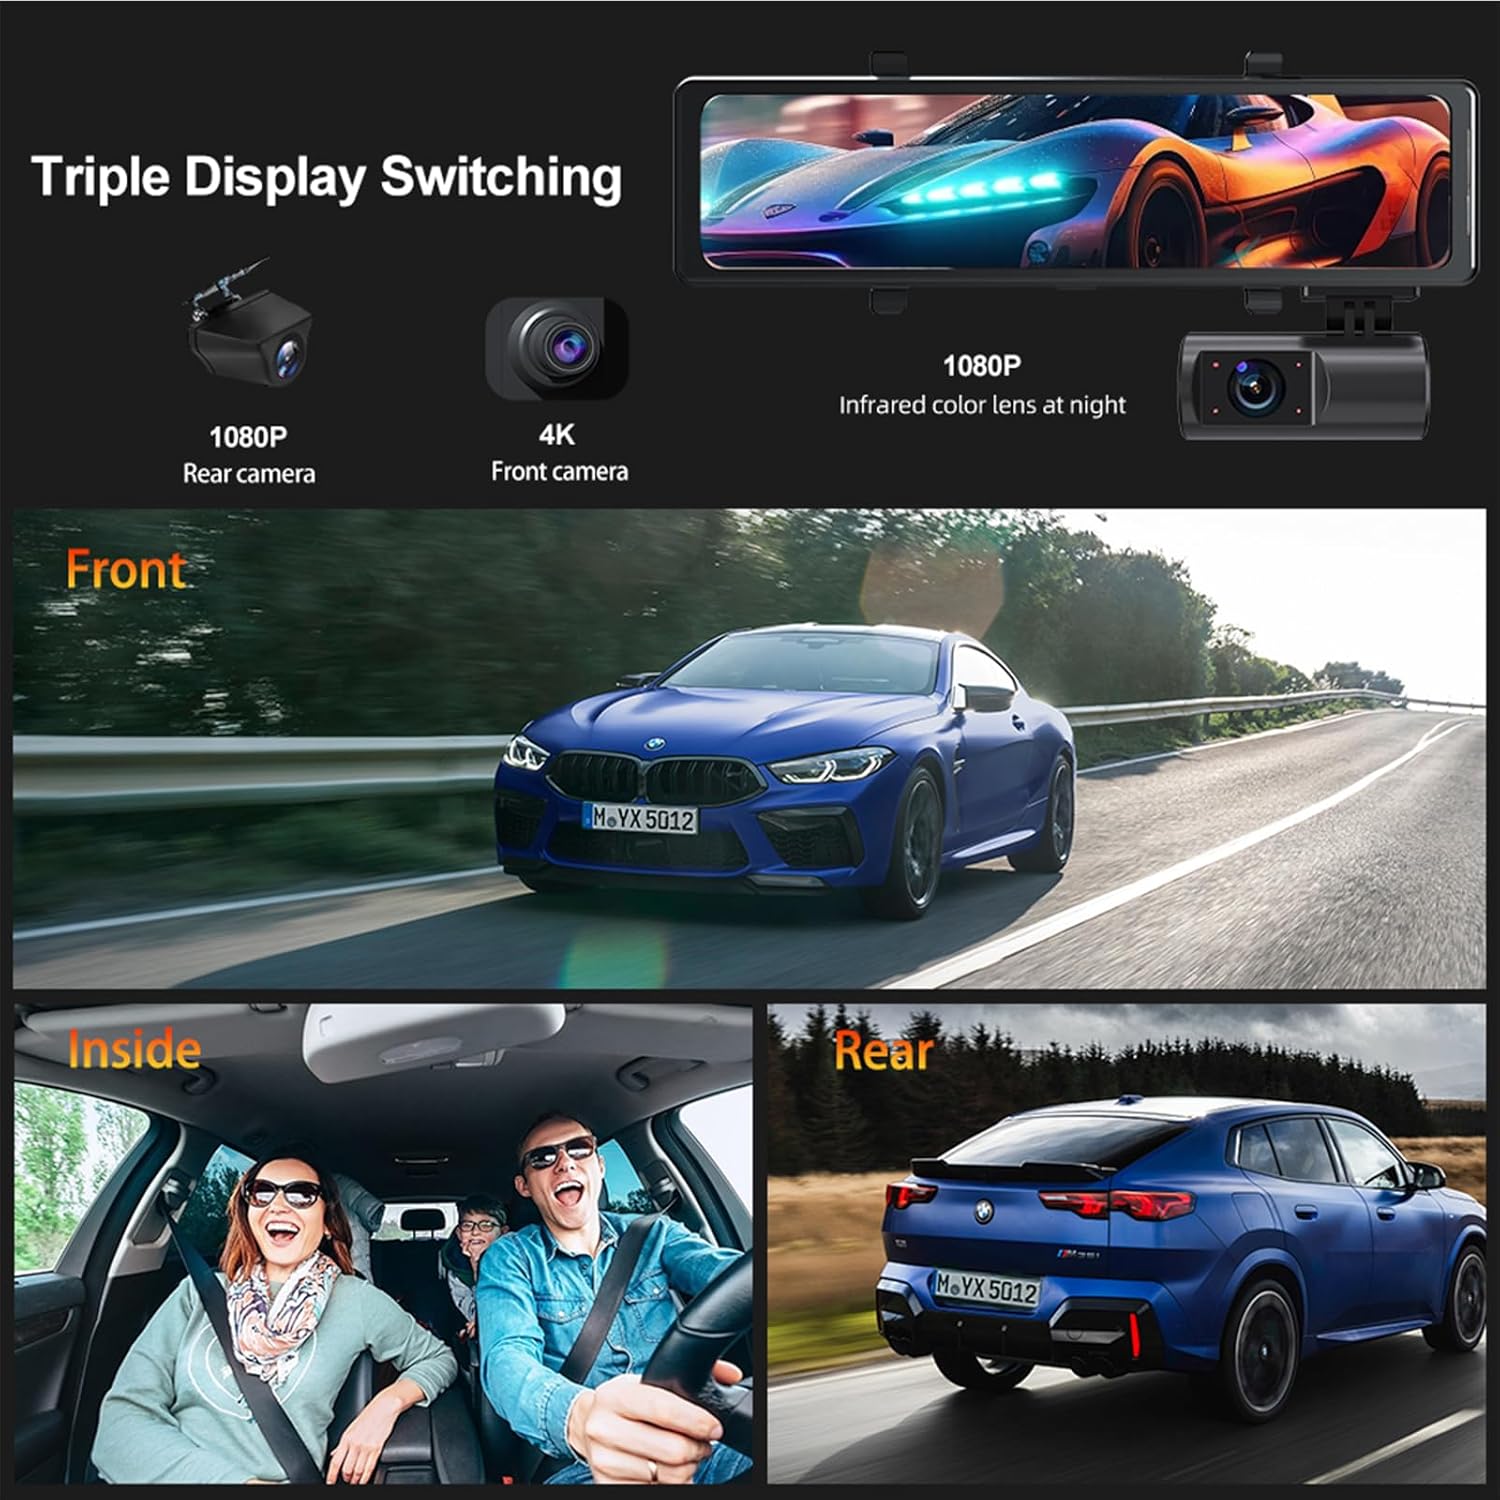
Image: Illustrates the triple display switching capability, showing views from the front, inside, and rear cameras simultaneously on the mirror display.
You can typically switch between display modes (e.g., front only, front and rear, triple view) using the touch screen interface or physical buttons on the device.
4.4 Wi-Fi Connectivity and App Control
The built-in 5.8GHz WiFi allows for seamless connection to your smartphone via the "viidure" app.

Image: Shows a smartphone screen displaying the "viidure" app interface, demonstrating live view, video playback, and social media sharing options for the dash cam.
- Download the "viidure" app from the App Store (iOS) or Google Play Store (Android). You can also access the app download page via this link: viidure App Download.
- Enable Wi-Fi on your dash cam and your smartphone.
- Connect your smartphone to the dash cam's Wi-Fi network (SSID and password typically displayed on the dash cam screen).
- Open the "viidure" app to view live footage, play back recorded videos, adjust settings, and download files to your phone.
4.5 G-Sensor and Emergency Lock
The integrated G-sensor detects sudden movements or impacts. In the event of a collision, the G-sensor automatically triggers an emergency lock, protecting the current video file from being overwritten by loop recording. These locked files are stored in a separate folder on the SD card.
5. Advanced Features
5.1 Parking Monitoring
The 24-hour parking monitoring feature provides continuous surveillance of your vehicle when it is parked. This function requires an optional ACC hardwire kit (ASIN: B0DLBH2CB8) to ensure constant power supply to the dash cam even when the vehicle is off. When enabled, the dash cam will detect impacts or motion around the vehicle and record footage.
5.2 Night Vision (WDR & HDR)
The dash cam incorporates WDR (Wide Dynamic Range) and HDR (High Dynamic Range) technologies, combined with an F1.7 aperture and 6-layer optical lens, to balance exposure and provide clear video footage in low-light conditions, including at night. This ensures details are captured even in challenging lighting environments.

Image: Highlights the dash cam's night vision capabilities, HDR, and the Sony sensor for improved low-light performance.
5.3 Wide Angle Lenses
The dash cam features wide-angle lenses for comprehensive coverage:
- Front Camera: 170°
- Inside Camera: 150°
- Rear Camera: 150°
These wide angles minimize blind spots and capture more of the surrounding environment.

Image: An overhead view of a car illustrating the 170° front, 150° inside, and 150° rear wide-angle coverage provided by the dash cam's three lenses.
5.4 Optional GPS Module
A GPS module is not included in the standard package. If you require GPS functionality (e.g., for speed and location data recording), it must be purchased separately. Please search for ASIN: B0DXPCLJ1B to acquire the compatible GPS module.
6. Maintenance
6.1 SD Card Management
- Formatting: Regularly format the SD card (at least once a month) through the dash cam's settings menu to ensure optimal performance and prevent data corruption.
- Capacity: The dash cam supports SD cards up to 256GB. A 64GB card is included.
- Replacement: Replace the SD card if you notice decreased performance or frequent errors.
6.2 Cleaning
- Gently wipe the dash cam screen and camera lenses with a soft, lint-free cloth.
- Avoid using abrasive cleaners or solvents, as these can damage the device.
- Ensure all ports are free from dust and debris.
7. Troubleshooting
If you encounter issues with your Aprilboy Dash Cam, refer to the following common problems and solutions:
- Dash Cam Not Powering On:
- Check the car charger connection to both the dash cam and the vehicle's power outlet.
- Ensure the vehicle's 12V power outlet is functioning.
- Test with a different power source if available.
- Camera Keeps Cutting Off / Power Disconnected Message:
- Verify all power cable connections are secure.
- Ensure the car charger is not loose in the socket.
- The issue might be with the power cable itself; consider replacing it if possible.
- Rear Camera Image Not Displaying:
- Check the connection of the rear camera cable to both the main unit and the rear camera.
- Ensure the rear camera cable is not damaged.
- Restart the dash cam.
- Screen Freezes / Unresponsive:
- Press and hold the power button to force a restart.
- If the issue persists, try formatting the SD card.
- Ensure the firmware is up to date (check the manufacturer's website or app for updates).
- Poor Video Quality:
- Clean the camera lenses.
- Ensure the protective film has been removed from the lenses.
- Check video resolution settings in the menu.
- Format the SD card.
- Wi-Fi Connection Issues:
- Ensure Wi-Fi is enabled on both the dash cam and your smartphone.
- Verify the correct Wi-Fi password is being used.
- Move closer to the dash cam to improve signal strength.
- Restart both the dash cam and your smartphone.
If these steps do not resolve the issue, please contact Aprilboy customer support for further assistance.
8. Technical Specifications
| Feature | Specification |
|---|---|
| Product Dimensions | 0.98 x 11.81 x 2.95 inches |
| Item Weight | 1.1 pounds |
| Model Number | B19 |
| Front Camera Resolution | 4K |
| Inside Camera Resolution | 1080P |
| Rear Camera Resolution | 1080P |
| Front Camera Angle | 170 Degrees |
| Inside Camera Angle | 150 Degrees |
| Rear Camera Angle | 150 Degrees |
| Connectivity Technology | Type-C, 5.8GHz WiFi |
| Special Features | Built-In Display, Built-In WiFi, Loop Recording, Motion Sensing, Night Vision (WDR & HDR), G-Sensor |
| Mounting Type | Rearview Mirror Mount |
| Supported SD Card | Up to 256GB (64GB included) |
| Vehicle Service Type | Bus, Car, Minivan, Truck |
9. Warranty and Support
Aprilboy is committed to providing quality products and customer satisfaction. Your dash cam comes with the following support:

Image: Details on Aprilboy's customer support, including response time, return policy, replacement period, and lifetime technical support.
- Quick Reply: Customer inquiries receive a response within 24 hours.
- Return Policy: 60 days for worry-free returns.
- Replacement: A replacement is available within 12 months of purchase.
- Technical Support: Lifetime after-sales consultation and technical support are provided.
For any questions or support needs, please contact Aprilboy customer service.


