
1. Introduction
The ANTHBOT Pion1000 is an automatic robotic lawn mower designed for efficient and autonomous lawn maintenance. This manual provides essential information for the safe and effective operation, setup, and maintenance of your ANTHBOT Pion1000 robot lawn mower. Please read this manual thoroughly before initial use and retain it for future reference.
The Pion1000 is engineered for lawns up to a maximum coverage area of 1000 square meters (approximately 1/4 acre), with a recommended optimal performance area of 600 square meters. It features a stable boundary wire system, advanced CABLE-TOF global positioning technology for grid-shaped mowing paths, auto mapping, and automatic recharge capabilities. With an IPX6 waterproof rating, it is suitable for use in light rain and can be easily cleaned.

Image: The ANTHBOT Pion1000 robot lawn mower shown alongside a smartphone displaying its control application, illustrating smart operation.
2. Important Safety Instructions
To ensure safe operation and prevent injury or damage, always adhere to the following safety guidelines:
- Read the Entire Manual: Familiarize yourself with all instructions and warnings before operating the mower.
- Keep Children and Pets Away: The robot mower operates automatically. Ensure children, pets, and bystanders are kept at a safe distance from the working area.
- Inspect the Mowing Area: Before each operation, clear the lawn of any objects such as stones, toys, wires, or debris that could be thrown by the blades or obstruct the mower.
- Never Operate with Damaged Blades: Regularly inspect the blades for wear or damage. Replace worn or damaged blades immediately to prevent injury and ensure efficient cutting.
- Do Not Lift While Operating: Never lift or carry the mower while it is running. Always turn off the mower and disconnect power before handling or performing maintenance.
- Use Only Approved Accessories: Use only ANTHBOT-approved replacement parts and accessories. Use of unapproved items may void your warranty and pose safety risks.
- Avoid Wet Conditions: While the mower is IPX6 waterproof, avoid operating it during heavy rain or extreme weather conditions. The app can be used to delay mowing until conditions improve.
- Secure Boundary Wire: Ensure the boundary wire is properly installed and secured to prevent tripping hazards or damage to the wire.
- Emergency Stop: Familiarize yourself with the emergency stop function on the mower.
3. Package Contents
Verify that all items listed below are included in your package. If any items are missing or damaged, please contact ANTHBOT customer support.
- ANTHBOT Pion1000 Robot Lawn Mower Unit
- Charging Station
- Power Adapter
- Boundary Wire (180 meters)
- Wire Pegs (240 pieces)
- Ruler for wire placement
- Waterproof Wire Connectors
- Replacement Blades and Screws
- Hex Key
- User Manual (this document)

Image: A comprehensive view of all items included in the ANTHBOT Pion1000 package, including the mower, charging station, boundary wire, pegs, and tools.
4. Setup and Installation
4.1. Planning Your Lawn Area
Before installing the boundary wire, plan the mowing area. The ANTHBOT Pion1000 uses a boundary wire to define its working area. Consider obstacles, slopes, and areas you wish to exclude.
4.2. Charging Station Placement
The charging station must be placed in an optimal location for reliable operation. Choose a spot that meets the following criteria:
- Flat and Soft Grass Area: Ensures stable placement and easy access for the mower.
- Good Network Coverage: For optimal app connectivity and signal stability.
- No Obstacles: Clear surroundings for the mower to dock and undock without interference.
- Near a Power Supply: The power adapter needs to be connected to an outdoor power outlet.
- Secure Grounding: The charging station should be able to be fully secured with ground nails.
- Clearance: Ensure at least 1.5 meters (5 feet) of clear space before and after the charging station for the mower to navigate.
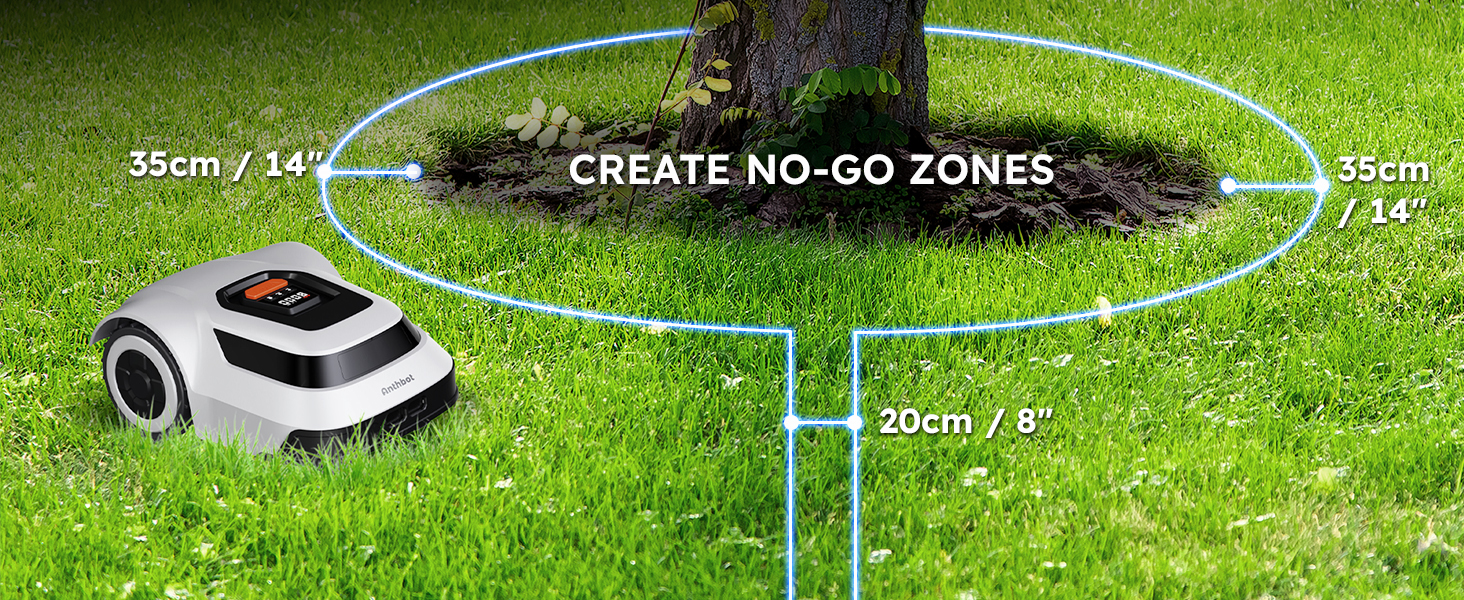
Image: A visual guide illustrating the recommended location and clearance requirements for installing the charging station.
4.3. Boundary Wire Installation
The boundary wire defines the mowing area. The included 180-meter boundary wire covers the maximum allowed area for a single setup. It cannot be extended. For lawns exceeding 600 square meters, consider adding an additional charging station and boundary wires for separate mowing zones.
- Lay the Wire: Use the provided ruler to maintain consistent distances from lawn edges and obstacles.
- Secure the Wire: Use the wire pegs to secure the boundary wire tightly to the ground. Install a peg approximately every 75 cm (2.5 ft). For curved sections, increase the number of pegs to ensure the wire stays in place.
- Distance from Obstacles: Maintain a distance of 35 cm (1.15 ft) from any raised boundary obstacles like walls, fences, or garden beds. For obstacles at lawn edge level, a 10 cm (4 inch) distance is sufficient.
- No-Go Zones: To exclude specific areas like flower beds or trees, create an island by routing the boundary wire around the object. Ensure the wire leading to and from the island is close together (approx. 20 cm / 8 inches) to cancel the signal, allowing the mower to cross.
- Around Pools: Maintain a minimum distance of 75 cm (2.5 ft) from pools or water features.
- Paths and Driveways: The mower can cross hard surfaces like stone paths or driveways if the boundary wire is laid underneath or along the edge, effectively wiring the entire area without creating separate zones.
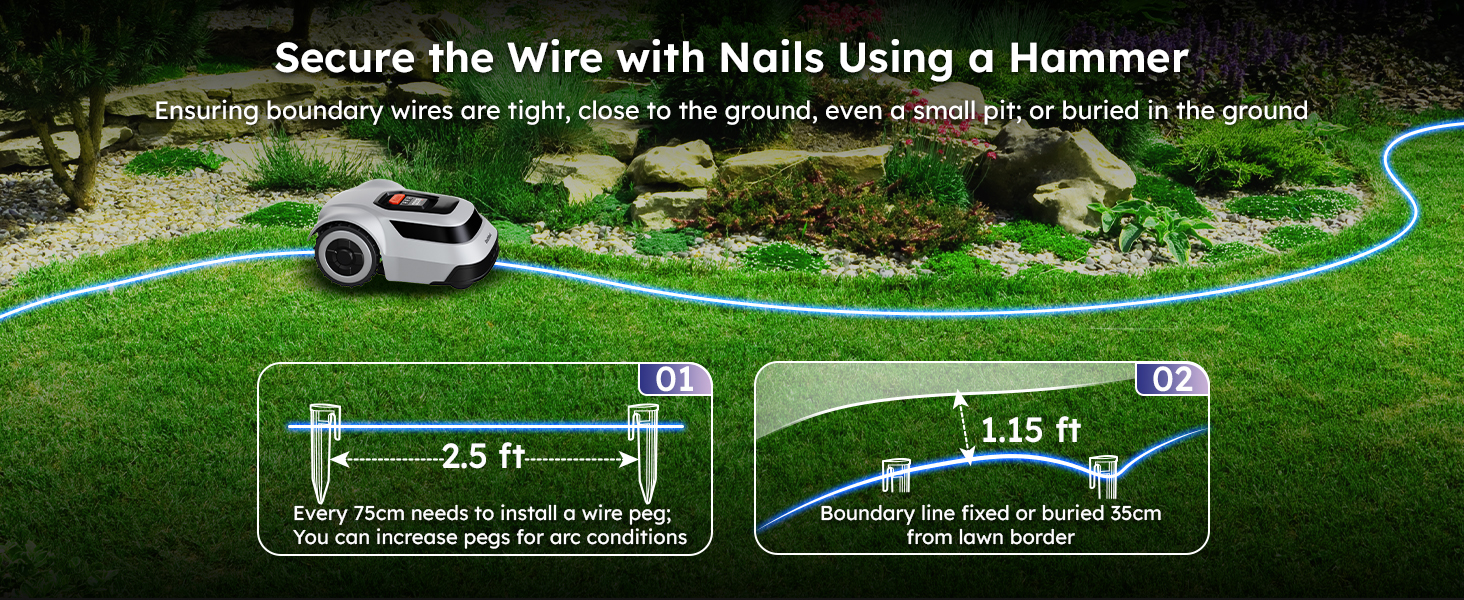
Image: An aerial perspective demonstrating how to define your lawn mowing area using the boundary wire, outlining the perimeter of the property.

Image: Detailed instructions on how to secure the boundary wire using pegs and maintain appropriate distances from lawn borders and obstacles.

Image: A visual guide demonstrating the correct method for creating a no-go zone around a tree or other fixed obstacle using the boundary wire.
5. Operation
5.1. Initial Start-up and Mapping
After the boundary wire and charging station are installed, place the mower within the defined area and initiate the first mowing cycle. The mower will automatically map the area within the boundary wire.
5.2. Mowing Efficiency and Path Planning
The ANTHBOT Pion1000 utilizes CABLE-TOF global positioning technology to achieve a highly efficient, grid-shaped mowing path. This intelligent route planning ensures comprehensive coverage and significantly increases mowing efficiency compared to random mowing patterns.

Image: A visual comparison demonstrating the precise, line-by-line mowing pattern achieved by the Cable-ToF algorithm versus a less efficient random mowing pattern.
5.3. Automatic Charging
The mower is equipped with a large battery providing approximately 70 minutes of mowing time per charge. When the battery level drops below 15%, the mower will automatically return to its charging station. It will resume mowing once it reaches 90% charge.

Image: The robot lawn mower intelligently navigating back to its charging station for automatic recharging.
5.4. App Control and Monitoring
The user-friendly ANTHBOT app allows for real-time tracking and control of your mower. You can:
- Monitor mowing progress and current location.
- Schedule mowing times and days.
- Receive start and end-of-mowing alerts.
- View coverage area statistics.

Image: A hand holding a smartphone showing the ANTHBOT application, which provides real-time tracking and control over the lawn mower's operations.
5.5. Adjustable Cutting Height
The ANTHBOT Pion1000 features an automatic adjustable blade deck, allowing for cutting heights between 1.18 inches (3 cm) and 2.76 inches (7 cm). The cutting width is 20 cm (7.87 inches). The smart blades automatically adjust to prioritize completing the mowing job successfully, even when encountering tall or dense grass.

Image: A detailed view of the mower's blade disc and the internal mechanism for adjusting cutting height, controlled via the app.
5.6. Slope Handling and Obstacle Avoidance
The robotic lawn mower can handle slopes up to 45% (24°). Equipped with collision sensors, it adjusts direction to avoid obstacles and protect your lawn.

Image: The ANTHBOT Pion1000 robot lawn mower shown effectively navigating a grassy slope, highlighting its ability to handle inclines up to 45%.
5.7. Rain Sensor
The mower automatically returns to its charging station if it detects rain. You can use the app to delay mowing until the rain stops and the lawn is dry enough for optimal results.

Image: The robot lawn mower automatically returning to its charging station during a rainy period, demonstrating its weather-sensing capability.
6. Maintenance
6.1. Cleaning
The ANTHBOT Pion1000 has an IPX6 waterproof rating, allowing for easy cleaning. You can clean the underside of the mower with a garden hose to remove grass clippings and debris. Ensure the mower is turned off and disconnected from the charging station before cleaning.

Image: A person cleaning the underside of the ANTHBOT Pion1000 with a garden hose, demonstrating its IPX6 waterproof feature for easy maintenance.
6.2. Blade Replacement
Regularly inspect the blades for sharpness and damage. Dull or damaged blades can affect cutting performance and mower efficiency. Replace blades as needed using the provided replacement blades and hex key. Always wear protective gloves when handling blades.
7. Troubleshooting
This section addresses common issues you might encounter with your ANTHBOT Pion1000 robot lawn mower.
7.1. Boundary Wire Break Detection
If the mower stops and indicates a boundary wire error, the ANTHBOT app can help identify the damage location. Bring the mower back to the charging station, and the app will pinpoint the break. Use the included cable connectors to repair the damaged section of the wire.

Image: The robot lawn mower halted due to a detected boundary wire break, with the accompanying mobile application indicating the precise location of the damage for easy repair.
7.2. Common Error Messages and Solutions
- Mower Stuck: Check for obstacles, uneven terrain, or areas where the mower might get wedged. Clear the path and restart.
- Not Charging: Ensure the mower is properly docked in the charging station and the power adapter is connected and receiving power. Clean charging contacts if necessary.
- Poor Mowing Performance: Check blade sharpness and cleanliness. Ensure the cutting height is appropriate for the grass length.
- No App Connection: Verify your Wi-Fi network is active and the mower is within range. Restart the app and the mower if needed.
For persistent issues or error codes not listed, refer to the ANTHBOT app for detailed explanations or contact customer support.
8. Specifications
| Feature | Specification |
|---|---|
| Brand | ANTHBOT |
| Model | Pion1000 |
| Power Source | Battery Powered (1 Lithium Polymer battery included) |
| Material | Plastic |
| Color | Gray |
| Item Weight | 23.6 Pounds |
| Product Dimensions (DxWxH) | 23.86" x 16.54" x 10.16" |
| Cutting Width | 7.87 Inches (20 cm) |
| Adjustable Cutting Height | 1.18 - 2.76 Inches (3 - 7 cm) |
| Operation Mode | Automatic |
| Maximum Coverage Area | 1000 m² (Recommended 600 m²) |
| Slope Capability | Up to 45% (24°) |
| Waterproof Rating | IPX6 |
| Mowing Time per Charge | Approximately 70 minutes |
9. Warranty Information
The ANTHBOT Pion1000 Robot Lawn Mower comes with a 3-year warranty. This warranty covers manufacturing defects and ensures the product functions as intended under normal use. Please retain your proof of purchase for warranty claims. For specific terms and conditions, refer to the warranty card included in your package or contact ANTHBOT customer support.

Image: A graphic indicating a 3-year warranty for the ANTHBOT robot lawn mower.
10. Customer Support
If you require assistance, have questions, or encounter any issues with your ANTHBOT Pion1000, please utilize the following support channels:
- In-App Live Chat: Access real-time support directly through the ANTHBOT mobile application.
- Email Support: Send your inquiries via email for detailed assistance.
- Technical Service Team: Our dedicated team is available to provide expert technical support.
Please have your model number (Pion1000) and purchase information ready when contacting support to expedite the process.

Image: A visual representation of available customer support channels, including in-app chat, email, and access to a technical service team.


