
Vtopek P095
Vtopek AHD 1080P 180° Wide Angle Backup Camera User Manual
Model: P095
Introduction
This manual provides detailed instructions for the installation, operation, and maintenance of your Vtopek AHD 1080P 180° Wide Angle Backup Camera. Please read this manual thoroughly before installation and use to ensure proper function and safety.
Key Features
- 180° Ultra-Wide Angle with Fisheye Correction: Maximizes blind spot coverage and provides realistic, clear reverse scenes.
- 360° + 45° Adjustable Camera Body: Allows for precise angle adjustment without drilling.
- 1080P HD Image & Super Night Vision: Equipped with an AHD image sensor and 6-level glass lens for clear images even in low light.
- IP69K Waterproof Design: Durable and reliable performance in various weather conditions.
- AHD & CVBS 2-in-1 Compatibility: Supports both AHD 1080P and universal CVBS video signals.
- Customizable Display Options: Mirror image, front/rear facing, and parking line control via cuttable cables.
- Wide Compatibility: Suitable for 99% of cars, SUVs, trucks, and RVs with RCA inputs.
Setup and Installation
Follow these steps for proper installation of your Vtopek backup camera.
Package Contents
Please verify that all components are present before beginning installation.
- Vtopek AHD 1080P Backup Camera
- 6-meter Extension Cable (RCA)
- Power Cable
- 3M Adhesive / Car Glue (for drill-free installation, check packaging)
- User Manual (this document)
Installation Steps
- Choose Mounting Location: Select a suitable location at the rear of your vehicle. The camera supports various mounting positions.
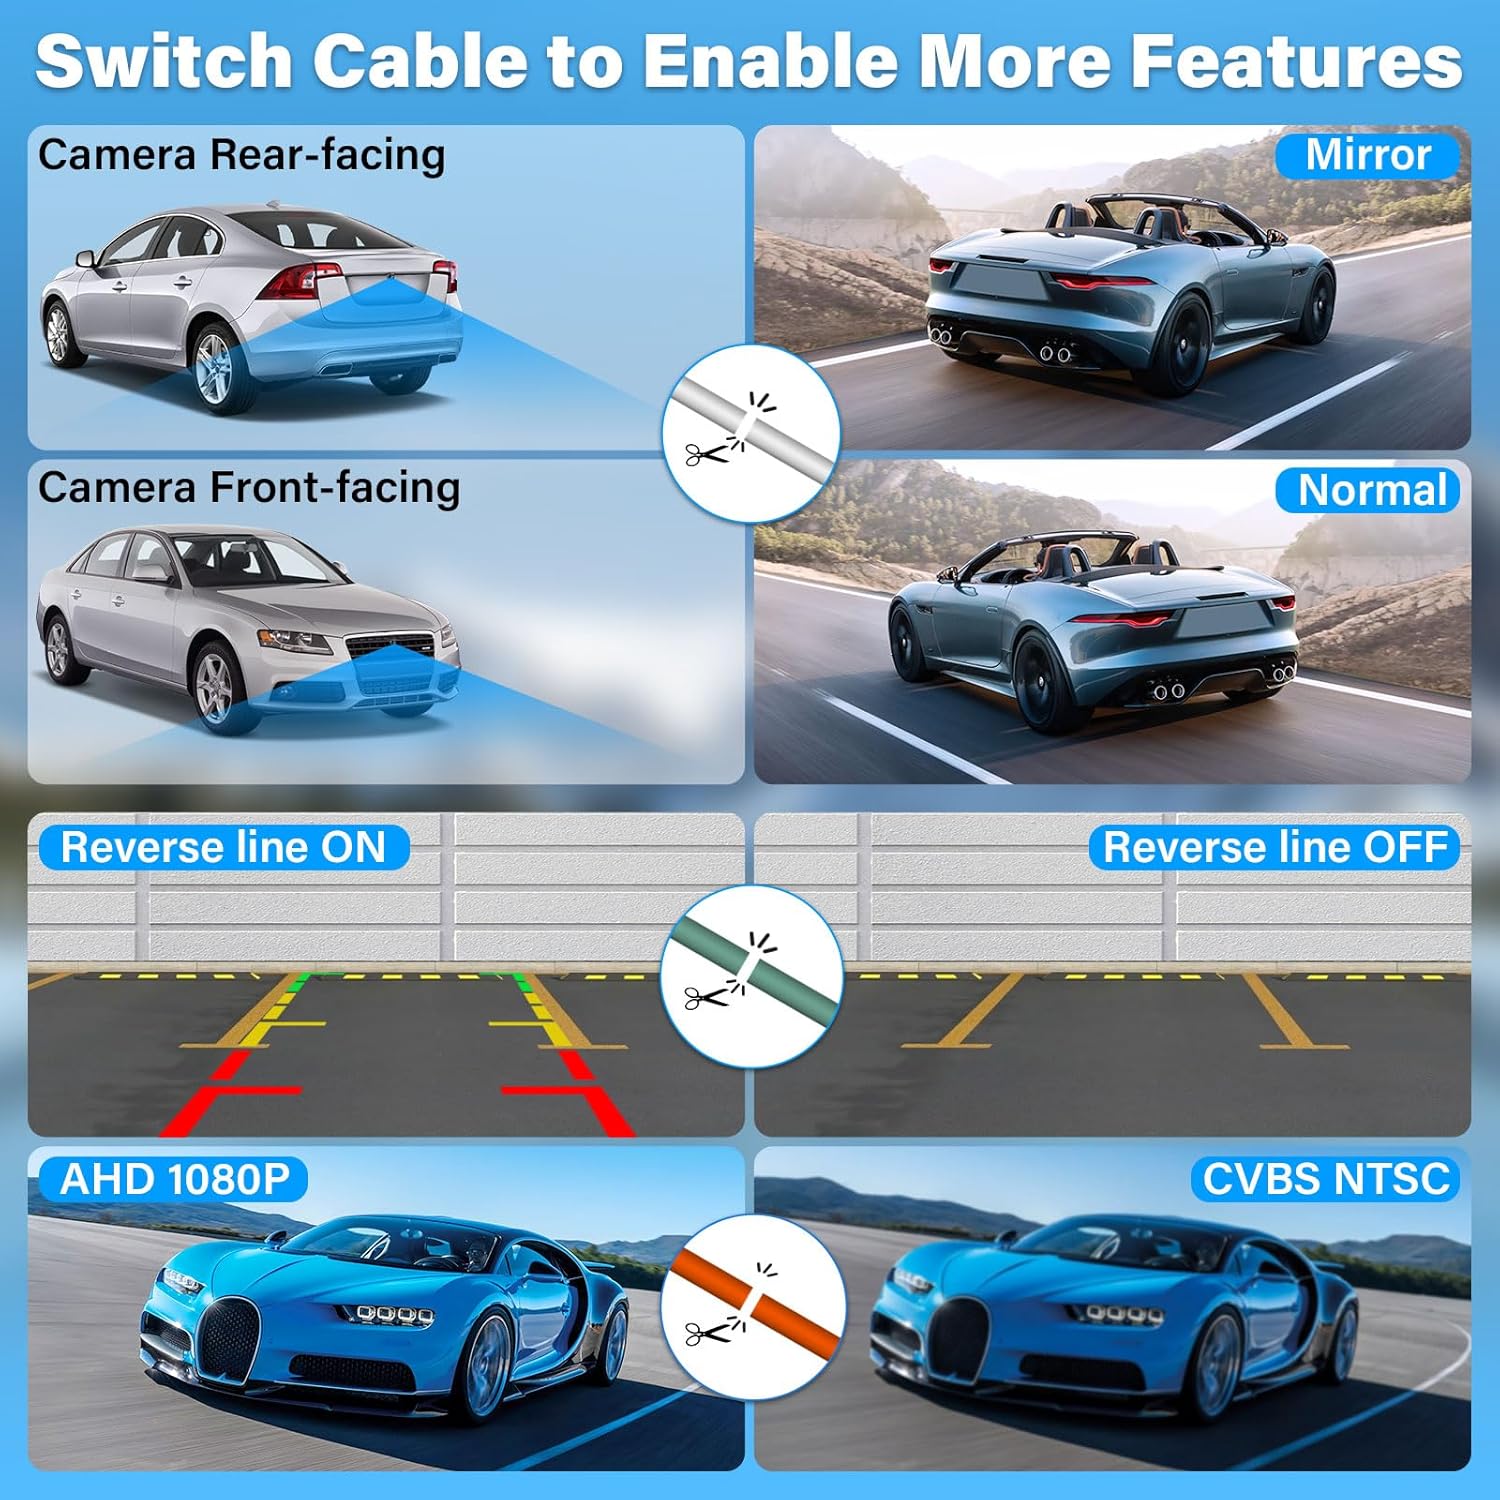
Figure 1: Examples of suitable installation positions for the camera.
- Mount the Camera:
- Drill-Free Installation: Use 3M adhesive or car glue to securely attach the camera. Ensure the surface is clean and dry before application.
- Drill Installation (Optional): If preferred, drill appropriate holes for mounting screws.

Figure 2: Drill-free installation method and camera dimensions.
- Connect Power: Connect the camera's power cable (red wire) to the positive pole of your vehicle's reverse light. Connect the black wire to a ground (GND) point.
- Connect Video Signal: Connect the camera's RCA video output plug to the RCA video input on your car's head unit or monitor.

Figure 3: Wiring diagram for camera installation.
- Route Cables: Carefully route all cables to avoid interference and damage. Ensure the 6-meter extension cable is sufficient for your vehicle type (longer cables may be needed for RVs).
- Adjust Camera Angle: The camera supports 360° rotation and 45° up/down/left/right adjustment. Manually adjust the camera to achieve the optimal viewing angle.
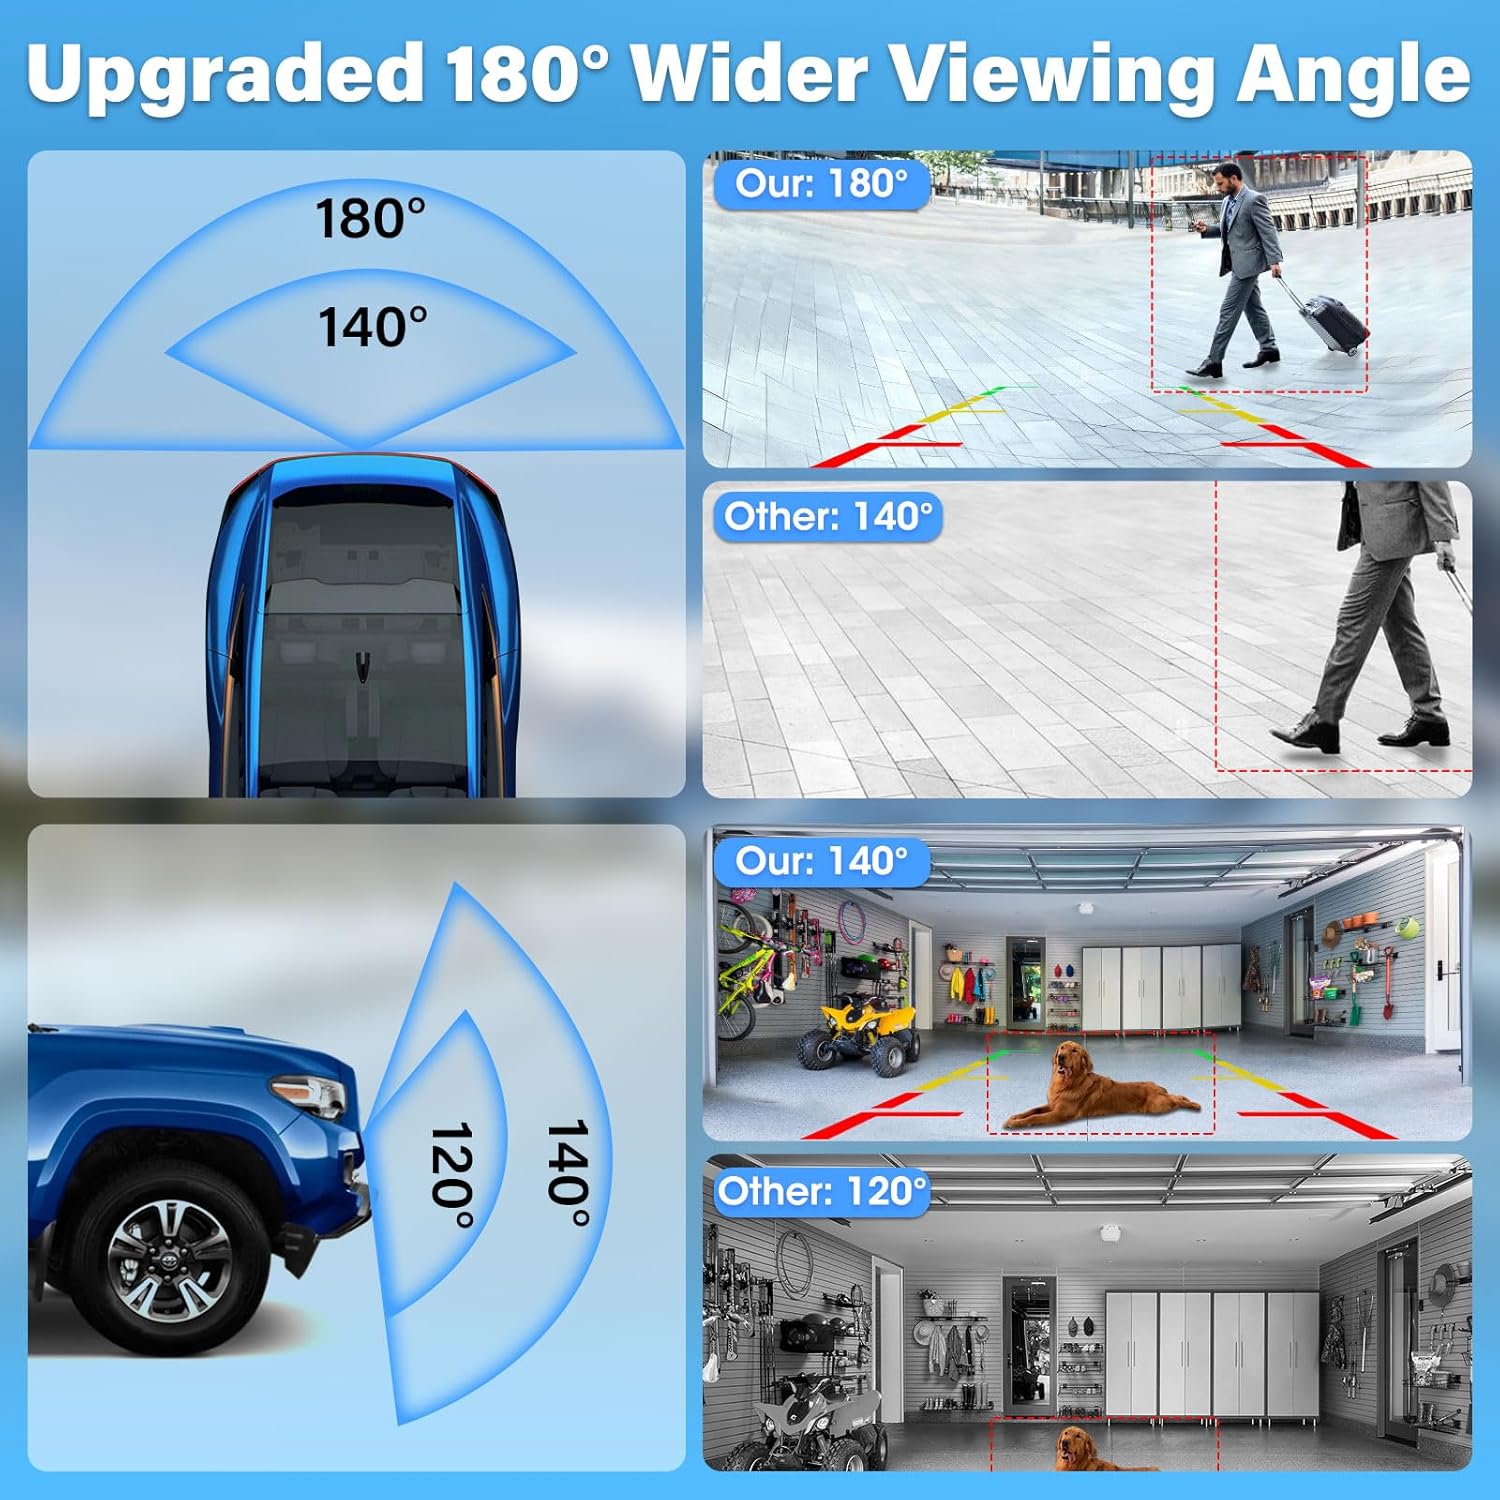
Figure 4: Camera body adjustment for optimal view.
Operating Instructions
Once installed, the camera will activate automatically when the vehicle is put into reverse gear.
Basic Operation
- When shifting into reverse, the image from the backup camera will display on your connected monitor.
- The 180° wide-angle lens provides an expansive view, reducing blind spots.
- The 1080P HD resolution ensures clear images, even at night, thanks to its super night vision capabilities.
Advanced Features (Cable Cutting Options)
The camera features several customizable options by cutting specific wires on the camera cable. Always ensure the monitor is restarted after cutting any cable.

Figure 5: Cable cutting options for advanced features.
- Orange Cable (AHD/CVBS Switch):
- If your monitor supports AHD 1080P 25fps, no action is needed.
- If your monitor does not support AHD, cut the orange cable to convert the signal to universal CVBS.
- White Cable (Mirror/Normal Image):
- By default, the camera provides a mirror image suitable for rear view.
- To convert to a normal image (e.g., for front camera installation), cut the white cable.
- Green Cable (Parking Line On/Off):
- By default, parking lines are displayed.
- To disable parking lines, cut the green cable.
Maintenance
Proper maintenance ensures the longevity and optimal performance of your backup camera.
- Cleaning: Regularly clean the camera lens with a soft, damp cloth to remove dirt, dust, or water spots. Avoid abrasive cleaners.
- Inspection: Periodically check the camera's mounting and cable connections for any signs of looseness or damage.
- Waterproof Rating: The camera is IP69K waterproof, meaning it is protected against high-pressure, high-temperature jet sprays. You do not need to worry about car washes or rainy conditions.

Figure 6: The camera's IP69K waterproof rating ensures durability in harsh conditions.
Troubleshooting
If you encounter issues with your Vtopek backup camera, refer to the following common problems and solutions.
| Problem | Possible Cause | Solution |
|---|---|---|
| No image on monitor / Black screen |
|
 Figure 7: AHD compatibility warning and solution. |
| Flickering image |
|
|
| Image is reversed (not mirror) | White cable was cut, or camera is set to front-facing mode. | If you need a mirror image for rear view, ensure the white cable is intact. If it was cut accidentally, the camera will display a normal image. This feature is not reversible once cut. |
| No parking lines | Green cable was cut. | If you need parking lines, ensure the green cable is intact. If it was cut, parking lines will be disabled. This feature is not reversible once cut. |
Important Note: This camera has an RCA video output plug and must work with monitors that have an RCA video input plug. It is not compatible with dash cams, mirror cams, or GPS units that do not support RCA video input directly. All Vtopek 4-pin cameras cannot be directly connected to other screens (DVR/on-board camera/dash cam) that are not compatible with RCA video input, as the pin definition is different.

Figure 8: RCA compatibility and device limitations.
Specifications
| Feature | Detail |
|---|---|
| Brand | Vtopek |
| Model Number | P095 |
| Color | Black |
| Optical Sensor Technology | CMOS |
| Optical Sensor Size | 1/3 inch |
| Lens Type | Wide angle with fisheye correction (fixed) |
| Actual View Angle | 180 degrees |
| Voltage | 12 Volts (DC) |
| Connector Type | RCA |
| Installation Type | Surface Mount |
| Compatible Devices | Almost all vehicles with compatible screens (RCA input) |
| Product Dimensions | 25L x 25W x 25H millimeters |
| Waterproof Rating | IP69K |
Warranty Information
Vtopek offers a 1-year manufacturer's warranty on this product. This warranty covers defects in materials and workmanship under normal use. Please retain your proof of purchase for warranty claims.
Additionally, Vtopek provides 24 months of replacement service for the backup camera.
Customer Support
For any questions, technical assistance, or warranty claims, please contact Vtopek customer service. We typically respond within 24 hours.
- Email: jenny@jansite.cn
- Lifetime Technical Support: Vtopek is committed to providing lifetime technical support for its products.

Figure 9: Vtopek Customer Support Information.
Ask a question about this manual
Ask about setup, troubleshooting, compatibility, parts, safety, or missing instructions. Manuals+ will review the question and use this page’s manual context to help answer it.