Introduction
Thank you for choosing the WELLFOR Matte Black 10-inch Wall Mounted Shower Faucet Set. This manual provides detailed instructions for the proper installation, operation, and maintenance of your new shower system. Please read this manual thoroughly before installation and keep it for future reference to ensure safe and efficient use of the product.

Image: Overview of the WELLFOR Matte Black 10-inch Wall Mounted Shower Faucet Set components.
Product Features
- High-Performance Shower Head: Features a 10-inch 304 stainless steel square shower head, delivering a flow rate of 2.5 GPM @ 80 psi. Includes a US standard 1/2 inch NPT water outlet thread for easy installation.
- Pressure Balance Valve: Ceramic disc pressure balance valve ensures consistent water pressure and temperature, preventing scalding. All mounting hardware is included and cUPC approved.
- Advanced Design Features: Dual Head Built-In Shower Faucet Holder and a brass water diverter with a flow rate of 2.5 GPM at 80 psi enhance usability and safety.
- Premium Materials: Constructed with 304 stainless steel shower arm and trim, zinc alloy handle, and a solid brass 2-function pressure balance diverter valve with a 40 mm Cupc certified cartridge for durability and reliability.
- Rigorous Testing: Shower head and handheld spray undergo 100% pressure and water flow testing, 24-hour acid salt spray coating testing, and 10,000 times shower head rotate and spray testing. The 11LB shower arm flange strength and endurance testing ensure durability and long-term performance.
- Enhanced Functionality: A 360° rotation connection ball allows adjustable head angles, including a 15° angle slope for optimal comfort. The premium brass faucet with a matte black layer offers a sleek appearance, while ensuring leak-proof and rust-resistant properties for long-lasting use.
- Easy Installation: Shower system, shower bracket holder, shower arm, and shower mixer valve feature 1/2" NPT threading, a standard U.S. connection size, ensuring quick and professional installation.

Image: The WELLFOR Dual Function Shower System demonstrating both rainfall and handheld spray modes.
Package Contents
Please verify that all components are present and undamaged before beginning installation. If any parts are missing or damaged, please contact WELLFOR customer service.
- 10-inch Square Shower Head
- Shower Arm
- Pressure Balance Mixer Valve (with cUPC certified cartridge)
- Handheld Shower Spray
- Shower Hose
- Shower Bracket Holder
- Trim Plate and Handle
- Mounting Hardware (screws, anchors, etc.)
- Installation Manual

Image: All accessories and installation manual included in the package.
Specifications
| Attribute | Detail |
|---|---|
| Brand | WELLFOR |
| Model Number | DTG-583S10MB |
| Color | Matte Black |
| Material | Stainless Steel, Brass |
| Finish Type | Brushed |
| Number of Handles | 1 |
| Mounting Type | Wall Mount |
| Maximum Pressure | 80 PSI |
| Flow Rate | 2.5 GPM @ 80 psi |
| Connection Size | 1/2" NPT |
| Item Weight | 12.13 pounds |
| Product Dimensions | 12 x 12 x 12 inches (approximate) |
| Country of Origin | China |
| UPC | 755097147236 |

Image: Dimensional drawing with key measurements for installation planning.
Setup and Installation
Professional installation is recommended. Ensure all local plumbing codes are followed. Turn off the main water supply before starting installation.
Tools Required (Not Included):
- Adjustable Wrench
- Pipe Thread Sealant Tape (Teflon Tape)
- Phillips Head Screwdriver
- Level
- Measuring Tape
- Drill (if needed for mounting)
Installation Steps:
- Prepare the Wall: Ensure the wall cavity is ready for the built-in valve. The valve should be installed such that the "FINISHED WALL FLUSH WITH THIS SURFACE" marking on the valve body aligns with the finished wall surface.
- Install the Valve Body: Connect the hot and cold water supply lines to the marked inlets on the pressure balance valve (H for Hot, C for Cold). Connect the shower head outlet and handheld spray outlet lines. Use pipe thread sealant tape on all threaded connections. Secure the valve body to the wall framing using appropriate fasteners.
- Install Shower Arm: Thread the shower arm into the wall outlet, ensuring it is securely tightened and properly oriented. Apply thread sealant tape.
- Attach Shower Head: Thread the 10-inch square shower head onto the shower arm. The 360° rotation connection ball allows for angle adjustment. Hand-tighten, then use a wrench for a final snug fit, being careful not to overtighten.
- Install Handheld Shower Bracket: Mount the shower bracket holder to the wall at a comfortable height, ensuring it is level.
- Connect Handheld Shower and Hose: Attach one end of the shower hose to the handheld shower spray and the other end to the outlet on the valve body or a dedicated wall elbow. Place the handheld shower into its bracket.
- Install Trim Plate and Handle: Once the rough-in plumbing is complete and tested, install the decorative trim plate over the valve body. Secure it with the provided screws. Attach the handle to the valve stem, ensuring it operates smoothly.
- Test for Leaks: Slowly turn on the main water supply and check all connections for leaks. Operate the handle to switch between the shower head and handheld spray to ensure proper function.

Image: Detailed view of the two-function pressure balance valve components.

Image: Example of the WELLFOR shower system installed in a bathroom.
Operating Instructions
Your WELLFOR shower system is designed for ease of use and optimal comfort.
Water Flow and Temperature Control:
- The single handle controls both water flow and temperature.
- To turn on the water and adjust flow, rotate the handle.
- To adjust temperature, rotate the handle left for hotter water and right for colder water. The pressure balance valve will maintain a consistent temperature to prevent sudden changes.
Diverter Function:
- The small knob above the main handle is the 2-way diverter.
- Rotate the diverter knob to switch water flow between the main shower head and the handheld spray.
- Ensure the diverter is fully engaged in one position for optimal water pressure from the selected outlet.

Image: The WELLFOR shower system demonstrating water flow from both shower head and handheld spray.
Maintenance
Regular cleaning and proper care will ensure the longevity and optimal performance of your WELLFOR shower system.
Cleaning the Finish:
- Clean the matte black finish with a soft, damp cloth and mild soap.
- Avoid abrasive cleaners, harsh chemicals, or scouring pads, as these can damage the finish.
- Rinse thoroughly with clean water and dry with a soft cloth to prevent water spots.
Cleaning Nozzles:
- The shower head and handheld spray feature touch-clean nozzles. Simply rub the rubber nozzles with your finger or a soft brush to remove mineral buildup.
- For stubborn mineral deposits, a solution of equal parts white vinegar and water can be used. Soak the shower head (if removable) or apply the solution to the nozzles, let it sit for a few minutes, then scrub and rinse.
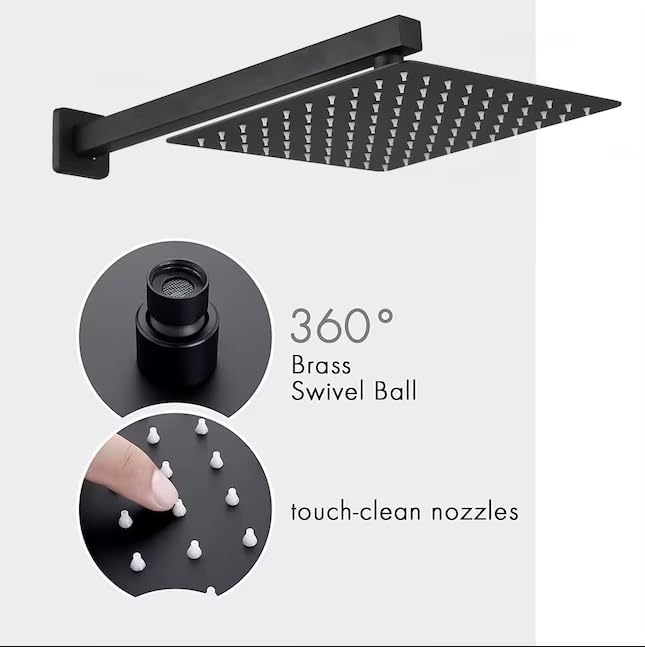
Image: Detail of the shower head with touch-clean nozzles and 360° brass swivel ball.
Troubleshooting
If you encounter any issues with your WELLFOR shower system, please refer to the following common problems and solutions:
| Problem | Possible Cause | Solution |
|---|---|---|
| Low Water Flow | Clogged shower head nozzles; partially closed shut-off valve; low house water pressure. | Clean shower head nozzles. Ensure shut-off valves are fully open. Consult a plumber for house water pressure issues. |
| Water Leaks from Connections | Loose connections; insufficient thread sealant tape; damaged O-rings/gaskets. | Turn off water supply. Tighten connections. Reapply thread sealant tape. Inspect and replace O-rings/gaskets if damaged. |
| Inconsistent Water Temperature | Pressure balance cartridge issue; hot/cold water supply imbalance. | Ensure hot and cold water supplies are balanced. If problem persists, the pressure balance cartridge may need inspection or replacement by a qualified plumber. |
| Diverter Not Switching Properly | Mineral buildup in diverter; diverter cartridge issue. | Operate the diverter several times to dislodge any debris. If problem persists, the diverter cartridge may need inspection or replacement. |
If these solutions do not resolve the issue, please contact WELLFOR customer support for further assistance.
Warranty and Support
WELLFOR products are manufactured to high-quality standards and are backed by our commitment to customer satisfaction. While specific warranty details may vary, WELLFOR typically offers a limited warranty against defects in materials and workmanship for a specified period from the date of purchase.
For detailed warranty information, technical support, or to inquire about replacement parts, please visit the official WELLFOR website or contact our customer service team. Please have your model number (DTG-583S10MB) and proof of purchase ready when contacting support.
You can find more information and contact details by visiting the WELLFOR Store on Amazon: WELLFOR Store


