Important Safety Instructions
Please read all instructions carefully before using this appliance. Keep this manual for future reference.
- Always unplug the appliance from the power outlet when not in use and before cleaning. Allow it to cool completely before handling or cleaning.
- Do not immerse the appliance, cord, or plug in water or any other liquid.
- Close supervision is necessary when any appliance is used by or near children.
- Do not operate any appliance with a damaged cord or plug, or after the appliance malfunctions or has been damaged in any manner. Contact customer support for assistance.
- Do not use attachments not recommended by the manufacturer, as this may cause hazards.
- Do not use outdoors. This appliance is for household use only.
- Do not let the cord hang over the edge of a table or counter, or touch hot surfaces.
- Do not place the appliance on or near a hot gas or electric burner, or in a heated oven.
- Exercise extreme caution when moving an appliance containing hot oil or other hot liquids.
- To disconnect, turn the temperature control knob to "OFF", then remove the plug from the wall outlet.
- When using this sandwich maker for the first time, a fine smoke haze may result. This is normal due to the initial heating of internal components. Discard any food cooked during the first use.
Product Overview
The COSTWAY 1200W 3-in-1 appliance is designed for versatility, allowing you to prepare sandwiches, waffles, and grilled items using interchangeable non-stick plates.

Interchangeable Plates: The appliance includes three sets of plates: waffle plates, sandwich plates, and grill plates, offering diverse cooking options.

5-Gear Temperature Control: A twisting knob allows for precise temperature adjustments to suit different food types and desired cooking levels.
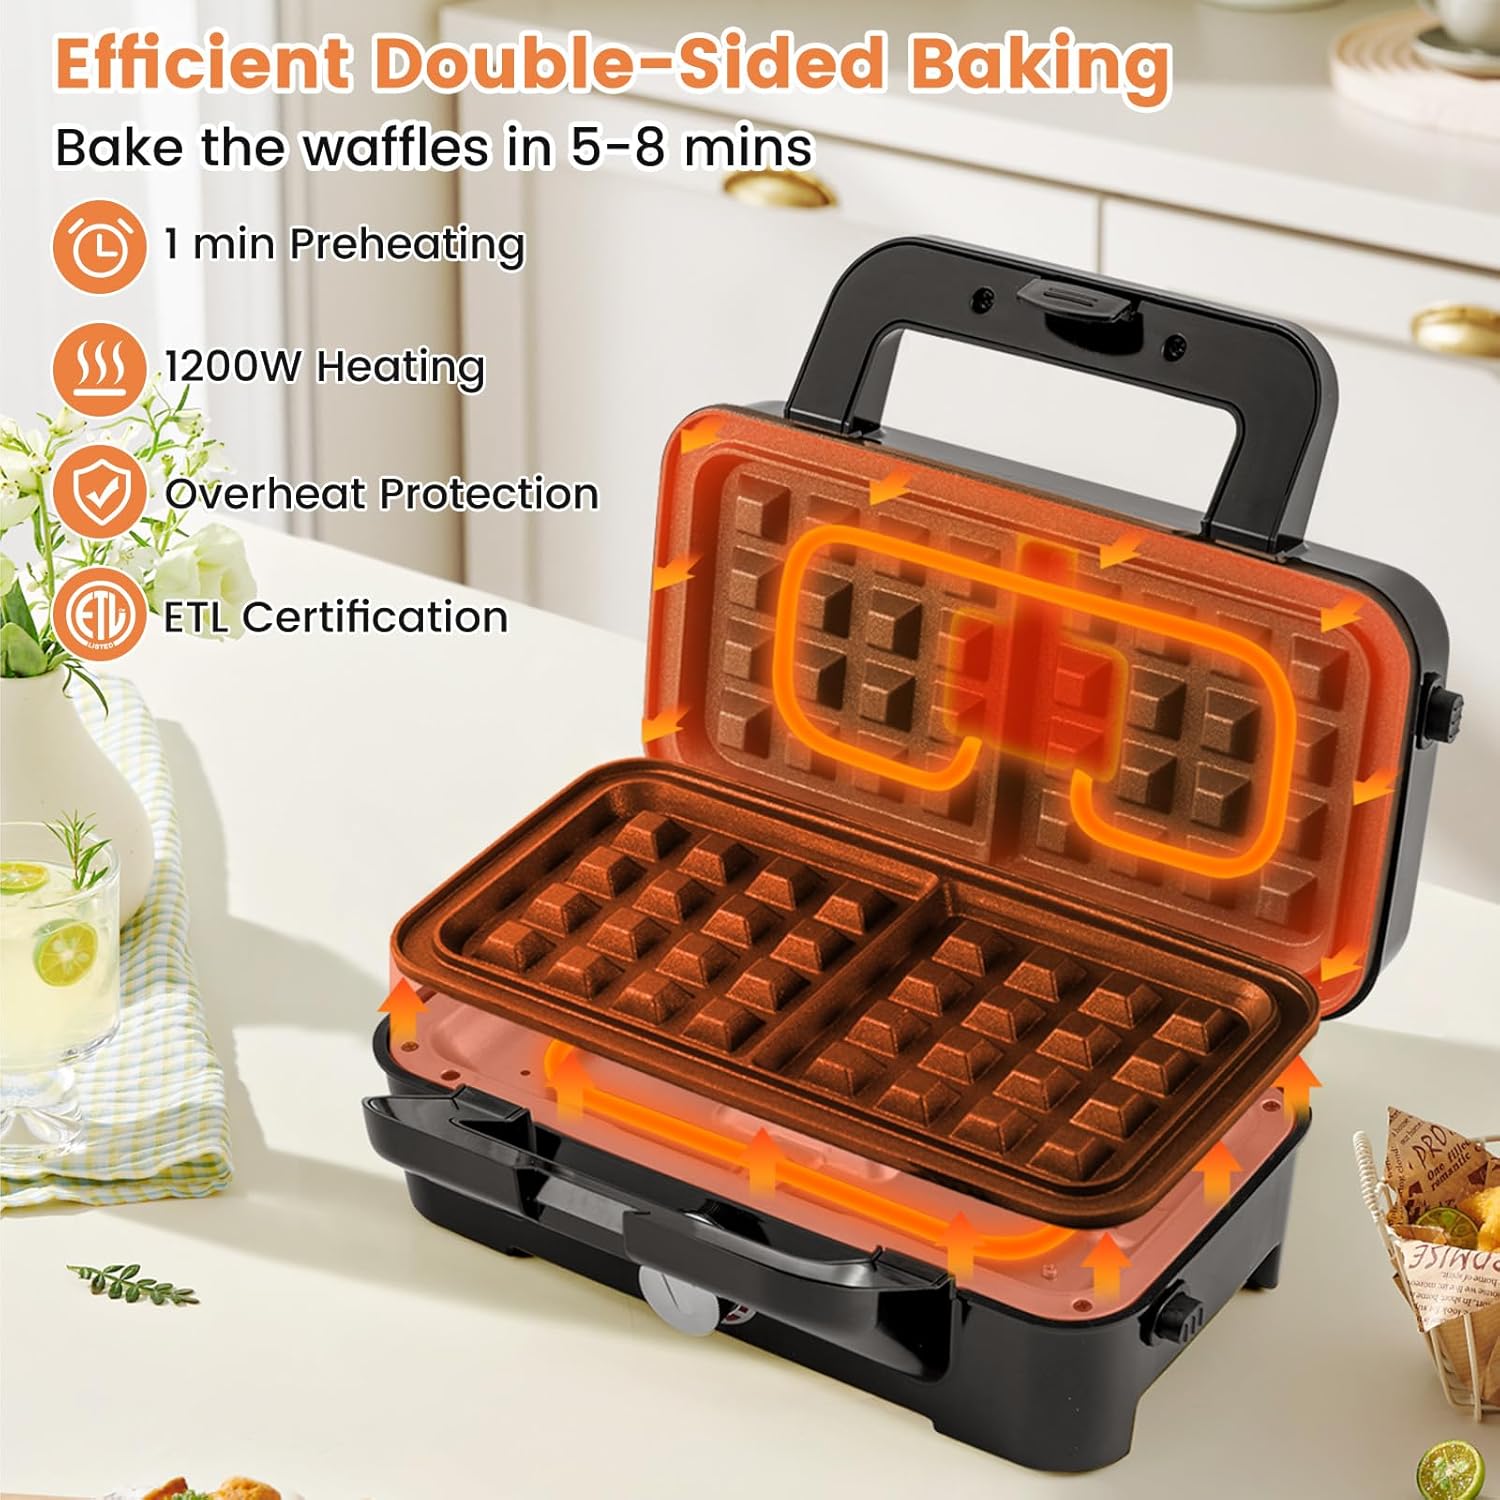
Efficient Heating: Features a 1200W heating system and double-sided bakeware for quick and even cooking. Includes overheat protection and ETL certification for safety.

User-Friendly Design: Equipped with a convenient handle, indicator light, and sturdy support legs for ease of use and stability.

Compact and Portable: Lightweight at 6.5 lbs with a foldable and freestanding design, making it easy to store and move.
Setup
- Unpacking: Carefully remove the appliance and all accessories from the packaging. Retain packaging for storage or disposal.
- Initial Cleaning: Before first use, wipe the exterior of the appliance with a damp cloth. Clean the cooking plates as described in the "Maintenance and Cleaning" section.
- Plate Installation:
- Ensure the appliance is unplugged and cool.
- Select the desired cooking plates (waffle, sandwich, or grill).
- Align the plates with the slots on the upper and lower heating elements.
- Gently press down until the plates click securely into place. Ensure both plates are firmly installed before use.
- Placement: Place the appliance on a stable, heat-resistant, and dry surface. Ensure there is adequate ventilation around the unit.
Operating Instructions
Follow these steps for optimal performance:
- Preheating:
- Plug the appliance into a suitable power outlet. The red indicator light will illuminate, indicating the unit is heating.
- Turn the temperature control knob to your desired setting. For most items, a medium to high setting is recommended.
- Allow the appliance to preheat for approximately 1 minute, or until the green indicator light illuminates (if present and indicating readiness).
- Cooking:
- Once preheated, carefully open the lid.
- Lightly grease the non-stick plates with cooking oil or spray, if desired, to prevent sticking and enhance browning.
- Place your food (waffle batter, sandwich, meat, etc.) onto the lower plate. Do not overfill.
- Close the lid gently. The floating hinge design accommodates thicker foods.
- Cook for the recommended time (e.g., 5-8 minutes for waffles, or until desired browning is achieved). Monitor the cooking process to prevent overcooking.
- Use heat-resistant, non-metallic utensils to remove cooked food to avoid damaging the non-stick coating.
- Temperature Control: Adjust the 5-gear temperature knob to achieve different levels of browning and cooking for various foods. Lower settings are suitable for lighter browning, while higher settings provide crispier results.
- After Use: Once cooking is complete, turn the temperature control knob to "OFF" and unplug the appliance. Allow it to cool completely before cleaning.
Maintenance and Cleaning
Regular cleaning ensures the longevity and performance of your appliance.
- Cool Down: Always ensure the appliance is unplugged and completely cool before attempting to clean it.
- Removing Plates:

The cooking plates are designed for easy detachment, simplifying the cleaning process.
- Locate the plate release buttons or levers on the side of the appliance.
- Press the release mechanism and carefully lift the plates off the heating elements.
- Cleaning Plates:
- The non-stick aluminum cooking plates can be cleaned with a damp cloth or sponge.
- For stubborn residue, soak the plates in warm, soapy water for a few minutes before wiping clean.
- Do not use abrasive cleaners, scouring pads, or metal utensils on the non-stick surfaces, as this can damage the coating.
- The plates are not suitable for dishwashers. Hand wash only.
- Ensure plates are thoroughly dry before reattaching or storing.
- Cleaning Exterior: Wipe the exterior housing with a soft, damp cloth. Do not use abrasive cleaners.
- Storage: Store the appliance in a clean, dry place. The compact design allows for vertical storage to save space.
Troubleshooting
| Problem | Possible Cause | Solution |
|---|---|---|
| Appliance does not turn on. | Not plugged in; power outlet malfunction; internal fault. | Ensure the plug is securely inserted into a working outlet. Check the circuit breaker. If the issue persists, contact customer support. |
| Food sticks to plates. | Plates not properly greased; plates not preheated sufficiently; damaged non-stick coating. | Lightly grease plates before each use. Allow adequate preheating time. Avoid using metal utensils. If coating is damaged, consider replacing plates or appliance. |
| Food not cooking evenly or browning. | Insufficient preheating; incorrect temperature setting; uneven batter/food distribution. | Ensure the appliance is fully preheated. Adjust the temperature knob to a higher setting. Distribute batter or food evenly across the plates. |
| Smoke or odor during first use. | Normal initial heating of internal components. | This is normal. Ensure good ventilation. Discard food from the first use. |
Specifications
- Model Number: 3-in-1 Sandwich Maker
- Brand: COSTWAY
- Wattage: 1200 watts
- Voltage: 120 Volts
- Product Dimensions: 9"D x 11.5"W x 5"H
- Item Weight: 6.5 Pounds
- Material: PF, Stainless Steel, Aluminum
- Special Features: 3-in-1 Sandwich Maker, Cool Touch, Lightweight, Non Stick Coating, Temperature Control
- Included Components: 1 x Instruction, 1 x Sandwich Maker, 2 x Grill Plates, 2 x Sandwich Plates, 2 x Waffle Plates
- Number of Settings: 5 (Temperature Control)
Warranty and Support
This COSTWAY appliance comes with a Limited Warranty. For specific details regarding warranty coverage, duration, and terms, please refer to the warranty card included in your product packaging or visit the official COSTWAY website.
For technical support, troubleshooting assistance, or to inquire about replacement parts, please contact COSTWAY Customer Service:
- Website: www.costway.com (Check for contact information or support section)
- Email: Refer to your product documentation for the most current email address.
- Phone: Refer to your product documentation for the most current phone number.
When contacting support, please have your product model number (3-in-1 Sandwich Maker) and purchase date available.


