
Introduction
This manual provides essential information for the proper installation, operation, and maintenance of your TouchWo 15-inch Capacitive Multi-Touchscreen Industrial Embedded PC Monitor, model DM150NFWA. Please read this manual thoroughly before using the product to ensure safe and efficient operation.
Product Overview
Key Features
- 10-Point Capacitive Touchscreen: Supports multi-finger gestures, glove operation, and offers adjustable brightness. No additional drivers are required for basic touch functionality.
- Integrated System: Equipped with Windows 10, Wi-Fi, and Bluetooth for comprehensive functionality.
- Rich Connectivity: Features a gigabit Ethernet port, Phoenix2Pin connector, multiple USB ports, HDMI-Out, and audio ports for diverse industrial applications.
- Fanless and Silent Design: Engineered for quiet operation and energy efficiency, utilizing an aluminum alloy back shell for effective heat dissipation without the need for active cooling.
- Robust Industrial Design: IP65 rated screen for protection against dust and water splashes. Suitable for embedded installation and VESA mounting, ideal for high-traffic industrial environments such as cabinets, CNC tools, and control consoles.
What's in the Box
- 1 x Touchscreen Tablet
- 1 x Power Adapter (with 1.5m Power Line)
- 1 x Product Manual (this document)
- 4 x Embedded Snaps
Safety Information
Observe the following safety precautions to prevent damage to the device or injury to yourself.
- Power Supply: Use only the provided power adapter. Ensure the power source matches the specified voltage (12V DC).
- Environment: Operate the monitor within the specified temperature range (0°C-50°C). Avoid exposure to extreme temperatures, direct sunlight, or high humidity.
- Installation: Ensure the monitor is securely mounted using either embedded snaps or VESA mounting points. Improper installation can lead to device damage or personal injury.
- Cleaning: Disconnect power before cleaning. Use a soft, damp cloth. Avoid abrasive cleaners or solvents.
- Handling: Do not drop or subject the device to strong impacts. Avoid placing heavy objects on the monitor.
Setup
1. Unpacking
Carefully remove all components from the packaging. Verify that all items listed in the "What's in the Box" section are present.
2. Mounting Options
The monitor supports both embedded installation and VESA standard mounting (75mm x 75mm or 100mm x 100mm patterns are typically supported, refer to physical product for exact VESA pattern).
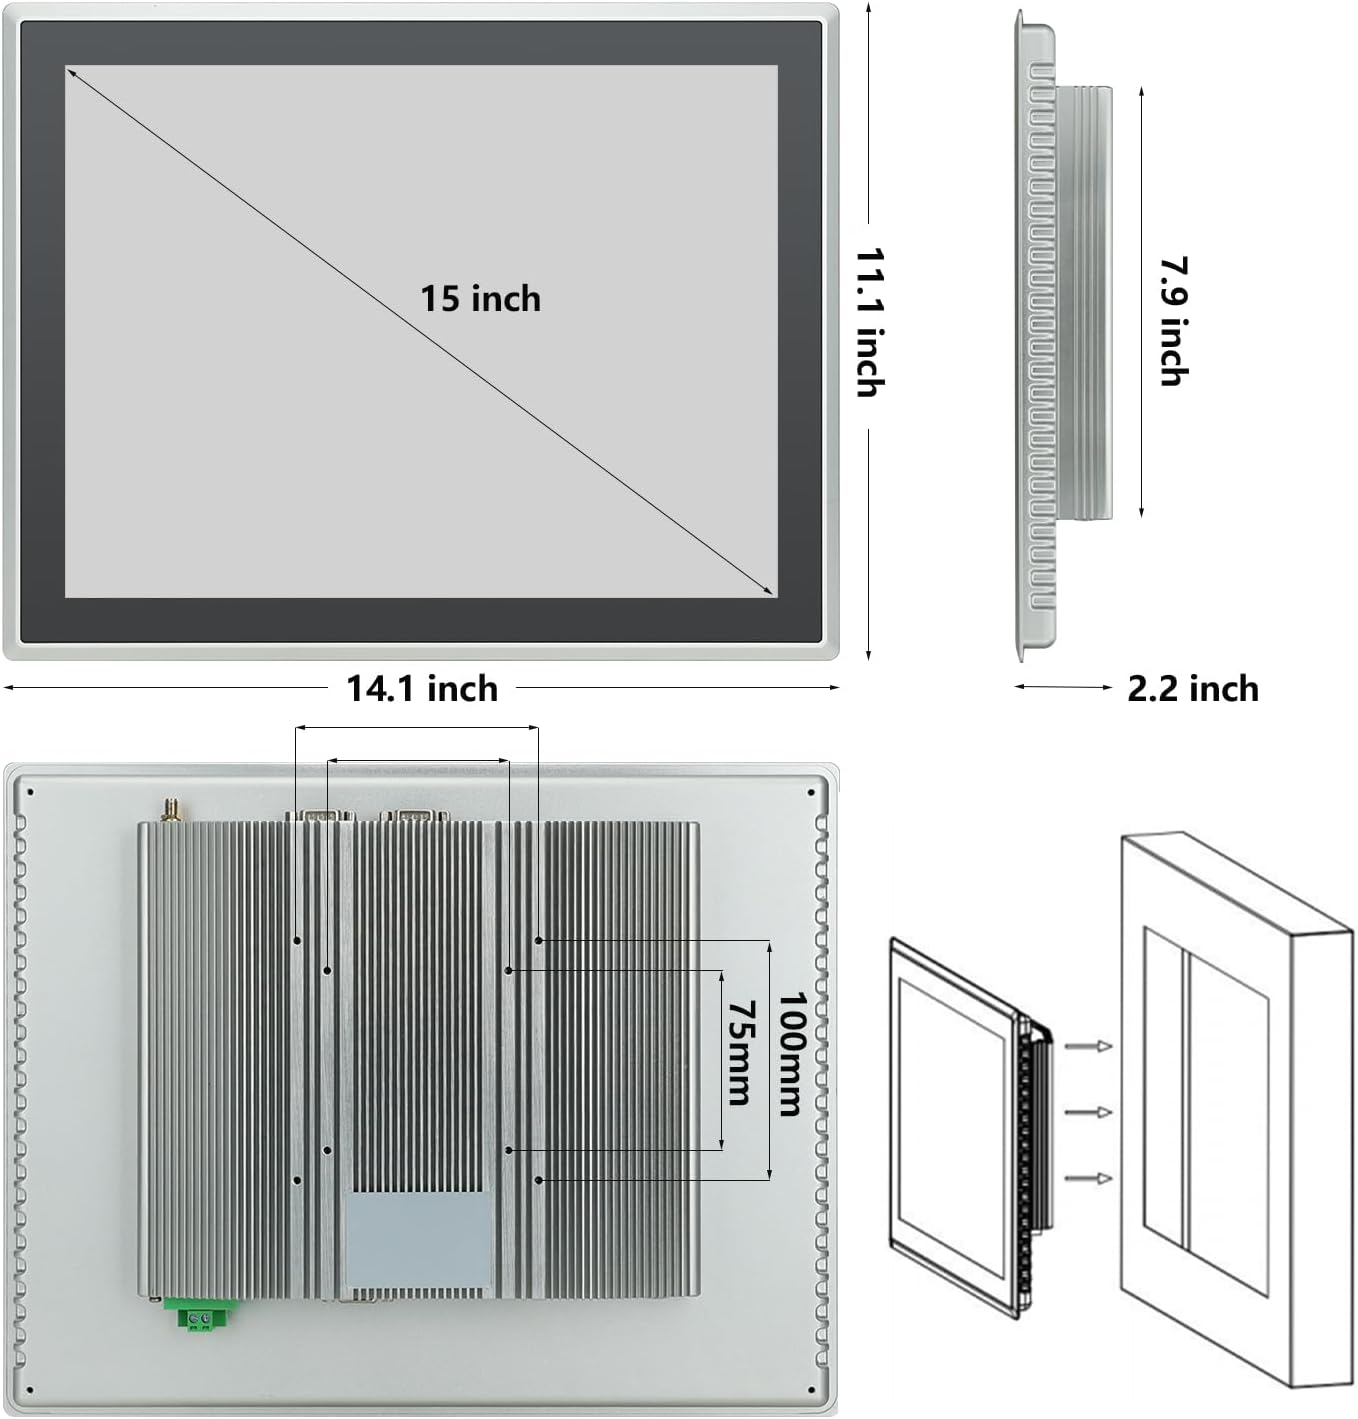
Figure 1: Monitor dimensions and embedded installation diagram. The monitor measures 14.1 inches wide, 11.1 inches high, and 2.2 inches deep. The screen display area is 15 inches diagonally. The back panel shows VESA mounting points and the embedded snap mechanism.
- Embedded Installation: Use the provided embedded snaps to secure the monitor into a compatible cutout in a panel or enclosure.
- VESA Mounting: Attach a VESA-compatible mount to the mounting holes on the rear of the monitor.
3. Connecting Peripherals
Connect necessary devices to the available ports. Refer to the port diagram below.

Figure 2: Rear view of the monitor displaying various input/output ports. These include Terminal Ground, DC12V power input, VGA, LAN, USB ports, Audio ports, HDMI, Phoenix2pin, and WiFi antenna connectors.
- Power: Connect the provided power adapter to the DC12V input port and then to a power outlet.
- Video Output: Use the HDMI-Out port to connect to an external display if needed.
- USB Devices: Connect keyboards, mice, or other USB peripherals to the USB ports.
- Network: Connect an Ethernet cable to the LAN port for wired network access.
- Audio: Use the audio ports for external speakers or headphones.
- Phoenix2Pin: Connect industrial control signals as required by your application.
4. Initial Power-On
After all connections are made, press the power button (location typically on the side or back, refer to product for exact placement) to turn on the monitor. The system will boot into Windows 10.
Operating Instructions
Touchscreen Operation
The monitor features a 10-point capacitive multi-touchscreen, allowing for intuitive interaction with the Windows 10 operating system.

Figure 3: A gloved hand interacting with the monitor's touchscreen, highlighting its 10-point touch capability and IP65 standard for industrial use.
- Single Tap: Functions like a left-click on a mouse to select items or open applications.
- Double Tap: Functions like a double-click on a mouse.
- Drag: Touch and hold an item, then move your finger across the screen to reposition it.
- Pinch-to-Zoom: Use two fingers to pinch in or spread out to zoom in or out of content.
- Glove Operation: The touchscreen is designed to respond even when wearing gloves, enhancing usability in industrial environments.
Brightness Adjustment
Brightness can be adjusted through the Windows 10 display settings or via dedicated buttons on the monitor (if available, refer to product for exact controls).
Audio
The monitor includes built-in speakers. Volume can be controlled via Windows 10 audio settings or external audio devices connected to the audio output ports.
Maintenance
Cleaning the Screen
- Ensure the monitor is powered off and unplugged before cleaning.
- Use a soft, lint-free cloth lightly dampened with water or a non-abrasive screen cleaner.
- Do not spray cleaning solutions directly onto the screen.
- Avoid using harsh chemicals, alcohol, or ammonia-based cleaners, as these can damage the screen surface.
Heat Dissipation
The monitor features a fanless design with an aluminum alloy back shell for efficient passive heat dissipation. Ensure adequate airflow around the back of the unit, especially if embedded, to maintain optimal operating temperatures.

Figure 4: The rear of the monitor, illustrating the fanless design with prominent heat dissipation fins. Blue arrows indicate the direction of heat dissipation, emphasizing the efficient thermal management.
Environmental Considerations
The IP65 rating protects the screen from dust ingress and low-pressure water jets. However, avoid submerging the device or exposing it to high-pressure water. Operate within the recommended temperature range of 0°C to 50°C.
Troubleshooting
If you encounter issues with your monitor, refer to the following common problems and solutions:
| Problem | Possible Cause | Solution |
|---|---|---|
| No Power | Power cable disconnected; Power adapter faulty; Power outlet issue. | Check power cable connections. Ensure power adapter is working. Test power outlet with another device. |
| No Display | Monitor is off; Brightness set too low; External display cable (if used) loose. | Press power button. Adjust brightness. Check HDMI/VGA cable connections. |
| Touchscreen Unresponsive | System frozen; Software issue; Screen dirty. | Restart the monitor. Ensure Windows 10 is updated. Clean the screen surface. |
| Network Connectivity Issues | Ethernet cable disconnected; Wi-Fi disabled; Router issue. | Check Ethernet cable. Verify Wi-Fi is enabled in Windows settings. Restart router. |
If the problem persists after attempting these solutions, please contact customer support.
Specifications
| Feature | Detail |
|---|---|
| Model Number | DM150NFWA |
| Screen Size | 15 Inches |
| Resolution | 1024 x 768 Pixels |
| Aspect Ratio | 4:3 |
| Touch Technology | 10-Point Capacitive Multi-Touch |
| Image Brightness | 350 lm |
| Operating System | Windows 10 (pre-installed) |
| Processor | Intel Core i3 |
| RAM | 4GB |
| Storage | 128GB SSD |
| Connectivity | Wi-Fi, Bluetooth, Gigabit Ethernet, USB (4 ports), HDMI-Out, Audio, Phoenix2Pin |
| Ingress Protection (Screen) | IP65 |
| Voltage | 12 Volts (DC) |
| Product Dimensions (L x W x H) | 14.1 x 11.1 x 2.2 inches |
| Item Weight | 11.46 pounds |
| Manufacturer | Guangzhou Touchwo Electronics Co., Ltd |
Warranty and Support
Quality Assurance
This TouchWo monitor is FCC, CE, and RoHS certified, ensuring compliance with relevant safety and environmental standards. The manufacturing facility holds ISO9001 quality management certification.
Customer Support
For any technical assistance, troubleshooting, or inquiries regarding your product, TouchWo offers 24/7 online customer support. Please refer to the product packaging or the official TouchWo website for contact details.