1. Introduction
This manual provides detailed instructions for the safe and effective use of your InoKraft Airbrush Kit. This kit is designed for various painting applications, offering precision and consistent performance for both beginners and experienced users. Please read this manual thoroughly before operating the device.
2. Package Contents
Your InoKraft Airbrush Kit includes the following components:
- 1/6 HP Quiet Air Compressor (120V 60Hz, 34 PSI output)
- Gravity Feed Dual-Action Airbrush
- Three Replaceable Nozzle Sizes: 0.2 mm, 0.3 mm, 0.5 mm
- Air Hose
- Airbrush Holder
- Oil-Water Separator
- Complete Cleaning Kit (including cleaner, bent nozzle bottle, various brushes)
- Beginner-Friendly Guide with Quick Start-up Instructions and Practice Sheets
- Stable Suction Base
- Portable Handle
- 4 Colors Airbrush Paint Set (US only)
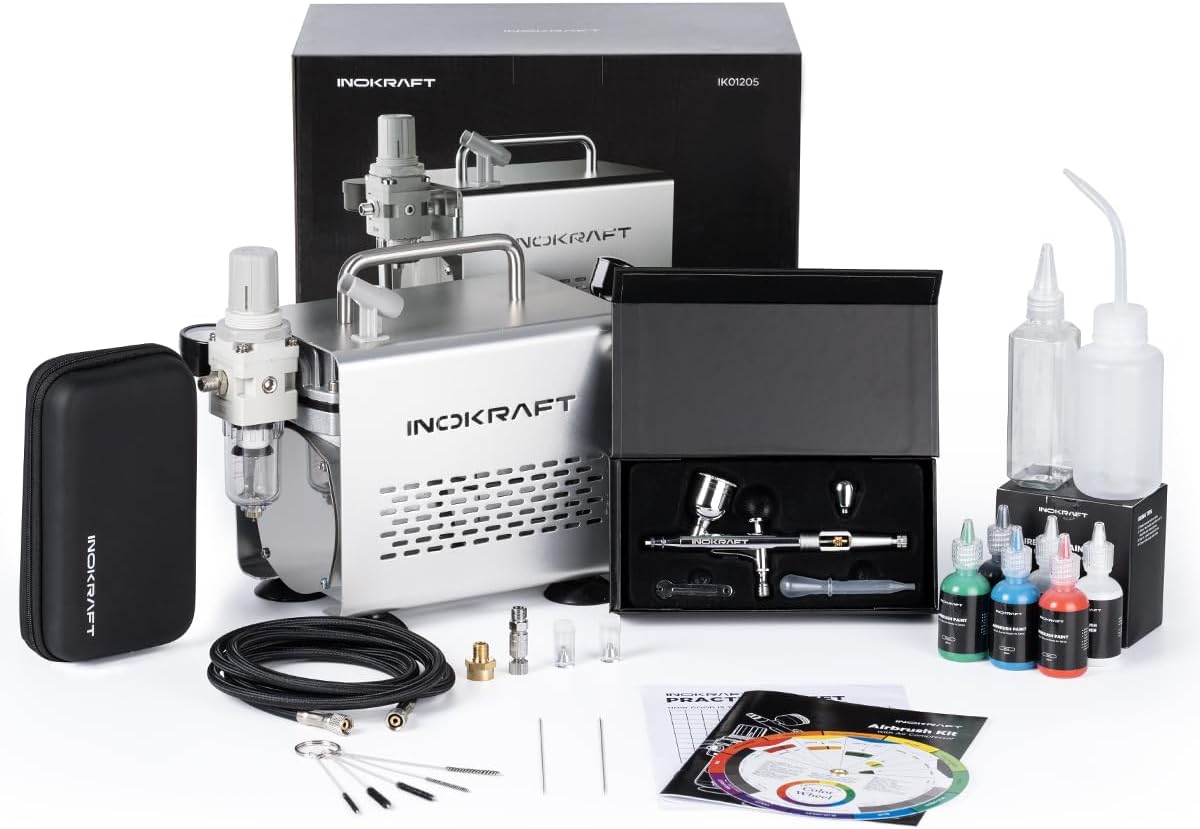
Figure 2.1: Overview of the InoKraft Airbrush Kit components.
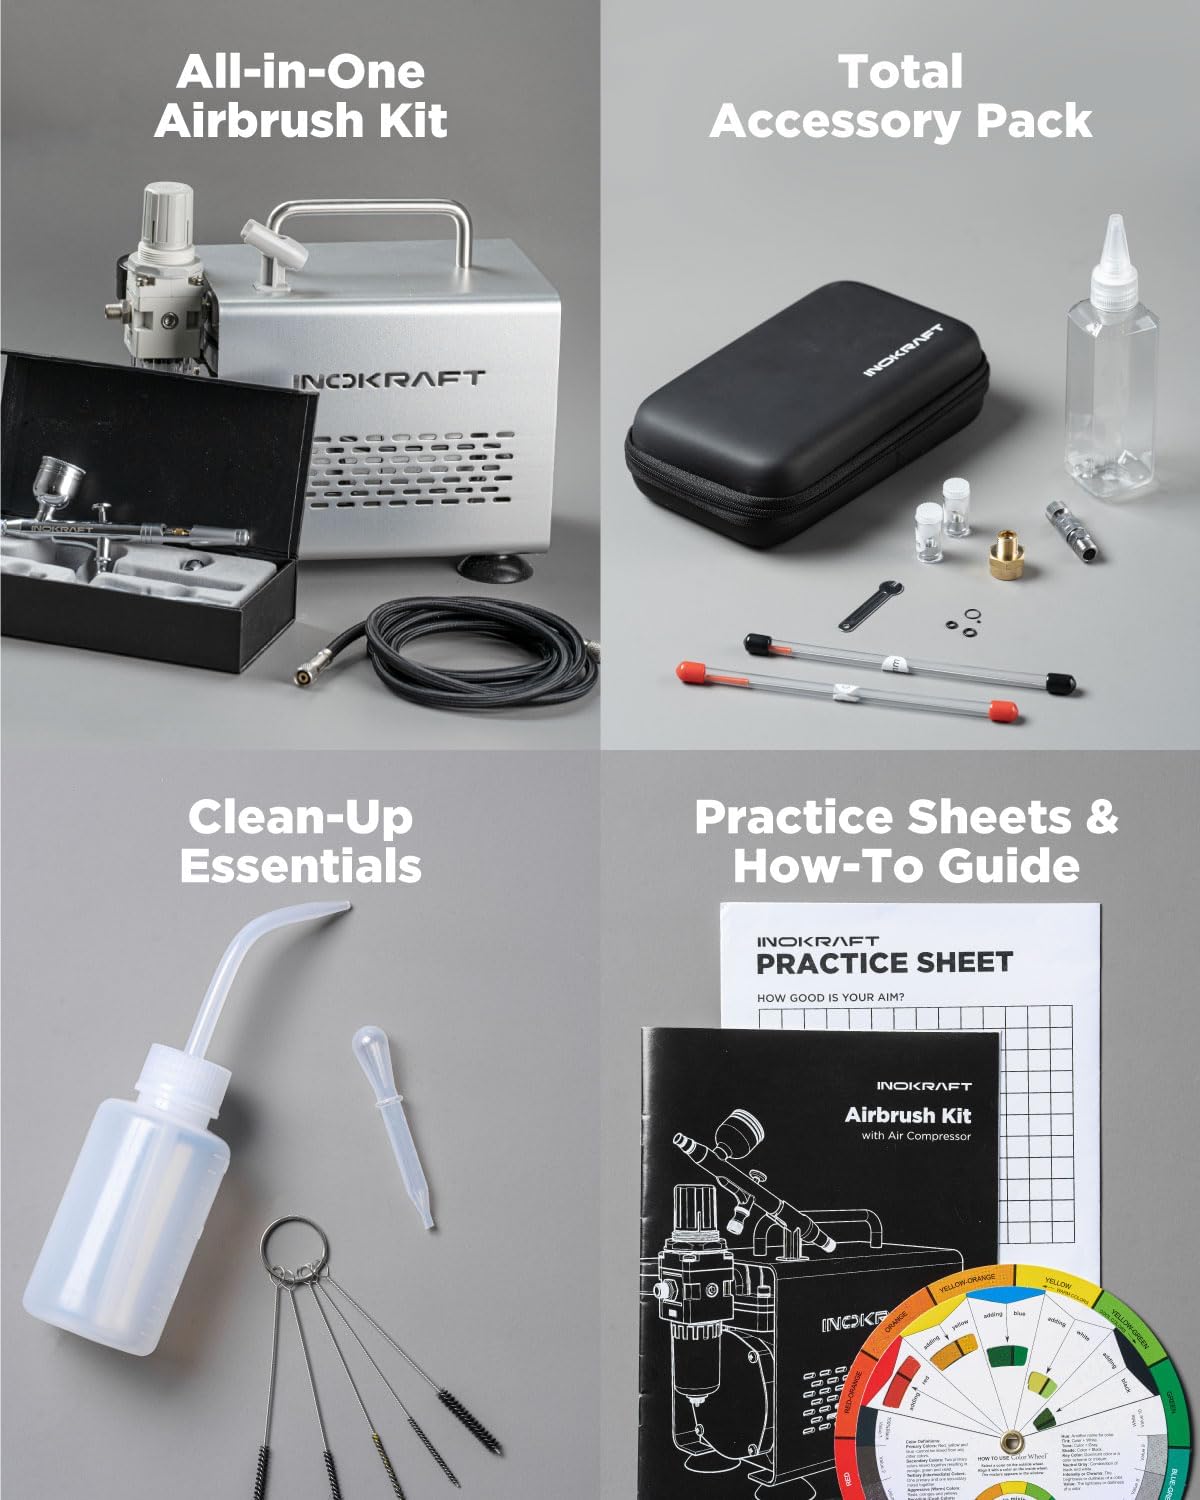
Figure 2.2: Detailed view of the kit's accessories, including the airbrush, compressor, cleaning tools, and instructional materials.
3. Setup Instructions
- Unpack Components: Carefully remove all items from the packaging and verify against the package contents list.
- Position the Compressor: Place the air compressor on a stable, flat surface. The stable suction base helps secure the compressor during operation.
- Attach Oil-Water Separator: Connect the oil-water separator to the air outlet of the compressor. Ensure a secure fit to prevent air leaks.
- Connect Air Hose: Attach one end of the air hose to the oil-water separator and the other end to the airbrush. Hand-tighten connections to avoid damage.
- Install Airbrush Nozzle: Select the desired nozzle size (0.2 mm for fine detail, 0.3 mm for general use, 0.5 mm for larger areas) and install it onto the airbrush. Refer to the beginner-friendly guide for detailed instructions on nozzle replacement.
- Power Connection: Plug the compressor's power cord into a standard 120V 60Hz electrical outlet.

Figure 3.1: Proper connection of the airbrush to the compressor via the air hose.
4. Operating Instructions
4.1. Preparing for Painting
- Prepare Paint: Thin your airbrush paint to the appropriate consistency. The beginner-friendly guide provides recommendations.
- Fill Paint Cup: Pour the prepared paint into the gravity feed cup of the airbrush.
- Adjust Air Pressure: Turn on the compressor. Use the adjustable pressure valve to set the desired air pressure. The compressor provides a steady 34 PSI output.
4.2. Airbrush Operation
The InoKraft airbrush features a dual-action mechanism, allowing independent control of air and paint flow.
- Air Control: Press down on the trigger to release air.
- Paint Control: Pull back on the trigger to release paint. The further you pull back, the more paint is released.
- Fine Detail: Use the 0.2 mm nozzle for intricate lines and small details.
- General Use: The 0.3 mm nozzle is suitable for most common airbrushing tasks.
- Larger Areas: Switch to the 0.5 mm nozzle for broader coverage and faster application.

Figure 4.1: Demonstrating the use of 0.2mm, 0.3mm, and 0.5mm nozzles for various painting tasks.

Figure 4.2: Illustration of the dual-action airbrush mechanism for precise control of air and paint flow.
5. Cleaning and Maintenance
Proper cleaning and maintenance are crucial for the longevity and performance of your airbrush kit.
5.1. Quick Cleaning (Between Colors)
To quickly change colors or prevent paint from drying in the airbrush during a session:
- Empty any remaining paint from the cup.
- Add a small amount of appropriate airbrush cleaner or water to the paint cup.
- Spray the cleaner through the airbrush onto a paper towel or into a cleaning pot until the spray runs clear. The bent nozzle bottle can assist in flushing the cup.
5.2. Deep Cleaning (After Use)
After each painting session, perform a thorough deep clean:
- Disconnect the airbrush from the air hose.
- Disassemble the airbrush components (nozzle, needle, paint cup, etc.). Refer to the beginner-friendly guide for detailed disassembly instructions.
- Use the provided cleaning brushes and cleaner to meticulously clean all paint-contacting parts. Pay special attention to the nozzle and needle.
- Rinse all components with clean water.
- Allow all parts to dry completely before reassembling.

Figure 5.1: Steps for quick cleaning between colors and deep cleaning after use, utilizing the provided cleaning tools.
6. Troubleshooting
If you encounter issues with your InoKraft Airbrush Kit, refer to the following common problems and solutions:
| Problem | Possible Cause | Solution |
|---|---|---|
| No paint flow or sputtering | Clogged nozzle, dried paint, paint too thick, bent needle | Clean nozzle and needle thoroughly. Thin paint. Replace bent needle. |
| Air leaks | Loose connections, damaged O-rings | Tighten all connections. Inspect and replace O-rings if damaged. |
| Inconsistent spray pattern | Partially clogged nozzle, improper paint consistency, damaged needle tip | Perform deep clean. Adjust paint thinning. Inspect and replace needle if damaged. |
| Compressor not turning on | No power, faulty switch | Check power connection. Contact customer support if switch is faulty. |
| Excessive noise from compressor | Loose components, internal issue | Ensure compressor is on a stable surface. If noise persists, contact customer support. |
7. Specifications
- Brand: InoKraft
- Model Name: Airbrush Kit Premium Kit
- Compressor Type: 1/6 HP, Oil-free, Quiet
- Operating Voltage: 120V 60Hz
- Maximum Operating Pressure: 34 PSI
- Noise Level: Under 47 dB
- Airbrush Type: Gravity Feed, Dual-Action
- Nozzle Sizes: 0.2 mm, 0.3 mm, 0.5 mm
- Item Weight: Approximately 10.83 pounds (4.92 Kilograms)
- Package Dimensions: 12.52 x 12.13 x 7.8 inches
- Special Features: Silent Operation, Adjustable Pressure Valve, Airbrush Holder, Oil-Water Separator

Figure 7.1: The InoKraft air compressor, highlighting its quiet operation (under 47 dB) and steady 34 PSI output.
8. Warranty and Support
The InoKraft Airbrush Kit comes with a one-year warranty, ensuring peace of mind regarding product quality and performance.
For any questions, technical assistance, or warranty claims, please contact our customer support team:
- Email: support@inokraft.com
Additional resources, including videos and guides, may be available online.

Figure 8.1: Scan this QR code for quick access to InoKraft support and resources.


