
ARROWMAX SDS
AM ARROWMAX Mini Drill Pen SDS User Manual
Model: SDS | Brand: ARROWMAX
1. Safety Information
Please read and understand all safety instructions before using the AM ARROWMAX Mini Drill Pen. Failure to follow these instructions may result in electric shock, fire, or serious injury.
- Always wear appropriate personal protective equipment, including safety glasses, when operating the drill.
- Keep the work area clean and well-lit. Cluttered or dark areas invite accidents.
- Do not operate power tools in explosive atmospheres, such as in the presence of flammable liquids, gases, or dust.
- Keep children and bystanders away while operating a power tool. Distractions can cause you to lose control.
- Avoid accidental starting. Ensure the switch is in the off-position before connecting to a power source, picking up or carrying the tool.
- Disconnect the battery pack from the power tool before making any adjustments, changing accessories, or storing power tools.
- Use the correct drill bit for the material. Forcing a bit can cause it to break or damage the material.
- Secure the workpiece. Use clamps or a vise to hold the workpiece stable. Holding it by hand is unstable and may lead to loss of control.
- Do not overreach. Keep proper footing and balance at all times.
- Maintain tools. Check for misalignment or binding of moving parts, breakage of parts, and any other condition that may affect the tool's operation.
- Only use with the specified USB-C charging cable and a compatible power source (5V).
2. Package Contents
Verify that all items listed below are included in your package:
- 1 x AM ARROWMAX Mini Drill Pen
- 10 x Drill Bits (various sizes from 0.6mm to 2.2mm, 2.35mm shank)
- 1 x USB-C Charging Cable
- 1 x Instruction Manual (this document)
- 1 x Magnetic CNC Alloy Storage Box
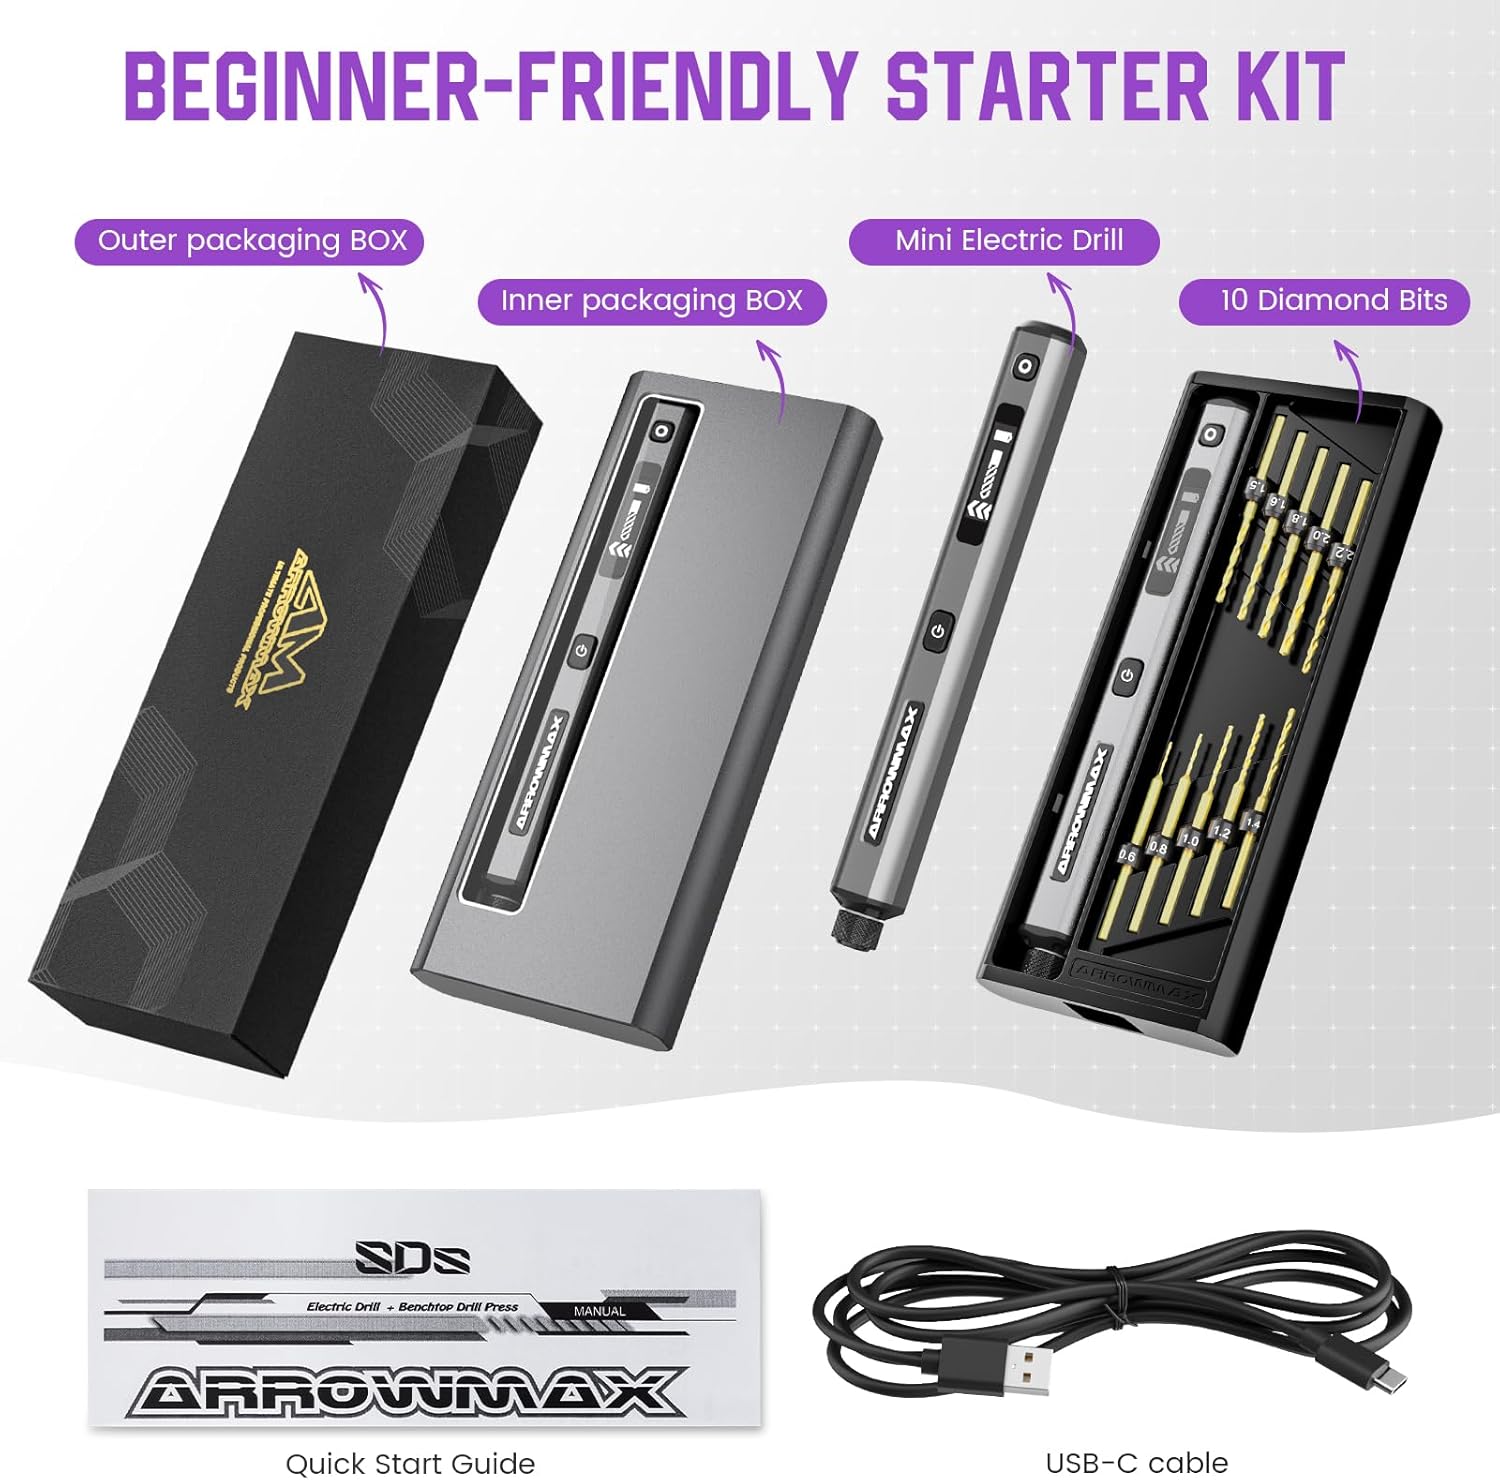
Figure 2.1: Included components of the AM ARROWMAX Mini Drill Pen kit.
3. Product Overview
The AM ARROWMAX Mini Drill Pen is a compact, portable electric drill designed for precision tasks. It features an OLED display, LED lights, and adjustable speed settings for versatile use across various materials.
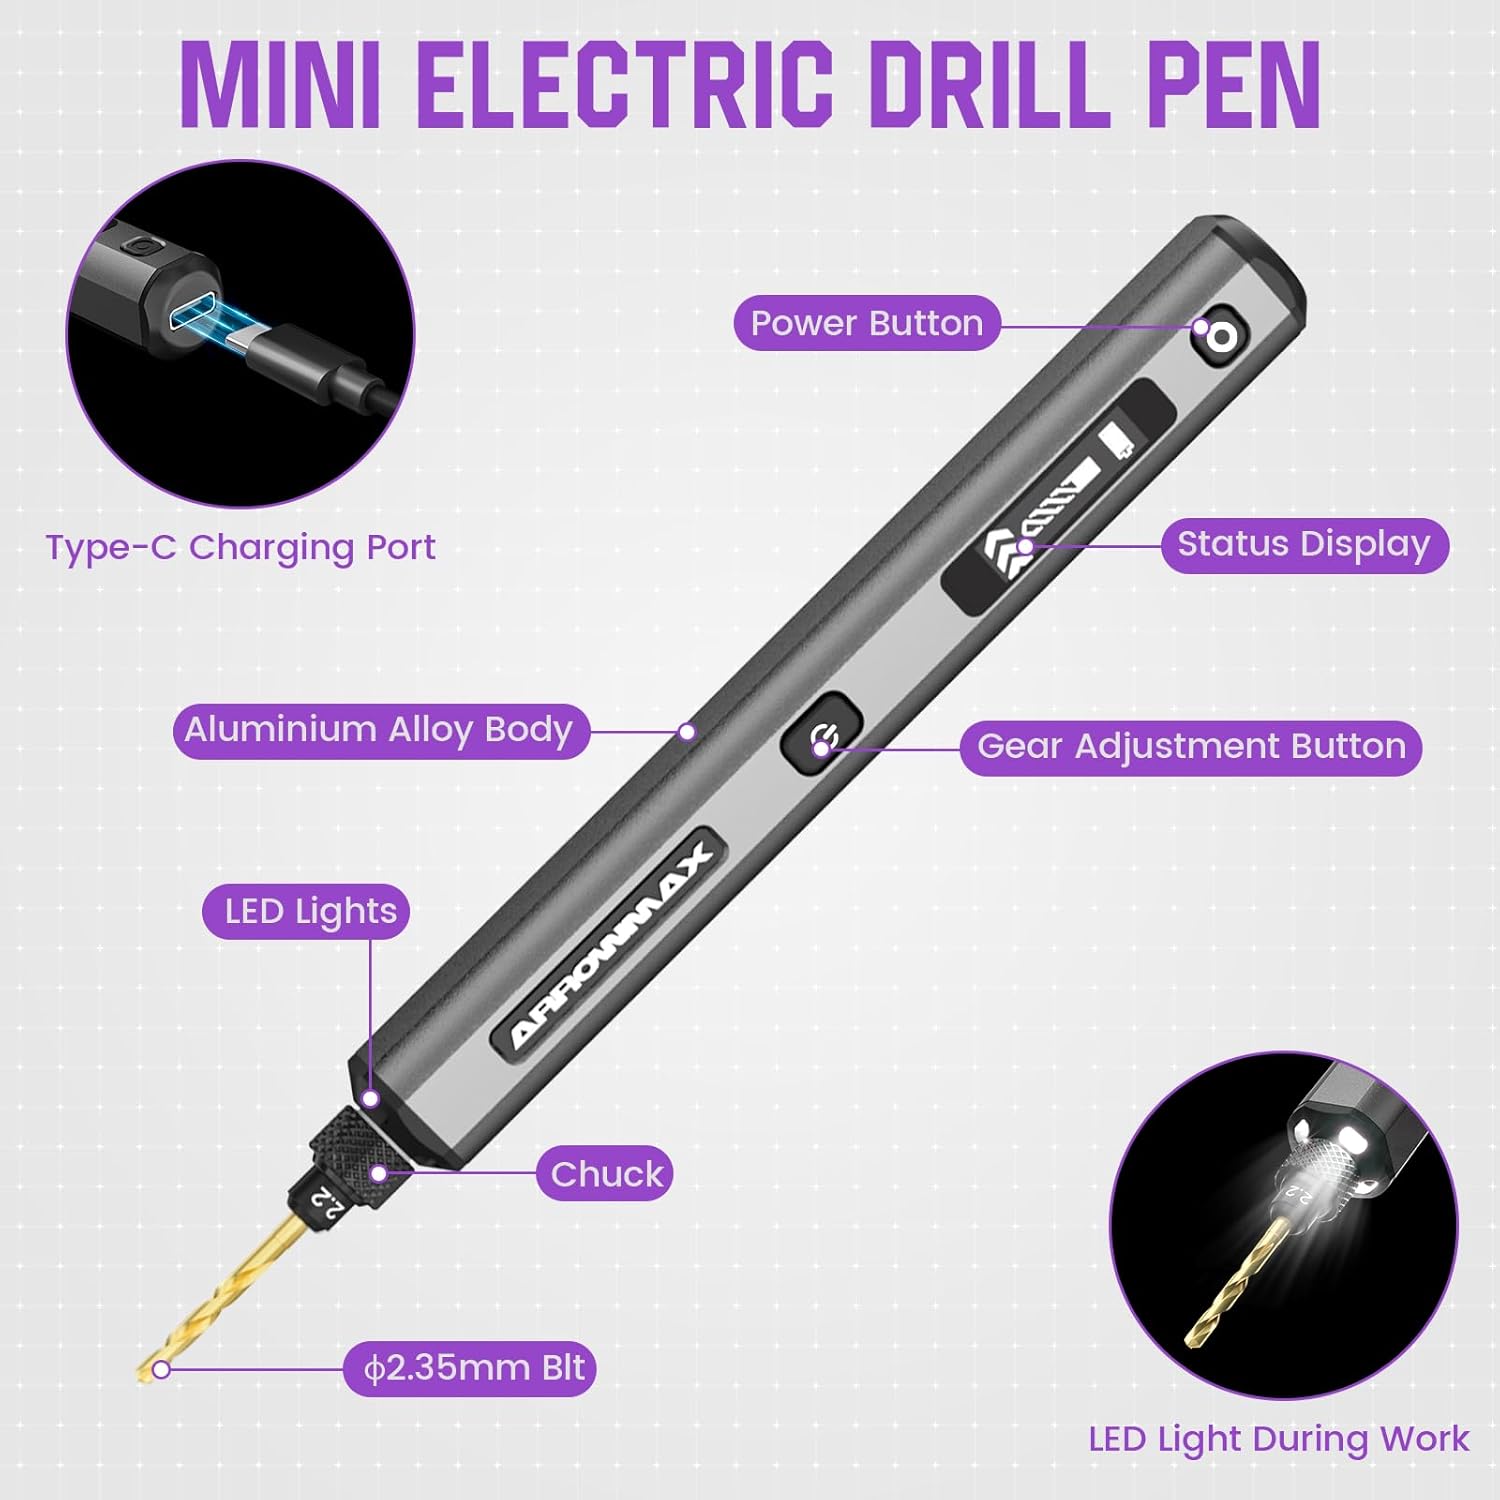
Figure 3.1: Labeled diagram of the Mini Drill Pen components.
Key Features:
- 5-Speed Adjustment: Select speeds from 500 RPM to 900 RPM.
- Integrated LED Lights: Illuminates the work area for improved visibility.
- OLED Display: Shows current speed setting and battery status.
- Aluminium Alloy Body: Durable and lightweight design.
- USB-C Charging: Convenient and fast recharging.

Figure 3.2: Overview of the drill pen's main features.
4. Setup
4.1 Charging the Device
Before first use, fully charge the Mini Drill Pen. Connect the provided USB-C charging cable to the Type-C charging port on the drill pen and plug the other end into a compatible 5V USB power adapter (not included) or a computer USB port. The OLED display will indicate charging status.
4.2 Installing a Drill Bit
- Slowly rotate the three-jaw chuck counter-clockwise to open it.
- Select the desired drill bit from the kit. Ensure the bit's shank (2.35mm) is clean.
- Insert the drill bit into the chuck, ensuring it is seated firmly and centered.
- Turn the chuck clockwise to firmly lock the bit in place. Do not overtighten.
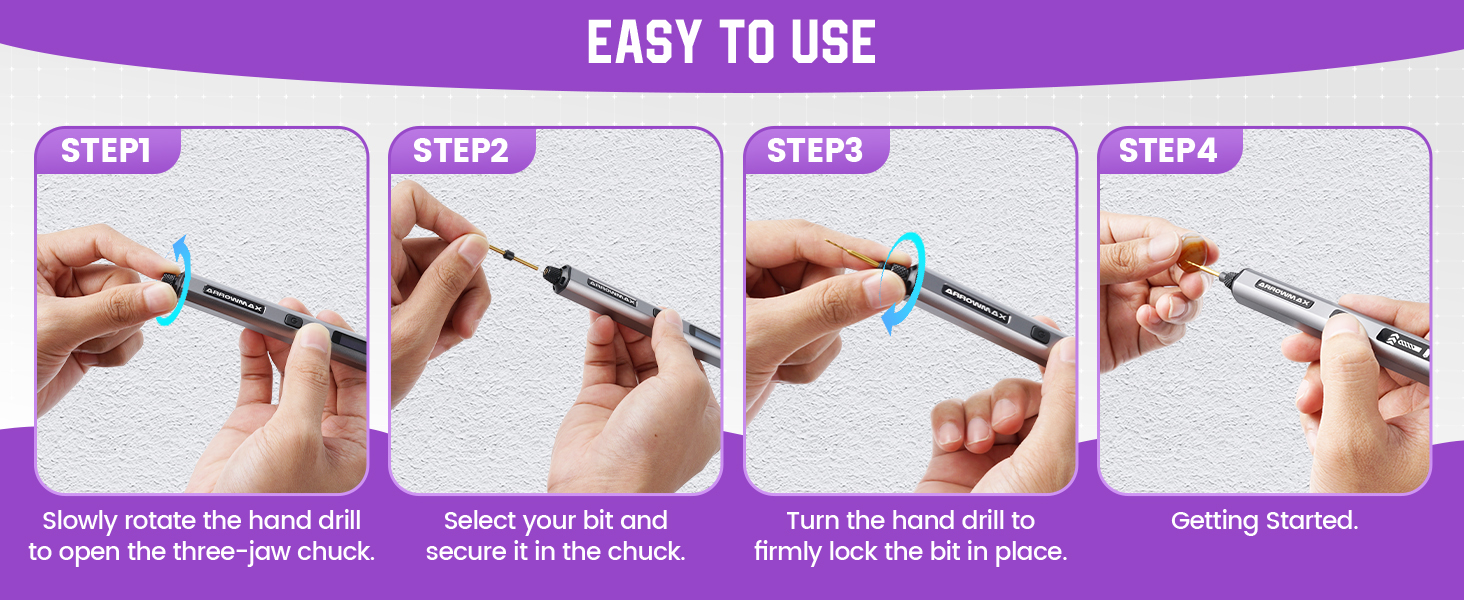
Figure 4.1: Step-by-step guide for drill bit installation.
5. Operating Instructions
5.1 Power On/Off
Press and hold the Power Button (marked with a circle) for approximately 2 seconds to turn the drill pen on or off. The OLED display will illuminate upon activation.
5.2 Adjusting Speed and Rotation Direction
The drill pen offers 5 adjustable speed settings:
- Speed 1: 500 RPM
- Speed 2: 600 RPM
- Speed 3: 700 RPM
- Speed 4: 800 RPM
- Speed 5: 900 RPM
To change the speed, press the Gear Adjustment Button (marked with an arrow icon). Each press cycles through the available speeds. The current speed level will be shown on the OLED display.
To toggle the rotation direction (clockwise/counter-clockwise), double-press the Power Button while the drill is running. The display will indicate the current rotation direction.
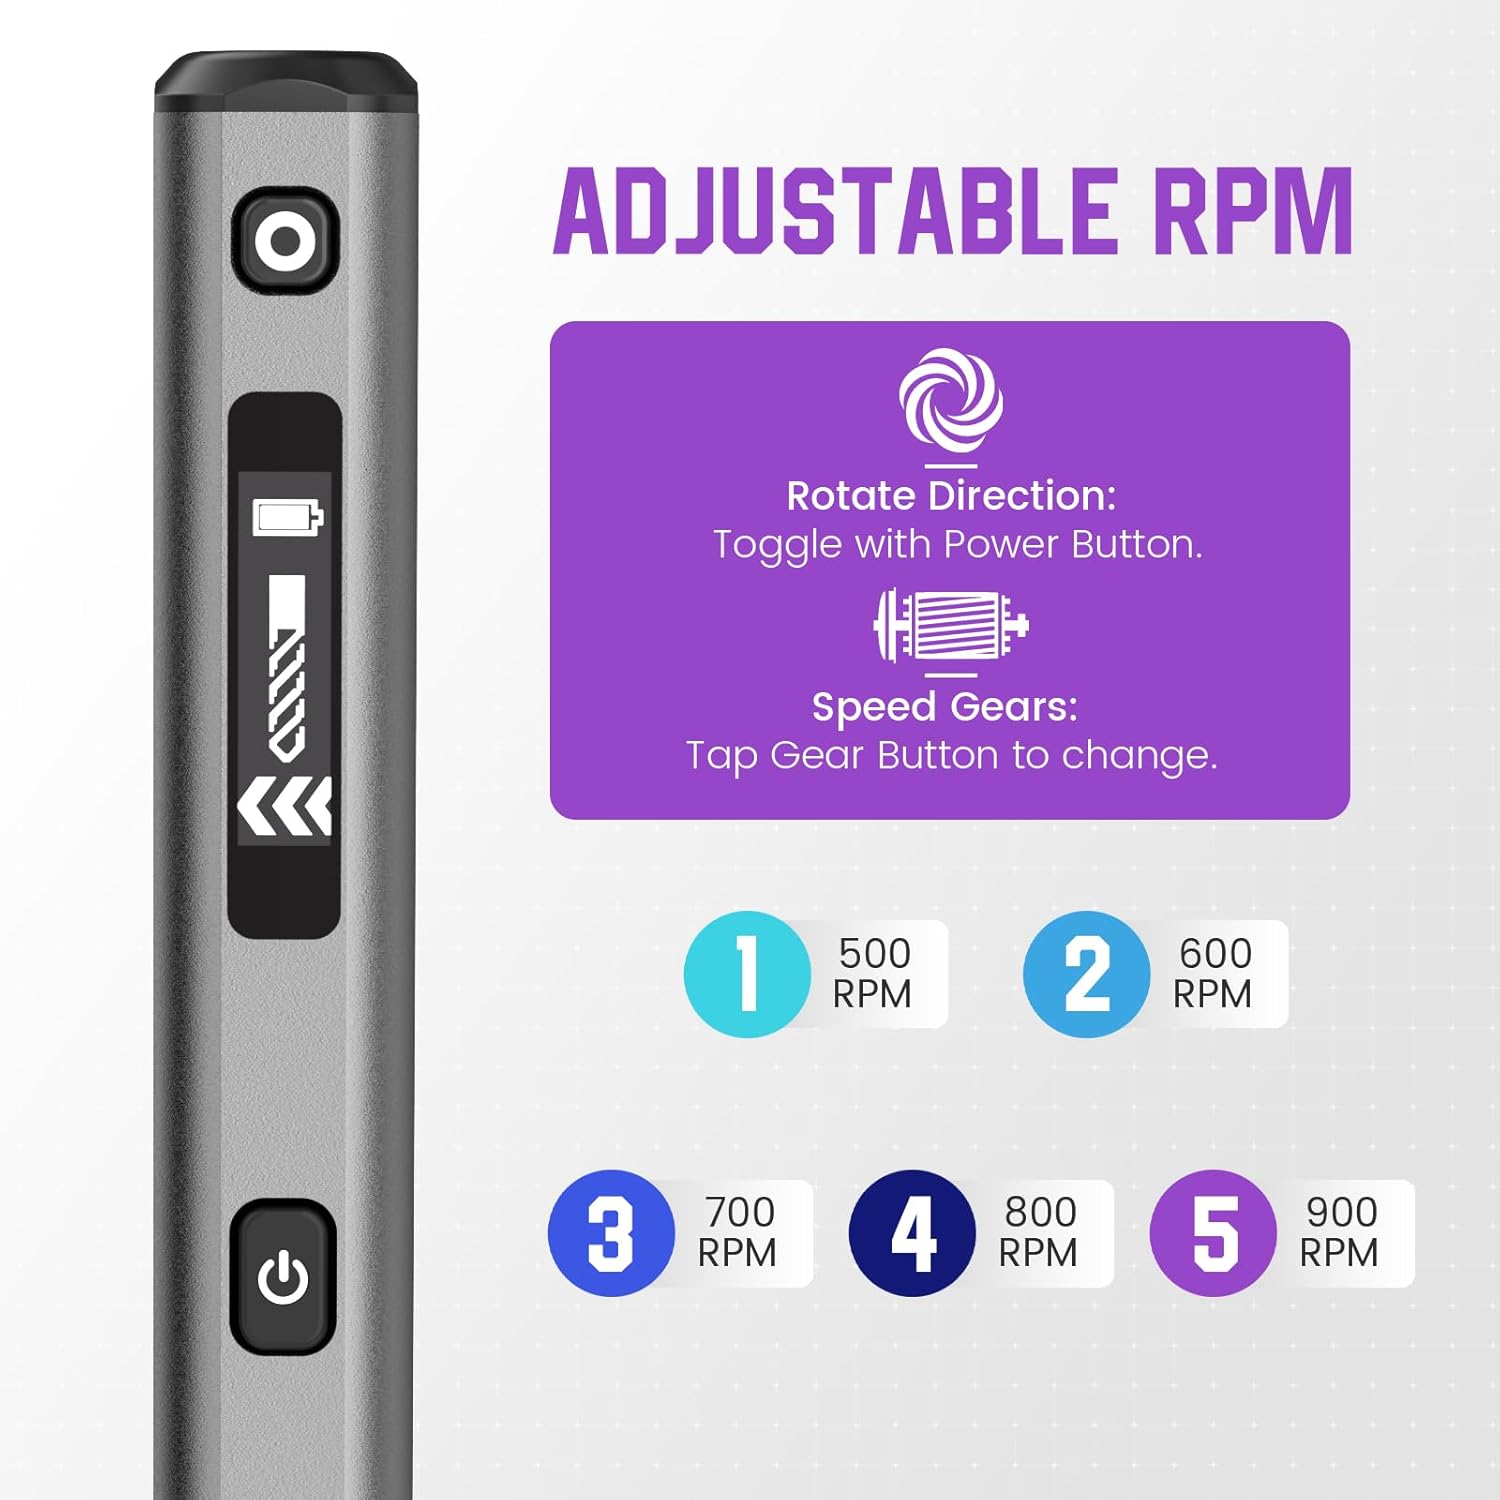
Figure 5.1: Speed adjustment and rotation control.
5.3 Drilling Techniques
Always ensure the workpiece is securely held. Start drilling at a lower speed, especially for delicate materials or when starting a hole. Gradually increase speed as needed. Apply gentle, consistent pressure. Allow the drill bit to do the work. The integrated LED lights will illuminate the drilling point for better accuracy.
5.4 Applicable Materials
The AM ARROWMAX Mini Drill Pen is suitable for precision drilling in various materials, including:
- Plastic
- Wood
- Resin
- Leather
- Shell
- PCB (Printed Circuit Boards)
- Soft metals (e.g., aluminum)
- Stone (soft varieties, with caution)

Figure 5.2: Examples of materials suitable for drilling.
6. Maintenance
6.1 Cleaning
After each use, ensure the drill pen and bits are clean. Use a soft, dry cloth to wipe down the drill pen. Remove any dust or debris from the chuck and drill bits. Do not use harsh chemicals or abrasive cleaners.
6.2 Storage
Store the drill pen and its accessories in the provided magnetic CNC Alloy Storage Box. Keep the device in a cool, dry place, away from direct sunlight and moisture. Ensure the drill pen is turned off before storing.
6.3 Drill Bit Care
The included titanium-coated steel drill bits are durable but can become dull or break with improper use. Replace dull or damaged bits to maintain drilling efficiency and prevent damage to the workpiece or drill pen. Ensure bits are stored securely in the case to prevent loss or damage.
7. Troubleshooting
| Problem | Possible Cause | Solution |
|---|---|---|
| Drill pen does not turn on. | Low battery. | Charge the drill pen using the USB-C cable. |
| Drill pen does not turn on. | Power button not pressed correctly. | Press and hold the Power Button for 2 seconds. |
| Drill bit is loose or wobbles. | Chuck not tightened sufficiently. | Ensure the drill bit is properly inserted and the chuck is firmly tightened. |
| Drill bit breaks easily. | Excessive pressure applied. | Apply gentle, consistent pressure. Let the drill do the work. |
| Drill bit breaks easily. | Incorrect speed for material. | Adjust speed according to the material being drilled. Start with lower speeds. |
| Drill bit breaks easily. | Dull or damaged drill bit. | Replace with a new, sharp drill bit. |
| Drill pen overheats. | Continuous heavy use. | Allow the drill pen to cool down between prolonged uses. |
| Inconsistent rotation or stops. | Internal malfunction. | Contact customer support for assistance. |
8. Specifications
| Feature | Detail |
|---|---|
| Brand | ARROWMAX |
| Model | SDS |
| Power Source | Battery Powered |
| Battery Type | Lithium Polymer |
| Battery Capacity | 500 mAh |
| Charging Port | USB-C |
| Voltage | 5 Volts |
| Amperage | 1.5 Amps |
| Number of Speeds | 5 |
| Maximum Rotational Speed | 900 RPM |
| Drill Bit Shank Size | 2.35 mm (3/32-inch) |
| Included Drill Bits | 10 (0.6mm to 2.2mm) |
| Material | Metal (Aluminium Alloy Body) |
| Product Dimensions (L x W x H) | 7.28" x 2.76" x 1.18" |
| Item Weight | 8.8 ounces |

Figure 8.1: Physical dimensions of the drill pen and included bits.
9. Warranty and Support
For warranty information or technical support, please refer to the contact details provided with your purchase or visit the official ARROWMAX website. Keep your purchase receipt as proof of purchase for any warranty claims.
Related documentsSDS


Ask a question about this manual
Ask about setup, troubleshooting, compatibility, parts, safety, or missing instructions. Manuals+ will review the question and use this page’s manual context to help answer it.