
Andonstar AD266S
Andonstar AD266S Digital Microscope User Manual
Model: AD266S
1. Introduction
This manual provides detailed instructions for the setup, operation, maintenance, and troubleshooting of your Andonstar AD266S Digital Microscope. Please read this manual thoroughly before using the device to ensure proper and safe operation.
The Andonstar AD266S is a versatile digital microscope featuring a 7-inch LCD display, 2160P UHD video recording capabilities, and a magnification range of 20X to 5000X. It includes five interchangeable lenses (A, B, C, M, L) to cater to various observation needs, from full coin views to biological slides and soldering tasks. Its robust metal stand and X-Y moveable stage enhance stability and precision for detailed work.
2. Package Contents
Before proceeding with the setup, please verify that all components listed below are present in your package:
- 7-inch Microscope Monitor
- Lens A (pre-installed on the microscope)
- Lens sets B, C, M
- Lens L
- Base
- Column
- External LED lights
- X-Y Moveable stage
- Backdrop board (3 pieces)
- Remote control
- Power adapter
- HDMI cable
- USB cable
- Power cable
- Biological slides kit
- Tweezers
- Observation box
- 32GB Micro SD card
- User manual

Figure 2.1: Overview of all included components, including the microscope unit, various lenses, stand, cables, remote, and accessories.
3. Setup Instructions
3.1. Assembly of the Microscope Stand
- Place the base on a stable, flat surface.
- Insert the column into the designated slot on the base and secure it firmly.
- Attach the microscope unit to the column, ensuring it is securely mounted.
- If using, attach the X-Y moveable stage to the base.

Figure 3.1: The robust metal stand of the AD266S, designed for enhanced stability during observation and repair tasks.
3.2. Lens Installation and Exchange
The microscope comes with Lens A pre-installed. To change lenses:
- Gently unscrew the currently installed lens from the microscope body.
- Select the desired lens (B, C, M, or L) based on your observation needs.
- Carefully screw the new lens into place until it is secure. Avoid overtightening.

Figure 3.2: Illustration of lens exchange and adjustment points.
3.3. Power Connection
Connect the power adapter to the microscope's power input port and then plug it into a standard electrical outlet. The microscope will power on automatically or can be turned on using the power button.
3.4. Micro SD Card Insertion
Locate the Micro SD card slot on the microscope monitor. Insert the provided 32GB Micro SD card into the slot until it clicks into place. This card is essential for saving photos and videos.
4. Operating Instructions
4.1. Basic Controls and Interface
The 7-inch LCD monitor features intuitive controls for easy operation.
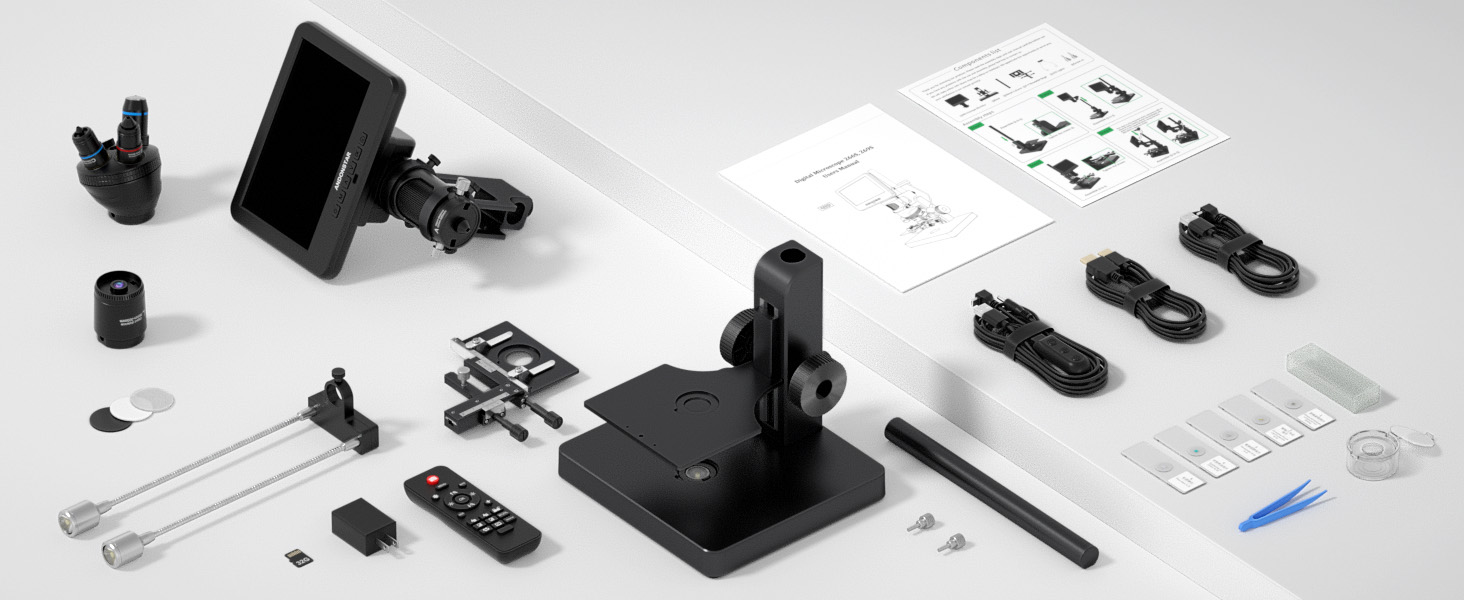
Figure 4.1: Front panel controls and rear ports of the microscope monitor.
- Power On/Off: Press to turn the device on or off.
- Mode/Menu: Press to switch between modes (e.g., video, photo, playback) or access the menu settings.
- Up/Down/Digital Zoom: Navigate menu options or adjust digital zoom levels.
- OK/Start Recording: Confirm selections or start/stop video recording.
- Take Pictures: Capture still images.
- Remote Signal Receiver: For use with the included remote control.
- Focusing Tube: Rotate to adjust focus.
- Lens Fixing Screws: Secure the lens in place.
- SD Card Slot: Insert Micro SD card for storage.
- USB Port: For PC connection.
- HDMI Port: For external monitor connection.
- Reset: Reset the device to factory settings.
4.2. Focusing and Working Distance Adjustment
To achieve a clear image, rotate the focusing wheel on the microscope body. For optimal clarity and magnification, adjust the object distance by rotating the bracket knob on the stand. Different lenses require different working distances.
4.3. Adjusting Lighting
The microscope features versatile lighting options:
- External LED Lights: Ideal for lenses A and L, suitable for observing larger objects like coins or for soldering tasks. These lights are adjustable for brightness.
- Bottom Lights: Designed for high-magnification lens sets B, C, and M, perfect for examining biological slides.

Figure 4.2: Lighting options for various observation scenarios.
4.4. Using Different Lenses
The AD266S comes with five specialized lenses, each designed for specific applications and magnification ranges:
- Lens A (4.5-180x on screen, 18-720x on 28-inch HDMI): Best for full views of coins, plants, stones, and other larger objects.
- Lens B (390-510x on screen, 1560-2040x on 28-inch HDMI): For biological slides.
- Lens C (690-1020x on screen, 2760-4080x on 28-inch HDMI): For biological slides.
- Lens M (3600-5100x on screen): For biological slides, offering the highest magnification.
- Lens L (15-60x on screen, 60-240x on 28-inch HDMI): Ideal for soldering and repairing circuit boards.

Figure 4.3: Overview of the 5 interchangeable lenses and their uses.
4.5. X-Y Moveable Stage Operation
The X-Y moveable stage allows for precise positioning of your specimen under the lens. Use the knobs on the side of the stage to move the specimen along the X-axis (left-right) and Y-axis (forward-backward) for detailed observation.

Figure 4.4: Operating the X-Y moveable stage for precise specimen positioning.
4.6. Connecting to an HDMI Monitor
For a larger viewing experience, connect the microscope to an external HDMI monitor using the provided HDMI cable. The microscope supports UHD 2160P video output, providing clear and detailed images on compatible displays.

Figure 4.5: HDMI and PC output capabilities of the microscope.
4.7. Connecting to a PC and Using Software
To utilize the professional measurement software and view images on your Windows PC, follow these steps:
- Download and install the "Microscope Measure" software from the official Andonstar website or as instructed in the included user manual.
- Connect the microscope to your computer using the provided USB cable (ensure it's the data transfer cable, not just for power).
- On the microscope screen, a mode box will pop up. Press the down and OK buttons to select 'PC Camera'.
- Open the Microscope Measure software on your PC, select 'Device', and then choose 'USB Camera' to display the image.

Figure 4.6: Steps for PC connection and software usage.
4.8. Taking Photos and Videos
With the Micro SD card inserted, you can capture images and record videos directly from the microscope. Use the dedicated 'Take Pictures' button for photos and the 'OK/Start Recording' button for videos. Files will be saved to the SD card.
4.9. Remote Control Usage
The included remote control allows for convenient operation from a distance. Functions such as image discoloration and digital zoom can be controlled remotely, which is particularly useful for educational demonstrations or when precise adjustments are needed without touching the microscope.
5. Maintenance
5.1. Cleaning the Lenses and Screen
To maintain optimal image clarity, regularly clean the lenses and the LCD screen. Use a soft, lint-free cloth specifically designed for optical surfaces. For stubborn smudges, a small amount of lens cleaning solution can be applied to the cloth (not directly to the lens/screen).
5.2. Storage
When not in use, store the microscope in a clean, dry, and dust-free environment. It is recommended to cover the microscope with a dust cover or return it to its original packaging to protect it from dust and potential damage.
6. Troubleshooting
This section addresses common issues you might encounter with your Andonstar AD266S Digital Microscope.
- No Power:
- Ensure the power adapter is securely connected to both the microscope and a working electrical outlet.
- Verify the power button is pressed.
- No Image on Screen:
- Check if the lens is properly installed and secured.
- Adjust the focusing wheel and working distance.
- Ensure adequate lighting is provided by adjusting the external or bottom LED lights.
- Blurry Image:
- Fine-tune the focus using the focusing wheel.
- Adjust the working distance between the lens and the object.
- Clean the lens surface if smudges or dust are present.
- Cannot Save Photos/Videos:
- Ensure the Micro SD card is correctly inserted and not full.
- Check if the SD card is locked (read-only mode).
- Try formatting the SD card (this will erase all data, so back up important files first).
- No Image on External Monitor (HDMI):
- Verify the HDMI cable is securely connected to both the microscope and the monitor.
- Ensure the external monitor is set to the correct HDMI input source.
- PC Software Not Detecting Microscope:
- Ensure the correct USB cable is used for data transfer.
- Verify 'PC Camera' mode is selected on the microscope screen.
- Reinstall the 'Microscope Measure' software.
7. Specifications
| Feature | Specification |
|---|---|
| Model Name | AD266S |
| Item Model Number | AD266S-US |
| Product Dimensions | 7.9 x 7.5 x 16 inches (7.9"L x 7.5"W x 16"H) |
| Item Weight | 7.48 pounds (3.4 Kilograms) |
| Display | 7-inch IPS LCD Monitor |
| Video Resolution | 2160P UHD |
| Photo Resolution | 24MP |
| Magnification Range | 20X-5000X (Digital Magnification) |
| Lenses Included | 5 (Lens A, B, C, M, L) |
| Stand Material | Metal |
| Light Source Type | LED (External and Bottom Lights) |
| Output Interfaces | HDMI, USB (for PC connection) |
| Storage | Micro SD card (up to 32GB included) |
| Manufacturer | ShenZhen Andonstar Technology Co., Ltd |
8. Warranty and Support
Andonstar is committed to providing high-quality products and excellent customer service. While specific warranty details may vary by region or retailer, we offer professional after-sales support to assist you with any questions or issues you may encounter.
For technical assistance, troubleshooting, or inquiries regarding your Andonstar AD266S Digital Microscope, please contact our customer support team. We aim to provide 24-hour professional after-sales service to ensure your satisfaction.
Please retain your purchase receipt as proof of purchase for any warranty claims or support requests.
Related documentsAD266S


Ask a question about this manual
Ask about setup, troubleshooting, compatibility, parts, safety, or missing instructions. Manuals+ will review the question and use this page’s manual context to help answer it.