
1. Introduction
This manual provides comprehensive instructions for the installation, operation, and maintenance of your TouchWo 15.6-inch Android 12 Industrial Embedded Interactive Touchscreen Monitor. Designed for robust industrial applications, this capacitive multi-touch tablet offers high performance and durability. Please read this manual thoroughly before using the product to ensure proper function and longevity.
2. Product Overview
Key Features
- 10 Points Touch Screen Monitor: The screen supports multi-finger touch for zooming and other gestures, requiring no driver installation. It also works with gloves and allows brightness adjustment.
- Rich Application Software & Interface: Runs on Android 12 OS with an RK3588 processor, 8GB RAM, and 128GB ROM. Pre-installed with Play Store. Features TF card slot, RJ45, Phoenix2Pin, USB, HD-MI, and audio ports. Powered by DC 12V or AC 110-240V.
- Fanless and Silent Design: Engineered for silent operation without the need for external cooling. The aluminum alloy back shell maximizes heat dissipation.
- Stable Performance: Designed for embedded installation with VESA standard mounting holes. Ideal for high-traffic industrial environments such as cabinets, CNC tools, and control consoles.
- Quality Assurance & After-Sales Service: FCC, CE, RoHS certified, and manufactured under ISO9001 quality management. 24/7 online customer support is available.
Visuals and Connectivity

This image highlights the 10-point capacitive multi-touch screen, demonstrating its responsiveness even with gloved hands. It also emphasizes the HD display and IP65 front panel rating for water and dust resistance.

The rear view of the monitor showcasing its fanless design and aluminum alloy casing, which is engineered for efficient heat dissipation and silent operation.

A detailed view of the monitor's rich interface options, including Power Terminal Connector, DC12V input, LAN, USB ports, TF card slot, HDMI, Audio, and WiFi antenna connections, ensuring wide compatibility for various industrial needs.

This image illustrates the diverse applications of the TouchWo industrial monitor, including industrial automation equipment, machine consoles, self-service terminals, and CNC control tools.
Product Introduction Video
This video provides a general introduction to the TouchWo DM Series Touchscreen Products, highlighting their design, features, and potential applications in various industrial settings.
Water and Dust Resistance Demonstration
Watch this video to see a demonstration of the front screen's IP67 water and dust resistance, showcasing its durability in challenging environments. Note that the backshell may require customization for specific needs.
3. Setup and Installation
What's in the Box
- 1 x Touchscreen Tablet
- 1 x Power Adapter, Power Line 1.5m
- 1 x Product Manual (this document)
- 4 x Embedded snap
Physical Installation (Embedded)
The TouchWo monitor is designed for easy embedded installation. It features VESA standard mounting holes on the back for flexible integration into various setups.
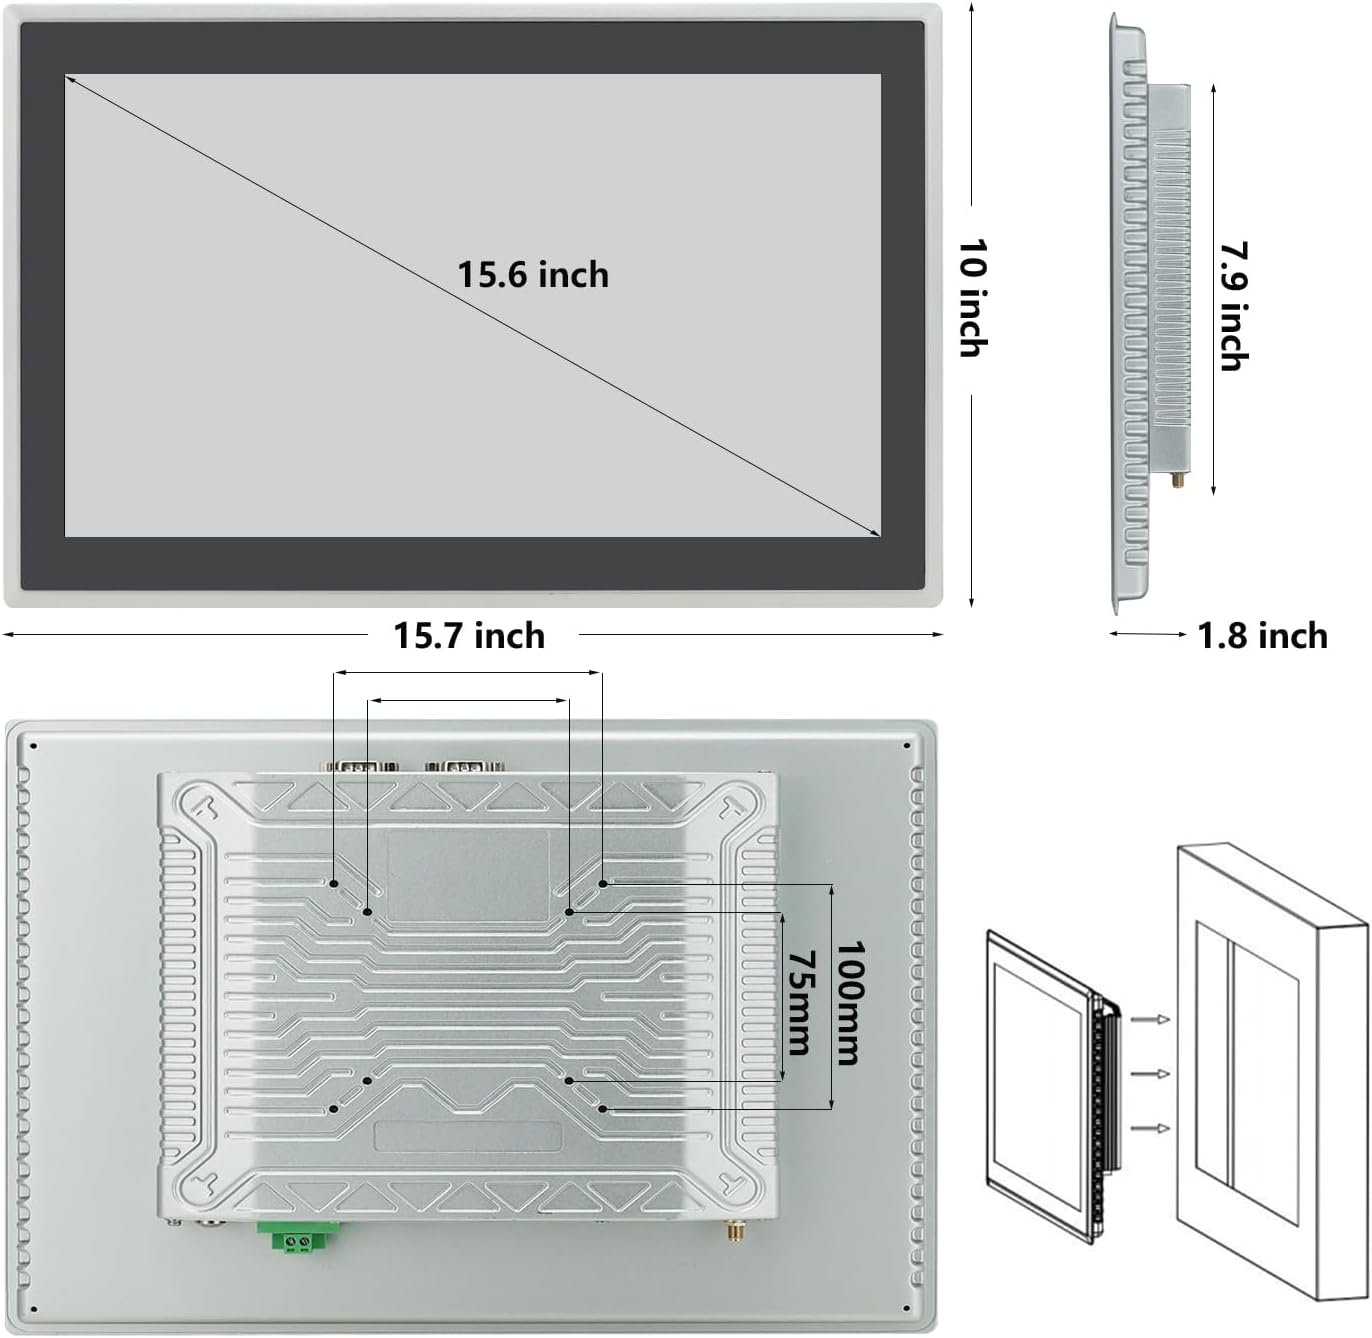
This diagram illustrates the product dimensions and the VESA mounting pattern on the rear of the monitor, providing necessary measurements for cabinet integration.
Embedded Installation Tutorial
This video provides a detailed step-by-step guide for embedding the TouchWo DMF Series monitor into a cabinet or panel, ensuring a secure and flush fit.
- Prepare Tools: You will only need a screwdriver for the installation.
- Unpack Accessories: Locate the clamp plates, long screws, and short screws from the accessory pack.
- Insert Monitor: Gently push the monitor from the outside of the cabinet opening into its designated slot.
- Attach Clamp Plates (Short Screws): Place a short screw into the hole of a clamp plate (the side without threads).
- Secure Clamp Plates (Short Screws): Use the screwdriver to screw the short screw into the installation hole of the machine, ensuring the clamp plate is secure against the cabinet.
- Attach Clamp Plates (Long Screws): Place a long screw into another hole on the clamp plate.
- Tighten Clamp Plates (Long Screws): Fix its position and then tighten it with the screwdriver.
- Repeat for All Sides: Apply the same installation method to the other three holes/sides of the monitor.
- Final Check: After installation, verify that all screws are securely tightened to ensure the monitor is firmly in place. The panel and cabinet should fit perfectly, making it waterproof, dustproof, and easy to clean.
4. Operation
Powering On/Off
- To Power On: Connect the provided power adapter to the DC 12V input or the Phoenix2Pin connector. The device will typically power on automatically or can be turned on via a dedicated power button if present.
- To Power Off: Access the Android system's power options (usually by holding the power button or through the system settings) and select 'Shut down' or 'Power off'. Avoid direct power disconnection during operation to prevent data corruption.
Basic Android 12 Navigation
- Touch Gestures: The 10-point capacitive touch screen supports standard Android gestures including tap, double-tap, pinch-to-zoom, swipe, and drag-and-drop.
- Home Screen: Navigate through applications and widgets. Customize by long-pressing on empty space.
- App Drawer: Swipe up from the home screen to access all installed applications.
- Notifications & Quick Settings: Swipe down from the top of the screen to view notifications and access quick settings toggles (Wi-Fi, Bluetooth, Brightness, etc.).
- Settings: Access the full system settings menu to configure network, display, sound, storage, security, and other device options.
Connecting Peripherals
- USB Devices: Connect USB keyboards, mice, or storage devices to the available USB ports.
- Network: Use the RJ45 port for wired Ethernet connection or connect to a Wi-Fi network via system settings.
- External Display: Connect an external monitor via the HD-MI port for extended display options.
- Audio: Use the audio output port for external speakers or headphones.
5. Maintenance
Cleaning the Monitor
- Always power off and unplug the monitor before cleaning.
- Use a soft, lint-free cloth slightly dampened with water or a non-abrasive screen cleaner.
- Do not spray liquid directly onto the screen or into any openings.
- Avoid using harsh chemicals, abrasive cleaners, or solvents.
General Care
- Ensure proper ventilation around the device, especially if not fully embedded, to maintain optimal operating temperature.
- Protect the screen from sharp objects to prevent scratches.
- Regularly check cable connections to ensure they are secure.
- Perform periodic software updates as recommended by the manufacturer to ensure system stability and security.
6. Troubleshooting
Common Issues and Solutions
- No Power:
- Check if the power adapter is securely connected to both the monitor and the power outlet.
- Verify the power outlet is functional.
- Ensure the power adapter is the correct voltage (DC 12V).
- Screen Not Responding to Touch:
- Ensure the screen is clean and free of debris.
- Restart the device.
- If using gloves, ensure they are compatible with capacitive touchscreens.
- No Display:
- Check power connection.
- Ensure the monitor is powered on.
- If connected to an external display, ensure the correct input source is selected on the external display.
- System Slow or Unresponsive:
- Close unnecessary applications running in the background.
- Clear cache and temporary files.
- Restart the device.
- Ensure sufficient storage space is available (128GB ROM).
For persistent issues not covered here, please refer to the warranty and support section for assistance.
7. Technical Specifications
| Feature | Specification |
|---|---|
| Model Number | DM156NFAB |
| Screen Size | 15.6 Inches |
| Display Resolution | 1920 x 1080 Pixels |
| Aspect Ratio | 16:9 |
| Operating System | Android 12 OS |
| Processor | RK3588 |
| RAM | 8GB |
| ROM | 128GB |
| Touch Technology | 10-Point Capacitive Multi-Touch |
| Front Panel Rating | IP65 (Water & Dust Resistant) |
| Connectivity | WiFi, Bluetooth, RJ45, USB, HD-MI-Out, Audio Ports, TF Card Slot |
| Power Input | DC 12V, AC 110-240V |
| Product Dimensions | 1.8 x 15.7 x 10 inches |
| Item Weight | 9.9 pounds (4.5 Kilograms) |
| Color | Black |
| Manufacturer | Guangzhou Touchwo Electronics Co., Ltd |
| Country of Origin | China |
8. Warranty and Support
The TouchWo 15.6-inch Android 12 Industrial Embedded Interactive Touchscreen Monitor is FCC, CE, and RoHS certified, ensuring compliance with relevant safety and environmental standards. The manufacturing facility holds ISO9001 quality management certification, reflecting a commitment to high-quality production processes.
For any inquiries, technical assistance, or support needs, TouchWo offers 24/7 online customer support. Please refer to the contact information provided on the product packaging or the official TouchWo website for direct assistance.