
1. Introduction
Thank you for choosing the JULIAQUA Aquarium Heater. This device is designed to maintain a stable and optimal temperature for your aquatic environment, suitable for both freshwater and saltwater aquariums. Please read this manual thoroughly before installation and operation to ensure safe and efficient use.
2. Important Safety Instructions
- Always ensure the heater is fully submerged in water before connecting it to a power source. Operating the heater out of water can cause damage to the unit and pose a fire hazard.
- Disconnect the power supply to the heater and all other aquarium equipment before performing any maintenance, water changes, or handling the heater.
- Allow the heater to cool down for at least 15-20 minutes after disconnecting power before removing it from the water.
- The controller unit is not waterproof. Keep it dry and away from water splashes.
- Regularly inspect the power cord and heater for any signs of damage. Do not use if damaged.
- This heater is designed for indoor use only, within an aquarium.
- Keep out of reach of children.
- Ensure the voltage and frequency of your power supply match the specifications of the heater (AC220-240V 50-60Hz).
3. Product Overview and Components
The JULIAQUA Aquarium Heater consists of a heating element, a protective honeycomb case, suction cups for mounting, and an external temperature controller with a digital display.

Image: Insulated and encapsulated heating element, safe for both fresh and seawater use.

Image: The heater features a removable honeycomb protective case for safety and high temperature resistance, along with strong suction cups for secure placement.
The external controller allows for easy temperature adjustment and displays both the current water temperature and the target temperature.
4. Specifications
Refer to the table below for detailed specifications of various JULIAQUA Aquarium Heater models:

Image: This table provides a comparison of different JULIAQUA heater models, including their power (W), physical size (cm), cable length (m), adjustable temperature range (18-35°C), and recommended aquarium water volume (L). For example, the E500 model is 500W, measures 31x4x3cm, has a 1.8m cable, and is suitable for up to 400L aquariums.
| Model | Power | Size (L x W x H) | Cable Length | Temperature Range | Recommended Water Volume |
|---|---|---|---|---|---|
| E50 | 50W | 21x4x3cm | 1.3m | 18~35°C | 30L |
| E100 | 100W | 21x4x3cm | 1.3m | 18~35°C | 70L |
| E200 | 200W | 21x4x3cm | 1.3m | 18~35°C | 150L |
| E300 | 300W | 26x4x3cm | 1.8m | 18~35°C | 250L |
| E500 | 500W | 31x4x3cm | 1.8m | 18~35°C | 400L |
Note: If the desired temperature is significantly higher (e.g., ten degrees Celsius) than the ambient room temperature, it is recommended to choose a heater with a higher wattage to ensure efficient heating.
5. Setup and Installation
- Unpack and Inspect: Carefully remove the heater from its packaging. Inspect the heater and power cord for any visible damage. Do not proceed with installation if any damage is found.
- Attach Suction Cups: Securely attach the provided suction cups to the heater body.
- Placement in Aquarium:
- Mount the heater vertically or horizontally on the inside wall of your aquarium using the suction cups.
- Ensure the heater is placed in an area with good water circulation for accurate temperature readings and even heat distribution. Placing it near the water outlet of a filter is ideal.
- The heater must be fully submerged in water at all times during operation. Refer to the image below for correct placement.

Image: Illustrations demonstrating correct (fully submerged, both vertically and horizontally) and incorrect (partially submerged) placement of the aquarium heater. The heater must always be completely underwater.
- Position Controller: Place the external temperature controller in a dry location, away from water splashes. Remember, the controller is not waterproof.
- Connect to Power: Once the heater is fully submerged and the controller is in a safe location, plug the power cord into a suitable electrical outlet.
6. Operating Instructions
The JULIAQUA Aquarium Heater features an easy-to-use external controller for temperature adjustment and monitoring.

Image: The digital display on the controller shows the current water temperature (top number) and the target temperature (bottom number). Indicator lights show when the heater is actively heating.
- Power On: After plugging in, the display will light up, showing the current water temperature and the default target temperature.
- Adjusting Temperature:
- Press the Up (▲) or Down (▼) button on the controller to adjust the target temperature.
- The target temperature can be set within the range of 18°C to 35°C.
- The display will show the target temperature as you adjust it, then revert to showing the current water temperature after a few seconds.
- Automatic Operation: The heater will automatically turn on when the water temperature falls below the set target temperature and turn off once the target temperature is reached. This automatic function helps save energy.
- Monitoring: The digital display continuously shows the current water temperature. An indicator will show when the heater is actively heating.
7. Troubleshooting
If you encounter any issues with your JULIAQUA Aquarium Heater, refer to the following guide:
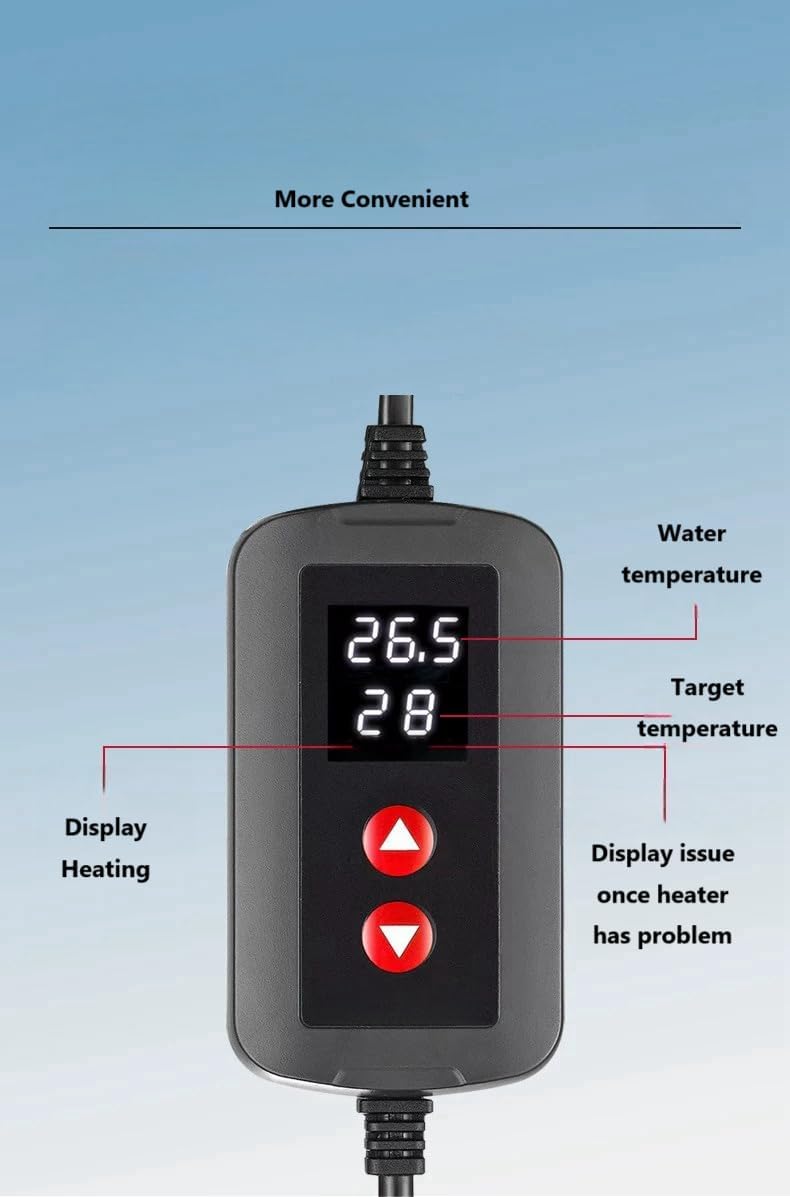
Image: This diagram illustrates common error codes displayed on the controller and their corresponding problems and solutions.
| Display | Problem | Solution |
|---|---|---|
| E1 | Heater is out of water. | Ensure the heater is fully submerged in water. If the water level is low, add water to the aquarium. |
| E2 | Heater malfunction. | Disconnect power, wait a few minutes, then reconnect. If the error persists, contact vendor support. |
| Heating But Not Accuracy | Too much water/water not circulating, or ambient temperature is too cold. |
|
For any issues not listed here, or if solutions do not resolve the problem, please contact JULIAQUA customer support.
8. Maintenance
- Cleaning: Periodically clean the heater surface to remove algae or mineral deposits. Always unplug the heater and allow it to cool completely before removing it from the water for cleaning. Use a soft brush or cloth and aquarium-safe cleaning solutions if necessary.
- Protective Case: The honeycomb protective case is removable for easier cleaning. Ensure it is securely reattached before placing the heater back into the aquarium.
- Inspection: Regularly check the heater and power cord for any signs of wear, cracks, or damage. Replace the unit if any damage is observed.
9. Warranty and Support
The JULIAQUA Aquarium Heater comes with a one-year warranty from the date of purchase. This warranty covers manufacturing defects and malfunctions under normal use.
If you experience any problems or have suggestions regarding your product, please do not hesitate to contact JULIAQUA customer support. Please have your purchase information and model number ready when contacting support.
Before contacting support, please ensure you have followed all installation and operating instructions in this manual.