
1. Introduction and Overview
The BIGTREETECH Eddy Coil V1.0 is a non-contact, high-speed automatic bed leveling sensor designed specifically for Klipper-based 3D printers. It utilizes millisecond-level eddy current scanning to precisely identify microscopic defects on the print bed, enabling automatic height adjustments for fast and accurate leveling. This sensor is engineered for efficiency and precision, making it an ideal upgrade for compatible 3D printing systems.
Key Features:
- Klipper Compatibility: Designed exclusively for use with Klipper firmware.
- I2C Interface: Requires tool boards with I2C interfaces, such as the BTT EBB36/42 CAN.
- Rapid Leveling: Achieves bed leveling in under 20 seconds for a 250x250mm print bed.
- Lightweight and Compact: Weighs only 6g, minimizing vibration effects.
- High Precision: Offers a leveling precision of 0.0005mm.
- Anti-Deception Design: Features a custom shell with a limited height setting to prevent metallic parts on the coil from affecting leveling accuracy.
- Wide Application: Compatible with Voron 2.4, Stealthburner, Trident, BIQU Hurakan, VzBOT, and other 3D printers.
Important Note: The Eddy Coil V1.0 does not have thermal compensation and is not suitable for Z-axis homing. It is primarily used in conjunction with existing 3D printer Z-axis feedback devices (e.g., endstop switches, micro-probes, BLTouch sensors) to provide a fast bed scanning function.

Image 1.1: Overview of the Eddy Coil V1.0's speed and precision capabilities.
2. What's in the Box
Please verify that all components listed below are included in your package:
- Eddy Coil V1.0 Sensor (x1)
- 150mm 4-Pin Dupont Female Connection Cable (x1) - Can be directly connected to EBB36/42 CAN.
- Cable Ties (x5)
- Mounting Screws M3*18 (x2)
- Special Voron Mounting Screws M3*25 (x2)
- Stickers (x3)
- BTT Duck (x1)

Image 2.1: All items included in the Eddy Coil V1.0 package.
3. Setup and Installation
The BIGTREETECH Eddy Coil V1.0 requires careful installation and configuration within your Klipper environment. Ensure your 3D printer is powered off before beginning any installation steps.
3.1 Compatibility Requirements
- Firmware: Klipper is mandatory. The Eddy Coil V1.0 will not function with other firmware.
- Tool Board: An I2C-enabled tool board such as the BTT EBB36 CAN or BTT EBB42 CAN is required. The provided cable is designed for direct connection to these boards.
- Print Surface: The sensor must operate on a metallic spring steel plate. It is not compatible with circular magnetic bed schemes (e.g., some Prusa models) due to potential interference from independent magnets. Uniform soft magnets (e.g., PEI steel plate + soft magnet solutions) are generally compatible.
3.2 Wiring Instructions
Connect the Eddy Coil V1.0 to your BTT EBB36 CAN or EBB42 CAN tool board using the provided 4-pin Dupont female connection cable. Ensure correct pin alignment:
- SDA (PB4)
- SCL (PB3)
- GND
- 5V

Image 3.1: Simple wiring diagram for Eddy Coil V1.0 with EBB36/42 CAN boards.
3.3 Physical Installation
The Eddy Coil V1.0 is designed for effortless installation. Its custom-designed shell neutralizes external metallic interference, providing a predefined clearance zone for the coil. This ensures simple, measurement-free installation, enhancing both ease of use and precision.
The sensor can be easily mounted to various hotend setups. For Voron Stealthburner, it can be fixed to the TL-Q5MC / PL-08N slot. It is also compatible with H2 series extruders and can be integrated into Ender-3 style setups.
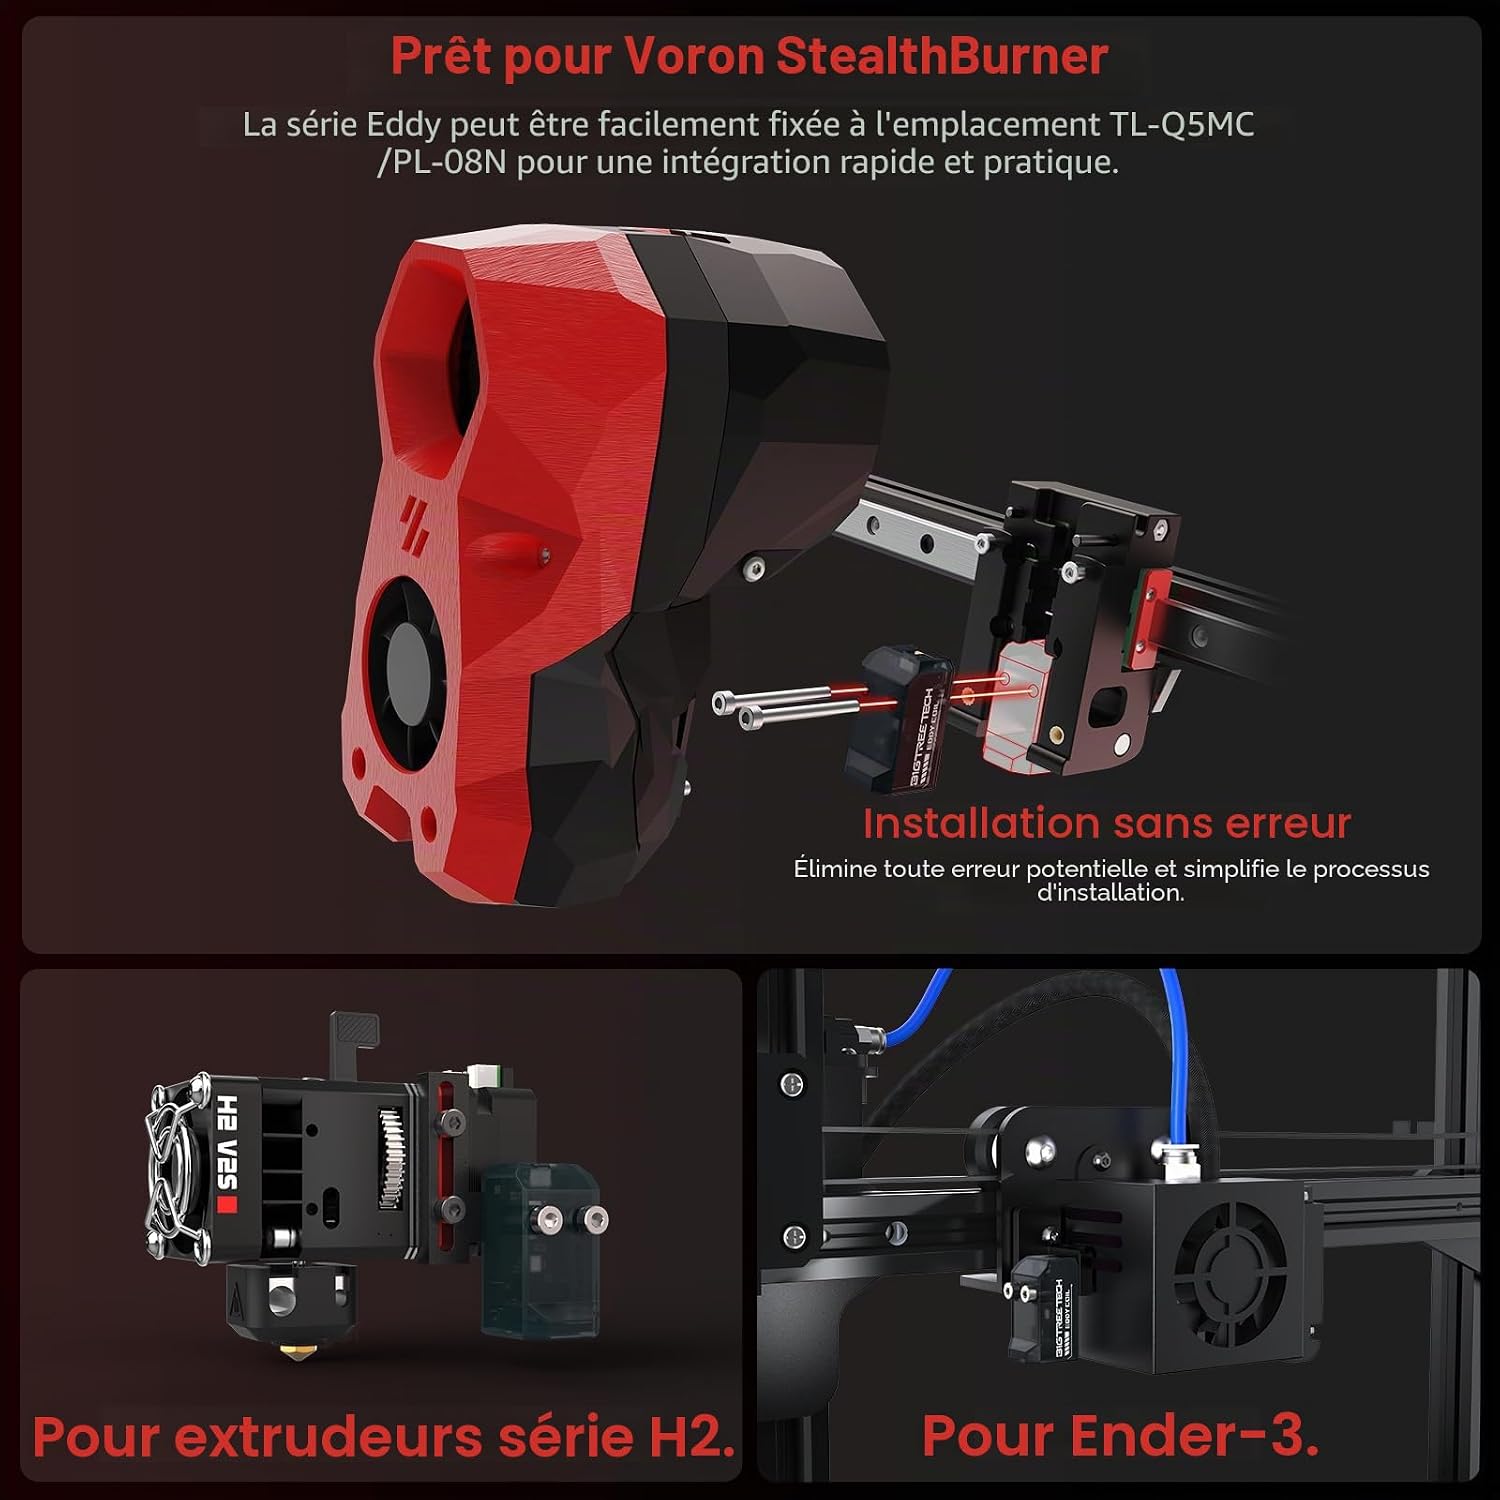
Image 3.2: Installation examples for various 3D printer hotends.

Image 3.3: Wide application compatibility with various 3D printer models.
3.4 Klipper Configuration
After physical installation and wiring, you must configure Klipper to recognize and utilize the Eddy Coil V1.0. Refer to the official BIGTREETECH documentation or Klipper community resources for detailed configuration steps, including setting up the I2C communication and defining the probe in your printer.cfg file. Proper calibration of sensitivity is crucial for accurate measurements.
4. Operating Instructions
The Eddy Coil V1.0 functions as a high-speed bed scanning tool, significantly reducing the time required for bed mesh generation.
4.1 Bed Leveling Process
Once configured in Klipper, the Eddy Coil V1.0 will perform rapid bed mesh probing. This process involves the sensor quickly scanning the print surface at multiple points to create a detailed map of its irregularities. Klipper then uses this mesh data to compensate for any unevenness during printing, ensuring a perfect first layer.

Image 4.1: Speed comparison between Eddy Coil and traditional leveling sensors.
4.2 Integration with Z-Axis Homing
As the Eddy Coil V1.0 does not provide thermal compensation and is not intended for Z-axis homing, it must be used in conjunction with an existing Z-axis homing device. This could be an endstop switch, a micro-probe, or another BLTouch-style sensor. The Eddy Coil's role is to provide the fast bed scanning functionality, complementing your printer's primary Z-homing mechanism.
5. Maintenance
To ensure the longevity and consistent performance of your BIGTREETECH Eddy Coil V1.0, follow these general maintenance guidelines:
- Keep Clean: Periodically inspect the sensor for any dust, debris, or filament residue. Gently clean with a soft, dry cloth. Avoid using liquids or abrasive materials.
- Check Connections: Ensure all wiring connections remain secure and free from damage. Loose connections can lead to intermittent operation or inaccurate readings.
- Secure Mounting: Verify that the sensor is firmly mounted to your hotend assembly. Vibrations during printing can loosen mounting hardware over time.
- Inspect Print Surface: Regularly check your metallic spring steel print plate for any damage, warping, or excessive wear that could affect leveling accuracy.
6. Troubleshooting
If you encounter issues with your Eddy Coil V1.0, refer to the following troubleshooting tips:
- Sensor Not Detected / Not Responding:
- Verify that Klipper firmware is installed and correctly configured for the Eddy Coil.
- Check all wiring connections to the EBB36/42 CAN board for proper seating and continuity.
- Ensure your tool board (EBB36/42 CAN) is powered and communicating correctly with your mainboard.
- Review your Klipper
printer.cfgfile for correct I2C address and probe definitions.
- Inaccurate or Inconsistent Leveling:
- Confirm that you are using a metallic spring steel print plate. The sensor will not work reliably with non-metallic surfaces.
- Ensure there are no strong, independent magnets directly beneath the probing area that could interfere with the eddy current. Circular magnetic bed designs (like some Prusa models) are incompatible.
- Recalibrate the sensor's sensitivity within Klipper.
- Check for any physical obstructions or debris on the sensor or print surface.
- Verify that the sensor is securely mounted and not experiencing excessive wobble or vibration.
- Slow Leveling Speed:
- The Eddy Coil V1.0 is designed for rapid leveling. If leveling is slow, review your Klipper configuration for any settings that might be limiting probe speed or mesh generation parameters.
- Z-Axis Homing Issues:
- Remember that the Eddy Coil V1.0 does not perform Z-axis homing. Ensure your printer has a separate, functional Z-axis endstop or probe for homing operations.
For further assistance, consult the BIGTREETECH official documentation or community forums for Klipper and Eddy Coil users.
7. Specifications
| Feature | Specification |
|---|---|
| Manufacturer | BIGTREETECH |
| Model Reference | EDDY Coil V1.0 |
| Style | EDDY Coil V1.0 |
| Weight | 6 grams |
| Precision | 0.0005 mm |
| Interface | I2C (compatible with BTT EBB36/42 CAN) |
| Firmware Compatibility | Klipper ONLY |
| Power Source | 5V (from tool board) |
| Batteries Required | No |
| Package Dimensions | 4 x 3 x 3 cm |
8. Warranty and Support
8.1 Warranty Information
BIGTREETECH products are covered by a manufacturer's warranty. Please refer to the official BIGTREETECH website or your point of purchase for specific warranty terms and conditions. Keep your proof of purchase for any warranty claims.
8.2 Technical Support
For technical assistance, troubleshooting guides, or further documentation, please visit the official BIGTREETECH website or their dedicated support channels. You can also find valuable resources and community support on Klipper forums and 3D printing communities.
BIGTREETECH Official Store: Visit BIGTREETECH Store