
HCK K185
HCK 24-inch Outdoor Kegerator & Refrigerator Instruction Manual
Model: K185
1. Introduction
Thank you for choosing the HCK 24-inch Outdoor Kegerator and Refrigerator. This appliance is designed for both freestanding outdoor use and undercounter installation, offering versatile beverage storage and dispensing solutions. Please read this manual thoroughly before installation, operation, or maintenance to ensure safe and efficient use of your unit.

Figure 1: HCK 24-inch Outdoor Kegerator (Model K185)
This image shows the HCK 24-inch Outdoor Kegerator, featuring a stainless steel door, black cabinet, and a three-tap draft beer tower with a chrome guard rail on top. The unit is designed for both freestanding and undercounter use.
2. Safety Information
Your safety and the safety of others are very important. We have provided many important safety messages in this manual and on your appliance. Always read and obey all safety messages.
General Safety Precautions:
- Read all instructions before using the appliance.
- Do not store or use gasoline or other flammable vapors and liquids in the vicinity of this or any other appliance.
- Keep ventilation openings, in the appliance enclosure or in the built-in structure, clear of obstruction.
- Do not use mechanical devices or other means to accelerate the defrosting process, other than those recommended by the manufacturer.
- Do not damage the refrigerant circuit.
- Do not use electrical appliances inside the food storage compartments of the appliance, unless they are of the type recommended by the manufacturer.
- This appliance is not intended for use by persons (including children) with reduced physical, sensory or mental capabilities, or lack of experience and knowledge, unless they have been given supervision or instruction concerning use of the appliance by a person responsible for their safety.
- Children should be supervised to ensure that they do not play with the appliance.
- Before cleaning or maintenance, always unplug the appliance from the power supply.
3. Package Contents
Verify that all items listed below are included in your package. If any items are missing or damaged, please contact HCK customer support immediately.
- HCK 24-inch Kegerator Unit
- D System Keg Tapping Kit (includes 100% SUS304 Tower & Tap, 100% SUS304 Probe Coupler, Dual Gauge Regulator, 2.5 lb. CO2 Tank (empty))
- Guard Rail
- Drip Tray
- Casters (wheels)
- Safety Lock
- Three Wire Shelves
- Instruction Manual
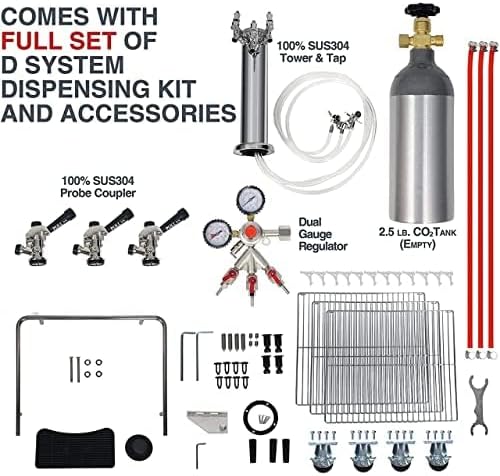
Figure 2: Full D System Dispensing Kit and Accessories
This image displays all the components included in the D system dispensing kit, such as the stainless steel tower with taps, probe couplers, a dual gauge regulator, an empty CO2 tank, hoses, a guard rail, drip tray, casters, and wire shelves.
4. Setup
Unpacking and Placement:
- Carefully remove all packaging materials.
- Place the unit on a flat, stable surface. Ensure there is adequate ventilation around the unit (at least 4 inches of space on the sides and back).
- Important: Allow the kegerator to sit upright for at least 24 hours before plugging it in. This allows the refrigerant to settle, preventing potential compressor damage.
- If using as a freestanding unit, attach the casters for easy mobility.
- Install the guard rail and drip tray on the top surface of the unit.
Converting to Refrigerator Mode (Optional):
This unit can function as a standard refrigerator by removing the keg and tapping kit and installing the provided wire shelves.
- Ensure the unit is unplugged.
- Remove the beer tower and any kegs or CO2 tanks.
- Insert the three wire shelves into the designated slots inside the unit.
- The door is reversible; refer to the separate door reversal instructions if you wish to change the door swing direction.

Figure 3: 2-in-1 Function Conversion
This diagram illustrates how the HCK Kegerator can be converted between Kegerator Mode (holding a keg) and Refrigerator Mode (with shelves for cans or bottles). It shows the internal layout for both configurations.

Figure 4: Kegerator in Refrigerator Mode
This image shows the interior of the HCK Kegerator with the three wire shelves installed, demonstrating its use as a standard beverage refrigerator capable of holding up to 230 standard 12-oz cans.
5. Operating Instructions
Temperature Control:
The kegerator features an efficient compressor-based cooling system that maintains temperatures from 32°F to 50°F (0°C to 10°C). Use the digital temperature control panel, typically located inside the unit or on the front, to set your desired temperature.
Loading Kegs:
The unit can accommodate various keg sizes:
- One full-size keg (15.5 gallons)
- Two 1/4 beer barrels (7.75 gallons each)
- Three 5-gallon kegs (5.2 gallons each)

Figure 5: Compatible Keg Sizes
This graphic illustrates the different keg capacities the HCK Kegerator can hold: three 5.2-gallon sixth-barrel kegs, two 7.57-gallon quarter-barrel (pony) kegs, or one 15.5-gallon full-size keg. Note that kegs are not included.
Dispensing Beer:
- Connect the CO2 tank to the regulator and the regulator to the keg coupler.
- Attach the beer line from the keg coupler to the beer tower tap.
- Ensure all connections are secure and leak-free.
- Open the CO2 valve and set the pressure according to the beer type (typically 10-12 PSI for most lagers).
- Pull the tap handle forward to dispense beer. Push it back to close.
6. Maintenance
Cleaning the Interior:
- Unplug the unit before cleaning.
- Use a soft cloth and a mild, non-abrasive cleaner to wipe down the interior surfaces.
- For stubborn stains, a solution of baking soda and water can be used.
- Rinse with clean water and dry thoroughly.
Cleaning the Exterior:
- Wipe the stainless steel door with a soft cloth and a stainless steel cleaner.
- Clean the black cabinet with a damp cloth and mild detergent.
- Regularly clean the drip tray to prevent spills and odors.
Defrosting:
This unit features manual defrost. When ice buildup on the evaporator coils reaches approximately 1/4 inch (6 mm) thick, the unit should be defrosted.
- Unplug the unit.
- Remove all contents, including kegs or shelves.
- Leave the door open to allow ice to melt naturally. You can place towels at the bottom to absorb water.
- Once defrosted, clean and dry the interior before plugging the unit back in.
7. Troubleshooting
| Problem | Possible Cause | Solution |
|---|---|---|
| Unit does not operate | Not plugged in; Circuit breaker tripped; Temperature control set to OFF. | Ensure plug is secure; Reset circuit breaker; Adjust temperature setting. |
| Temperature is not cold enough | Door not closed properly; Warm items added recently; Excessive door openings; Poor ventilation; Unit located in direct sunlight. | Check door seal; Allow time for cooling; Reduce door openings; Ensure proper clearance; Relocate unit. |
| Excessive frost buildup | Door left open; High humidity; Door gasket leaking. | Ensure door is closed; Defrost unit; Check and clean door gasket. |
| No beer dispensing | CO2 tank empty; Regulator pressure too low; Keg coupler not properly engaged; Beer line clogged. | Replace CO2 tank; Increase pressure; Re-engage coupler; Clean beer line. |
8. Specifications
| Feature | Detail |
|---|---|
| Brand | HCK |
| Model Number | K185 |
| Item Weight | 97 pounds |
| Product Dimensions | 22.83 x 23.23 x 34.25 inches (D x W x H) |
| Capacity | 6.53 Cubic Feet |
| Annual Energy Consumption | 263 Kilowatt Hours Per Year |
| Installation Type | Freestanding |
| Special Features | Door Lock |
| Color | Black |
| Voltage | 110 Volts |
| Defrost System | Manual |
| Door Hinges | Reversible |
| Door Material Type | Stainless Steel |
| Shelf Type | Wire |
| Number of Shelves | 2 (for refrigerator mode) |
| Refrigerant | R-600A |

Figure 6: Energy Guide Label
This image displays the official U.S. Government Energy Guide label for the HCK Kegerator, Model K185, indicating an estimated yearly energy cost of $32 and an estimated yearly electricity use of 263 kWh.
9. Warranty & Support
Warranty Information:
HCK offers a 1-year factory warranty on non-consumable components and a 3-year warranty on the compressor. This warranty covers defects in materials and workmanship under normal use.
Please retain your proof of purchase for warranty claims.
Customer Support:
For any inquiries, assistance, or warranty claims, please contact HCK customer support. The most efficient way to reach our dedicated support team is through your Amazon account by sending a message to the seller, HHT Information Tech.
We are committed to ensuring your 100% satisfaction.
Ask a question about this manual
Ask about setup, troubleshooting, compatibility, parts, safety, or missing instructions. Manuals+ will review the question and use this page’s manual context to help answer it.