Introduction
This manual provides detailed instructions for the safe and effective use of your VITCOCO 3.9mm Otoscope with 4.3-inch HD IPS Screen. This device is designed to assist in the visual inspection of the ear canal and facilitate earwax removal. Please read this manual thoroughly before operating the device and retain it for future reference.
Product Overview
The VITCOCO Otoscope features a high-definition camera and an integrated display for clear visualization. Key components include the main display unit, the otoscope probe with a camera, and various ear cleaning accessories.
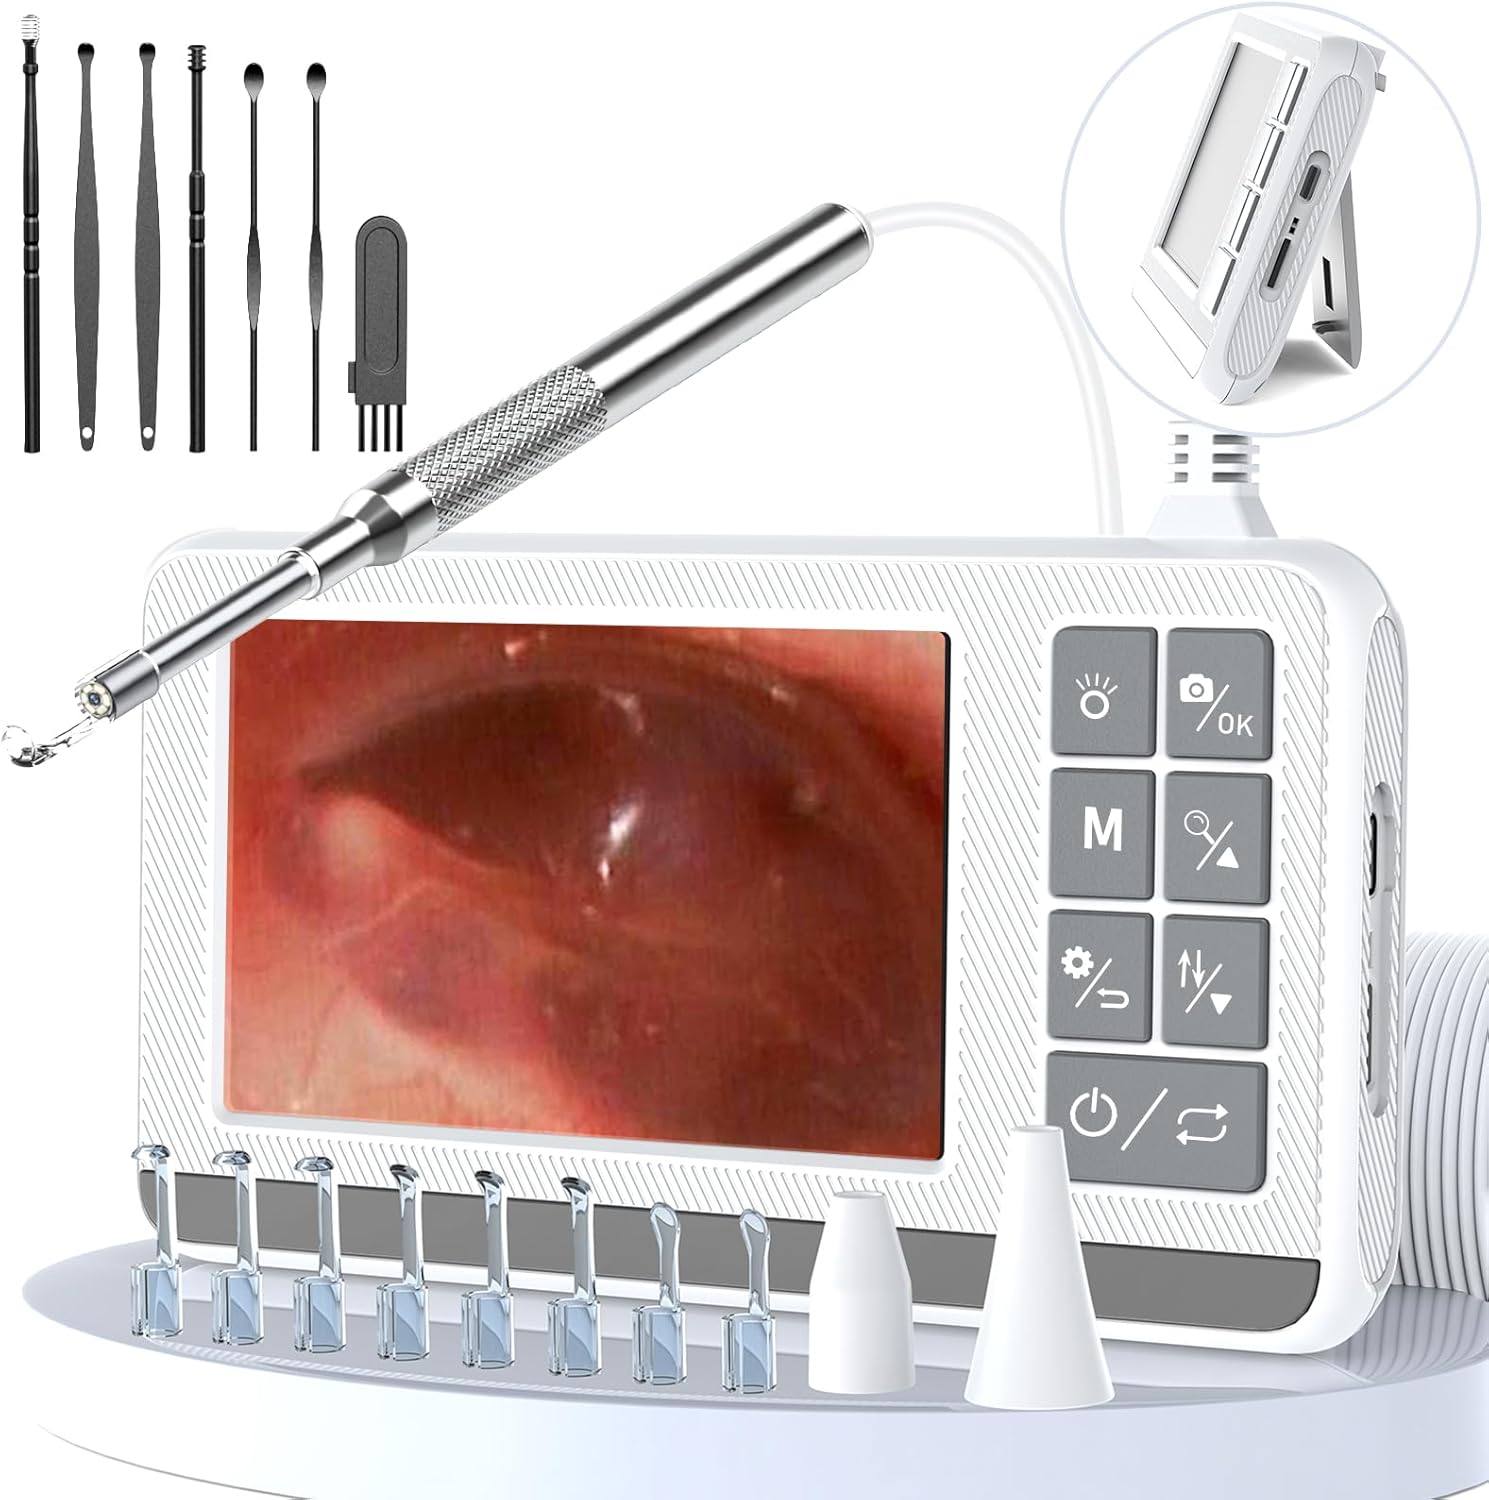
Figure 1: VITCOCO Otoscope main unit, probe, and included ear cleaning tools.
Key Features:
- 1920P HD Camera: Equipped with 6 LED lights for illuminated viewing inside the ear canal.
- 4.3-inch HD IPS Screen: Provides a clear, direct view without the need for external apps, Wi-Fi, or Bluetooth connections.
- 2600mAh Battery: Built-in rechargeable lithium battery offers 2-3 hours of continuous operation.
- 3.9mm Diameter Lens: Ultra-thin probe designed to fit various ear canal sizes comfortably and safely.
- IP67 Waterproof Lens: The camera lens is waterproof, allowing for direct rinsing or alcohol wiping for cleaning.
- Silicone Ear Spoons: Soft silicone cushions on the ear spoons enhance comfort and safety during use.
- Photo and Video Capture: Real-time photo and video recording capabilities to track conditions over time.
- Stand Design: Integrated stand for hands-free viewing.

Figure 2: The 4.3-inch HD IPS screen provides a clear, direct view of the ear canal.

Figure 3: The 3.9mm diameter probe with a soft silicone tip for comfortable and safe insertion.
Setup
- Charge the Device: Before first use, fully charge the otoscope using the provided USB charging cable. Connect the cable to the USB charging port on the device and a suitable power adapter (not included). The battery indicator will show charging status.
- Attach Ear Spoon: Select an appropriate silicone ear spoon from the accessory kit. Gently attach it to the tip of the otoscope probe. Ensure it is securely fastened.
- Power On: Press and hold the power button on the main unit to turn on the device. The screen will illuminate, displaying the camera feed.
- Adjust Brightness: If needed, use the brightness adjustment buttons on the main unit to optimize the LED illumination for a clear view.

Figure 4: The device features a USB charging port and an integrated stand for convenience.
Operating Instructions
General Use:
- Ensure the device is charged and an ear spoon is attached.
- Gently insert the otoscope probe into the ear canal. Observe the live feed on the 4.3-inch screen.
- Carefully maneuver the probe to inspect the ear canal and eardrum. Avoid pushing too deep or applying excessive force.
- If earwax removal is necessary, use the provided ear cleaning tools with extreme caution. Always maintain a clear view on the screen while performing any cleaning.
- To capture a photo, press the designated photo button. To record video, press the video recording button.
- After use, gently withdraw the probe from the ear.
- Power off the device by pressing and holding the power button.

Figure 5: The otoscope offers a direct, plug-and-play experience without external connections.
Important Safety Information:
- Do not use the device if you experience pain or discomfort.
- Consult a medical professional if you suspect an ear infection, injury, or have persistent ear issues.
- Keep out of reach of children. Adult supervision is required if used on children.
- Ensure the ear spoon is clean and properly attached before each use.

Figure 6: The otoscope can be used for various inspections including ears, mouth, nose, and even pet ears.
Maintenance
Cleaning the Probe and Ear Spoons:
- After each use, remove the silicone ear spoon from the probe.
- The IP67 waterproof camera lens can be rinsed directly with water or wiped with medical alcohol for sterilization. Ensure the lens is completely dry before storage or next use.
- Clean the silicone ear spoons with soap and water or medical alcohol. Allow them to air dry completely.
- Do not immerse the main display unit in water. Wipe it with a soft, dry cloth.

Figure 7: The IP67 waterproof lens allows for easy cleaning by rinsing with water.
Storage:
Store the otoscope and its accessories in the provided carrying case in a cool, dry place, away from direct sunlight and extreme temperatures.

Figure 8: The compact design and carrying case make the device easy to transport and store.

Figure 9: The complete kit, including the otoscope and all accessories, stored in its protective case.
Troubleshooting
- No Power: Ensure the device is fully charged. Connect it to a power source using the USB cable and allow it to charge for at least 30 minutes before attempting to power on again.
- No Image on Screen: Check if the otoscope probe is securely connected to the main unit. Ensure the device is powered on.
- Unclear Image: Clean the camera lens with a soft cloth or alcohol wipe. Adjust the LED brightness using the buttons on the main unit. Ensure the lens is not obstructed by earwax or debris.
- Short Battery Life: Ensure the device is fully charged before use. Battery performance may decrease over time with repeated charging cycles.
Specifications
| Brand | VITCOCO |
| Model Number | DQ-DE-P60 |
| Screen Size | 4.3 inches HD IPS |
| Camera Resolution | 1920P HD |
| Probe Diameter | 3.9 mm |
| LED Lights | 6 |
| Waterproof Rating | IP67 (Lens only) |
| Battery Capacity | 2600 mAh |
| Operating Time | 2-3 hours |
| Package Dimensions | 19.5 x 13.5 x 6.9 cm |
| Item Weight | 380 grams |
Warranty and Support
For product support, troubleshooting assistance, or warranty inquiries, please contact VITCOCO customer service. Refer to your purchase documentation for specific warranty terms and contact information. The standard return policy is 31 days from the date of purchase.
You can often find support contact details on the official VITCOCO website or through the retailer where the product was purchased.


