
1. Important Safety Instructions
Please read and understand all instructions before beginning installation. Failure to follow these instructions may result in electric shock, fire, or personal injury.
- Ensure the power is disconnected at the circuit breaker before installation or servicing.
- All wiring must be in accordance with national and local electrical codes. If you are unfamiliar with wiring, consult a qualified electrician.
- The fan must be mounted to a structurally sound ceiling joist or outlet box capable of supporting a minimum of 35 lbs (15.9 kg).
- Maintain a minimum clearance of 7 feet (2.1 meters) from the floor to the bottom of the fan blades.
- Do not operate the fan with damaged blades or any visible defects.
- Avoid placing objects in the path of the fan blades.
2. Package Contents
Verify that all components are present before proceeding with installation. If any parts are missing or damaged, contact customer support.
- Motor Housing Assembly
- Fan Blades (8)
- Down Rods (4.5" and 12")
- Canopy
- Mounting Bracket
- LED Light Kit
- Remote Control with Wall Mount
- Hardware Pack (screws, washers, wire nuts)
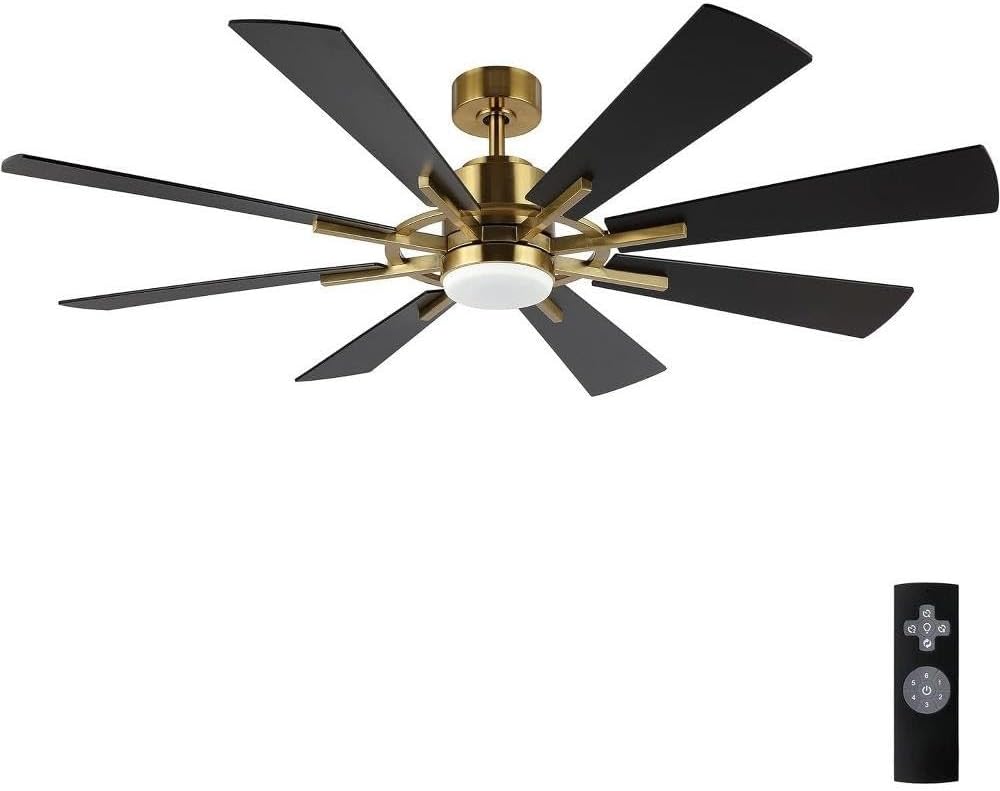
Figure 1: AeroBlade 60-inch 8-blade ceiling fan with integrated LED light and included remote control. The fan features a gold finish motor housing and black blades.
3. Installation Guide
3.1 Pre-Installation
- Turn off power at the circuit breaker and wall switch.
- Select the appropriate down rod (4.5" for lower ceilings, 12" for higher ceilings) based on your ceiling height.
- Ensure the mounting location can support the fan's weight and is free from obstructions.
3.2 Mounting the Fan
- Attach the mounting bracket to the ceiling outlet box using the provided screws. Ensure it is securely fastened.
- Feed the electrical wires from the outlet box through the center hole of the mounting bracket.
- Assemble the down rod to the motor housing, ensuring all screws are tightened.
- Carefully lift the fan assembly and hang it from the mounting bracket using the hanger ball.
3.3 Electrical Connections
Connect the fan's electrical wires to the household wiring according to the following:
- Connect the green/bare copper wire (ground) from the fan to the household ground wire.
- Connect the white wire (neutral) from the fan to the household neutral wire.
- Connect the black wire (hot) from the fan to the household hot wire.
- Secure all connections with wire nuts and ensure no loose strands are exposed.
3.4 Attaching Blades and Light Kit
- Attach each of the 8 fan blades to the motor housing using the provided screws. Ensure they are firmly secured.
- Connect the LED light kit wires to the corresponding wires from the fan motor.
- Secure the LED light kit to the bottom of the fan motor housing.
- Install the light diffuser by twisting or snapping it into place.
After completing all connections and assembly, carefully raise the canopy to cover the mounting bracket and secure it with the provided screws.
4. Operating Instructions
The AeroBlade ceiling fan is operated using the included remote control.
4.1 Remote Control Functions
Figure 2: Remote control for the AeroBlade ceiling fan. Features include fan speed control (1-6), light on/off, light color temperature adjustment, and fan direction reversal.
- Power Button: Turns the fan and light on/off.
- Fan Speed Buttons (1-6): Adjusts the fan speed from 1 (lowest) to 6 (highest).
- Light On/Off Button: Toggles the LED light on or off.
- Light Color Temperature Button: Cycles through 3000K (Warm White), 4500K (Natural White), and 6000K (Cool White) color temperatures.
- Reverse Function Button: Changes the direction of the fan blades.
- Summer Mode (Downward Airflow): Blades rotate counter-clockwise, creating a cooling breeze.
- Winter Mode (Upward Airflow): Blades rotate clockwise, circulating warm air near the ceiling.
4.2 Initial Operation
- Restore power at the circuit breaker.
- Press the Power Button on the remote control to turn on the fan and light.
- Adjust fan speed and light settings as desired.
5. Maintenance
Regular maintenance ensures optimal performance and extends the life of your ceiling fan.
- Cleaning: Periodically wipe the fan blades and motor housing with a soft, damp cloth. Do not use abrasive cleaners or solvents.
- Blade Inspection: Check blade screws annually to ensure they are tight. Loose blades can cause wobbling and noise.
- Light Kit: The integrated LED light source is designed for long life and typically does not require replacement. If issues arise, contact customer support.
- Remote Control: Replace batteries (not included) when the remote's range decreases or it stops responding.
Always turn off power at the circuit breaker before performing any cleaning or maintenance on the fan.
6. Troubleshooting
Before attempting any repairs, ensure power is disconnected at the circuit breaker.
| Problem | Possible Cause | Solution |
|---|---|---|
| Fan does not start | No power to the fan; Loose wire connections; Remote control battery low. | Check circuit breaker and wall switch; Verify all wire connections are secure; Replace remote control batteries. |
| Light does not work | Loose wire connection to light kit; LED light failure. | Check light kit wiring; Contact customer support if LED light is faulty. |
| Fan wobbles | Loose blade screws; Unbalanced blades; Loose mounting bracket. | Tighten all blade screws; Ensure blades are installed correctly; Verify mounting bracket is secure. |
| Noisy operation | Loose screws; Motor hum; Blades hitting an obstruction. | Check all screws on the fan and mounting bracket; Ensure no objects are in the fan's path. |
| Remote control not responding | Low batteries; Remote not paired (if applicable); Obstruction between remote and receiver. | Replace remote batteries; Ensure clear line of sight; Refer to pairing instructions if necessary (not explicitly provided, but a common troubleshooting step). |
7. Specifications
| Brand | Bed Bath & Beyond |
| Model Name | AB815-60 |
| Part Number | AB816-60 |
| Product Dimensions | 60 x 60 x 20 inches |
| Item Weight | 18.9 Pounds (8.57 kg) |
| Electric Fan Design | Ceiling Fan |
| Blade Sweep Diameter | 60 inches |
| Number of Blades | 8 |
| Blade Pitch | 12 degrees |
| Fan Speeds | 6 (Forward and Reverse) |
| Power Source | Corded Electric |
| Fan Motor Wattage | 24 watts |
| Integrated LED Light | 18W, Dimmable, 3000K/4500K/6000K (Color Temperature Adjustable) |
| Color | Gold (Motor Housing), Black (Blades) |
| Room Type | Living Room (Recommended) |
| UPC | 850051871292, 850051871285 |
8. Warranty and Support
8.1 Manufacturer's Warranty
This Bed Bath & Beyond AeroBlade ceiling fan is covered by a 1 Year Manufacturer's Warranty from the date of purchase. This warranty covers defects in materials and workmanship under normal use.
The warranty does not cover damage resulting from improper installation, misuse, abuse, accident, or unauthorized repairs. Proof of purchase is required for all warranty claims.
8.2 Customer Support
For technical assistance, missing parts, or warranty inquiries, please contact Bed Bath & Beyond customer support. Refer to your purchase documentation for specific contact information.
When contacting support, please have your model number (AB815-60) and proof of purchase readily available.


