
Introduction
The SEMIER Portable Cassette Tape Player Recorder (Model SM-136) is a versatile device designed for both playing and recording audio cassette tapes, as well as converting them into digital MP3 files. It features a built-in microphone for direct recording, an SD card slot for digital storage, and a USB-C port for computer connectivity. This compact and lightweight unit offers convenient power options and a clear LCD display for easy navigation, making it ideal for preserving old audio memories or creating new recordings.

Image: Front view of the SEMIER Portable Cassette Tape Player Recorder, highlighting its compact design and digital display.
What's in the Box
- Cassette Recorder Converter (1 unit)
- 16GB SD Card (1 unit)
- USB Reader (1 unit)
- Software CD-ROM (1 unit)
- User Manual (1 unit)
- Type-C Charging and Data Cable (1 unit)
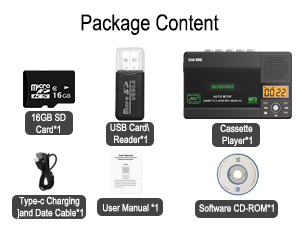
Image: A visual representation of all items included in the product package.
Product Overview
Familiarize yourself with the various components and controls of your cassette player recorder.
- Cassette Compartment: For inserting audio cassette tapes.
- Control Buttons: Play, Stop, Fast Forward (F.FWD), Fast Rewind (F.REW), Record (REC), Repeat (REP), Delete (DEL).
- LCD Display: Shows playback time, recording status, and SD card mode.
- Built-in Speaker: For audio playback without headphones.
- Built-in Microphone: For direct audio recording.
- Headphone Jack (3.5mm): For private listening.
- Micro SD Card Slot: For inserting the SD card for digital recording and playback.
- Volume Control: Adjusts the playback volume.
- Tape/Off/Micro SD Switch: Selects between tape mode, power off, and Micro SD mode.
- DC 5V USB-C Port: For power supply and connecting to a computer.

Image: Overview of the device's main functionalities and physical features.

Image: Detailed view of the LCD digital display for easy navigation.
Setup
Powering the Device
The cassette player recorder can be powered in two ways:
- USB-C Cable: Connect the included USB-C cable to the DC 5V port on the device and plug the other end into a USB power adapter (not included) or a computer USB port.
- AA Batteries: Open the battery compartment on the back of the device and insert four (4) AA batteries (not included), ensuring correct polarity.

Image: Illustration of the two power options: AA batteries and USB-C cable.
Inserting a Cassette Tape
- Gently open the cassette compartment door.
- Insert your cassette tape with the open edge facing you and the side you wish to play/record facing up.
- Close the cassette compartment door firmly until it clicks.
Inserting an SD Card
- Locate the Micro SD card slot on the side of the device.
- Insert the included 16GB Micro SD card (or your own compatible card) into the slot until it clicks into place. Ensure the card is inserted in the correct orientation.
Operating Instructions
Playing Cassette Tapes
- Ensure a cassette tape is inserted.
- Slide the "Tape/Off/Micro SD" switch to "Tape".
- Press the PLAY button to start playback.
- Adjust the volume using the volume control dial.
- Use F.FWD or F.REW for fast forwarding or rewinding.
- Press the STOP button to stop playback.
Converting Cassette to MP3 (via Micro SD Card)
This method allows you to convert your cassette audio directly to MP3 files on the SD card without needing a computer.
- Insert a cassette tape and a Micro SD card into the device.
- Slide the "Tape/Off/Micro SD" switch to "Tape".
- Press the PLAY button to start playing the cassette.
- Long press the REC button until the LCD display shows "SD REC" and the timer starts, indicating recording has begun.
- To stop recording, press the REC button again. The recorded MP3 file will be saved on the SD card.
- To play the recorded file, slide the switch to "Micro SD" mode and use the playback controls.

Image: Step-by-step guide for direct cassette to SD card conversion.
Video: Demonstrates the process of converting audio cassette tapes to digital files on an SD card.
Converting Cassette to MP3 (via Computer with Audacity)
For higher quality conversion and editing, you can use the included Audacity software on your computer.
- Install Audacity Software:
- If your computer has a CD-ROM drive, insert the included Software CD-ROM and follow the installation wizard.
- If your computer does not have a CD-ROM input, you can download Audacity from their official website: www.audacityteam.org.
- Connect Device to Computer: Plug the included USB-C cable into the cassette recorder's DC 5V port and the other end into a USB port on your computer.
- Prepare Cassette: Insert the cassette tape you wish to convert.
- Start Recording in Audacity: Open Audacity on your computer. Press the PLAY button on the cassette recorder. In Audacity, click the record button to begin capturing the audio.
- Save Converted Audio: Once the cassette playback is complete, stop recording in Audacity. You can then edit the audio as needed. Go to "File" > "Export" and choose your desired format (e.g., MP3, WAV) and save location.

Image: Visual guide for connecting the device to a computer and using Audacity for conversion.
Recording via Built-in Microphone
You can record directly to the SD card using the built-in microphone.
- Ensure a Micro SD card is inserted.
- Slide the "Tape/Off/Micro SD" switch to "Micro SD".
- Long press the REC button. The LCD display will show "SD REC" and the timer will start, indicating recording has begun via the built-in microphone.
- Speak clearly into the microphone located on the device.
- To stop recording, press the REC button again. The recorded audio will be saved as an MP3 file on the SD card.

Image: Demonstrates recording audio using the device's built-in microphone.
Playing MP3 Files from SD Card
- Ensure a Micro SD card with MP3 files is inserted.
- Slide the "Tape/Off/Micro SD" switch to "Micro SD". The device will automatically detect and display the first MP3 file.
- Press the PLAY button to start playback.
- Use the F.FWD and F.REW buttons to navigate between tracks.
- Press the REP button to repeat the current track or all tracks.
- Press the STOP button to stop playback.
- To delete a file, select the file using F.FWD/F.REW, then long press the DEL button. Confirm deletion if prompted.
Maintenance
- Keep the device clean by wiping it with a soft, dry cloth.
- Avoid exposing the device to extreme temperatures, humidity, or direct sunlight.
- Do not use abrasive cleaners or solvents.
- When not in use for extended periods, remove batteries to prevent leakage.
- Handle cassette tapes and SD cards carefully to prevent damage.
Troubleshooting
| Problem | Possible Cause | Solution |
|---|---|---|
| Device does not power on. | No power, low batteries, or incorrect USB connection. | Check USB-C cable connection, replace batteries, or try a different power source. |
| No sound during cassette playback. | Volume too low, headphones not connected properly, or tape issue. | Increase volume, check headphone connection, ensure tape is inserted correctly and not damaged. |
| Cannot record to SD card. | SD card full, not inserted correctly, or corrupted. | Check SD card space, reinsert card, or try formatting the card (this will erase all data). |
| Audacity does not recognize device. | Incorrect drivers, software not installed correctly, or USB connection issue. | Ensure Audacity is installed correctly, check USB cable, restart computer and device. Refer to Audacity's support for specific driver issues. |
Specifications
- Model Number: SM-136
- Product Dimensions: 6.3 x 1.2 x 3.9 inches
- Item Weight: 8 ounces
- Screen Size: 1 Inches (LCD Display)
- Memory Storage Capacity: 16 GB (SD Card included)
- Headphones Jack: 3.5 millimeters
- Microphone Form Factor: Built-In
- Power Source: USB-C (DC 5V) or 4 x AA Batteries
- Compatible Devices: MP3 Player, Earphone
- Manufacturer: SEMIER

Image: The compact dimensions of the device, highlighting its portability.
Warranty and Support
SEMIER is committed to providing high-quality products and excellent customer service. For any questions, concerns, or technical support regarding your Portable Cassette Tape Player Recorder, please refer to the contact information provided in your product packaging or visit the official SEMIER website. We strive for 100% customer satisfaction.


