
1. Introduction
This manual provides essential information for the safe operation, maintenance, and troubleshooting of your Gisam 16.8V Cordless Drill Driver, model MT01. Please read these instructions carefully before using the tool to ensure proper function and to prevent injury or damage.
2. Safety Instructions
WARNING: This product is not designed for heavy-duty masonry or concrete drilling and lacks a percussion function. Do not use it on ceilings or concrete walls to prevent damage to the tool and potential injury.
- Always wear appropriate personal protective equipment, including safety glasses, when operating the drill.
- Ensure the workpiece is securely clamped or held to prevent movement during operation.
- Keep hands and loose clothing away from rotating parts.
- Do not operate the drill in damp or wet conditions.
- Before changing accessories or performing maintenance, always remove the battery pack.
- Store the tool and batteries in a dry, secure location out of reach of children.
- Use only Gisam-approved batteries and chargers.
3. Package Contents
Verify that all items listed below are included in your package:
- 1 x Gisam 16.8V Cordless Drill Driver
- 2 x 2Ah Lithium-Ion Batteries
- 1 x Battery Charger
- 6 x Wood Drill Bits
- 6 x Screwdriver Bits
- 9 x Socket Wrenches
- 1 x Extension Rod
- 1 x Socket Wrench Adapter
- 1 x Flexible Rod
- 1 x User Manual (this document)

Figure 3.1: Complete Gisam 16.8V Cordless Drill Driver kit, including the drill, two batteries, charger, and various accessories.
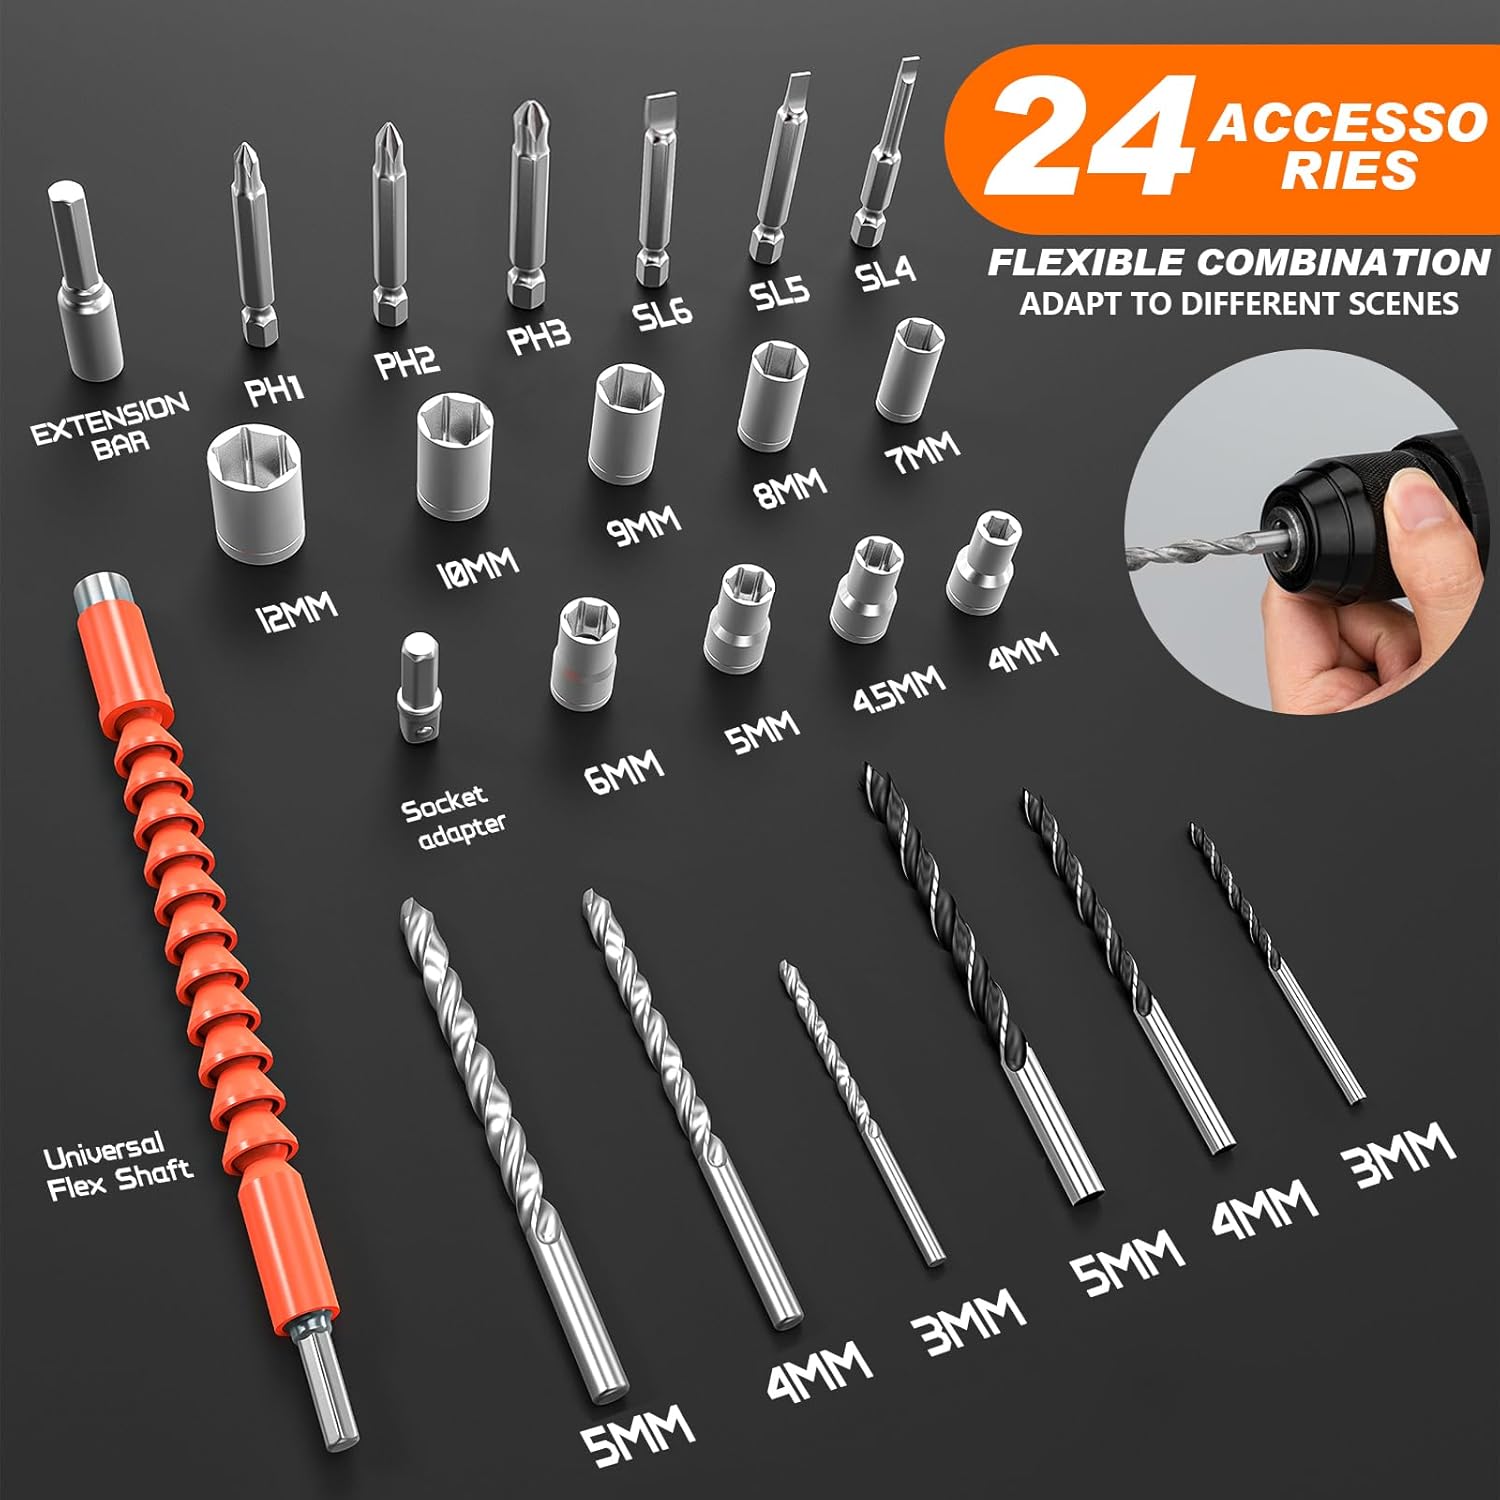
Figure 3.2: A detailed view of the 24 accessories provided, including drill bits, screwdriver bits, socket wrenches, and a flexible shaft.
4. Product Overview
Familiarize yourself with the components of your Gisam Cordless Drill Driver:

Figure 4.1: Labeled diagram illustrating the key components of the Gisam 16.8V Cordless Drill Driver: 1. 10mm Metal Keyless Chuck, 2. Torque Adjustment Ring, 3. LED Light, 4. Variable Speed Trigger, 5. Remaining Battery Display, 6. Battery Pack, 7. H/L 2-Speed Gear Selector, 8. Heat Dissipation Vent, 9. Forward & Reverse Button.
5. Setup
5.1. Battery Charging
- Connect the charger to a standard power outlet.
- Insert the battery pack into the charger.
- Allow the battery to charge fully before first use. The charging indicator on the charger will show the charging status.
5.2. Battery Installation and Removal
- Installation: Align the battery pack with the base of the drill handle and slide it in until it clicks securely into place.
- Removal: Press the battery release buttons (if present) on the sides of the battery pack and slide the battery out.
5.3. Accessory Installation
- Ensure the drill is off and the forward/reverse switch is in the center (locked) position.
- Rotate the chuck counter-clockwise to open the jaws.
- Insert the desired drill bit, screwdriver bit, or socket adapter into the chuck.
- Rotate the chuck clockwise to tighten the jaws securely around the accessory. Ensure the accessory is centered and firmly gripped.
6. Operation
6.1. Power On/Off (Variable Speed Trigger)
To start the drill, press the variable speed trigger. The speed of rotation is controlled by the amount of pressure applied to the trigger. Release the trigger to stop the drill.
6.2. Forward/Reverse Switch
The forward/reverse switch (position 9 in Figure 4.1) controls the direction of rotation and acts as a lock-off button.
- Forward (Tighten): Push the switch to the right for clockwise rotation (for driving screws).
- Reverse (Loosen): Push the switch to the left for counter-clockwise rotation (for removing screws).
- Locked: When the switch is in the center position, the trigger is locked, preventing accidental startup.

Figure 6.1: The forward/reverse switch allows for tightening (right), locking (center), and loosening (left).
6.3. Speed Selection (L/H 2-Speed Gear Selector)
The drill features a two-speed gearbox (position 7 in Figure 4.1) to match the application requirements.
- Low Speed (L): Select 'L' for applications requiring higher torque, such as driving screws or drilling larger holes (0-450 RPM).
- High Speed (H): Select 'H' for faster drilling in softer materials or smaller holes (0-1500 RPM).

Figure 6.2: The L/H 2-speed gear selector. 'L' (0-450 RPM) is recommended for screwing, and 'H' (0-1500 RPM) is recommended for drilling. Note: Not suitable for concrete walls.
6.4. Torque Adjustment
The torque adjustment ring (position 2 in Figure 4.1) allows you to set the amount of rotational force before the clutch disengages, preventing overtightening or stripping screws.
- Rotate the ring to select one of the 23 torque settings for screwdriving.
- Select the drill symbol for maximum torque when drilling.
- Start with a lower torque setting and increase as needed for the material and screw size.

Figure 6.3: The 23+1 torque setting provides precision control for different materials such as plastic, plasterboard, wood, and metal.
6.5. Drilling and Screwdriving Guidelines
- This cordless drill is suitable for drilling into wood and plastic, and for screw tightening and removal.
- It is not suitable for masonry or concrete.
- Apply steady, even pressure when drilling or driving.
- Do not touch freshly used drill bits immediately as they may be hot.

Figure 6.4: The Gisam cordless drill driver in use, demonstrating its application for tasks such as repairing furniture, installing accessories, and various DIY crafts.
6.6. LED Light
The integrated LED light (position 3 in Figure 4.1) illuminates the work area for improved visibility.
6.7. Remaining Battery Display
The remaining battery display (position 5 in Figure 4.1) indicates the current charge level of the battery pack.
7. Maintenance
- Keep the tool clean and free of dust and debris. Use a soft, dry cloth for cleaning.
- Regularly inspect the chuck for wear and ensure it operates smoothly.
- Check the battery contacts for cleanliness and ensure they are free of corrosion.
- Store the drill and batteries in a cool, dry place.
- Do not attempt to open the tool housing or battery pack for repairs. Refer to qualified service personnel.
8. Troubleshooting
| Problem | Possible Cause | Solution |
|---|---|---|
| Drill does not start | Battery not charged Battery not properly installed Forward/reverse switch in locked position | Charge battery Reinstall battery securely Move switch to forward or reverse position |
| Loss of power during operation | Battery low or depleted | Recharge or replace battery |
| Chuck not holding bit securely | Chuck not tightened sufficiently Bit shank is dirty or damaged | Tighten chuck firmly Clean or replace bit |
| Excessive vibration or noise | Bent or damaged accessory Loose chuck | Replace accessory Tighten chuck |
9. Specifications
| Feature | Specification |
|---|---|
| Model Number | MT01 |
| Voltage | 16.8 Volts |
| Battery Type | Lithium Ion |
| Battery Capacity | 2 Ah (2000mAh) |
| Maximum Torque | 50 Nm |
| Torque Settings | 23 + 1 (Drill Mode) |
| No-Load Speed (Low) | 0-450 RPM |
| No-Load Speed (High) | 0-1500 RPM |
| Chuck Size | 10 mm (3/8-inch) Keyless Metal Chuck |
| Motor Type | Brushless Motor |
| Item Weight | 2.13 Kilograms |
| Product Dimensions | 10 x 10 x 6 cm |
| Material | Metal |
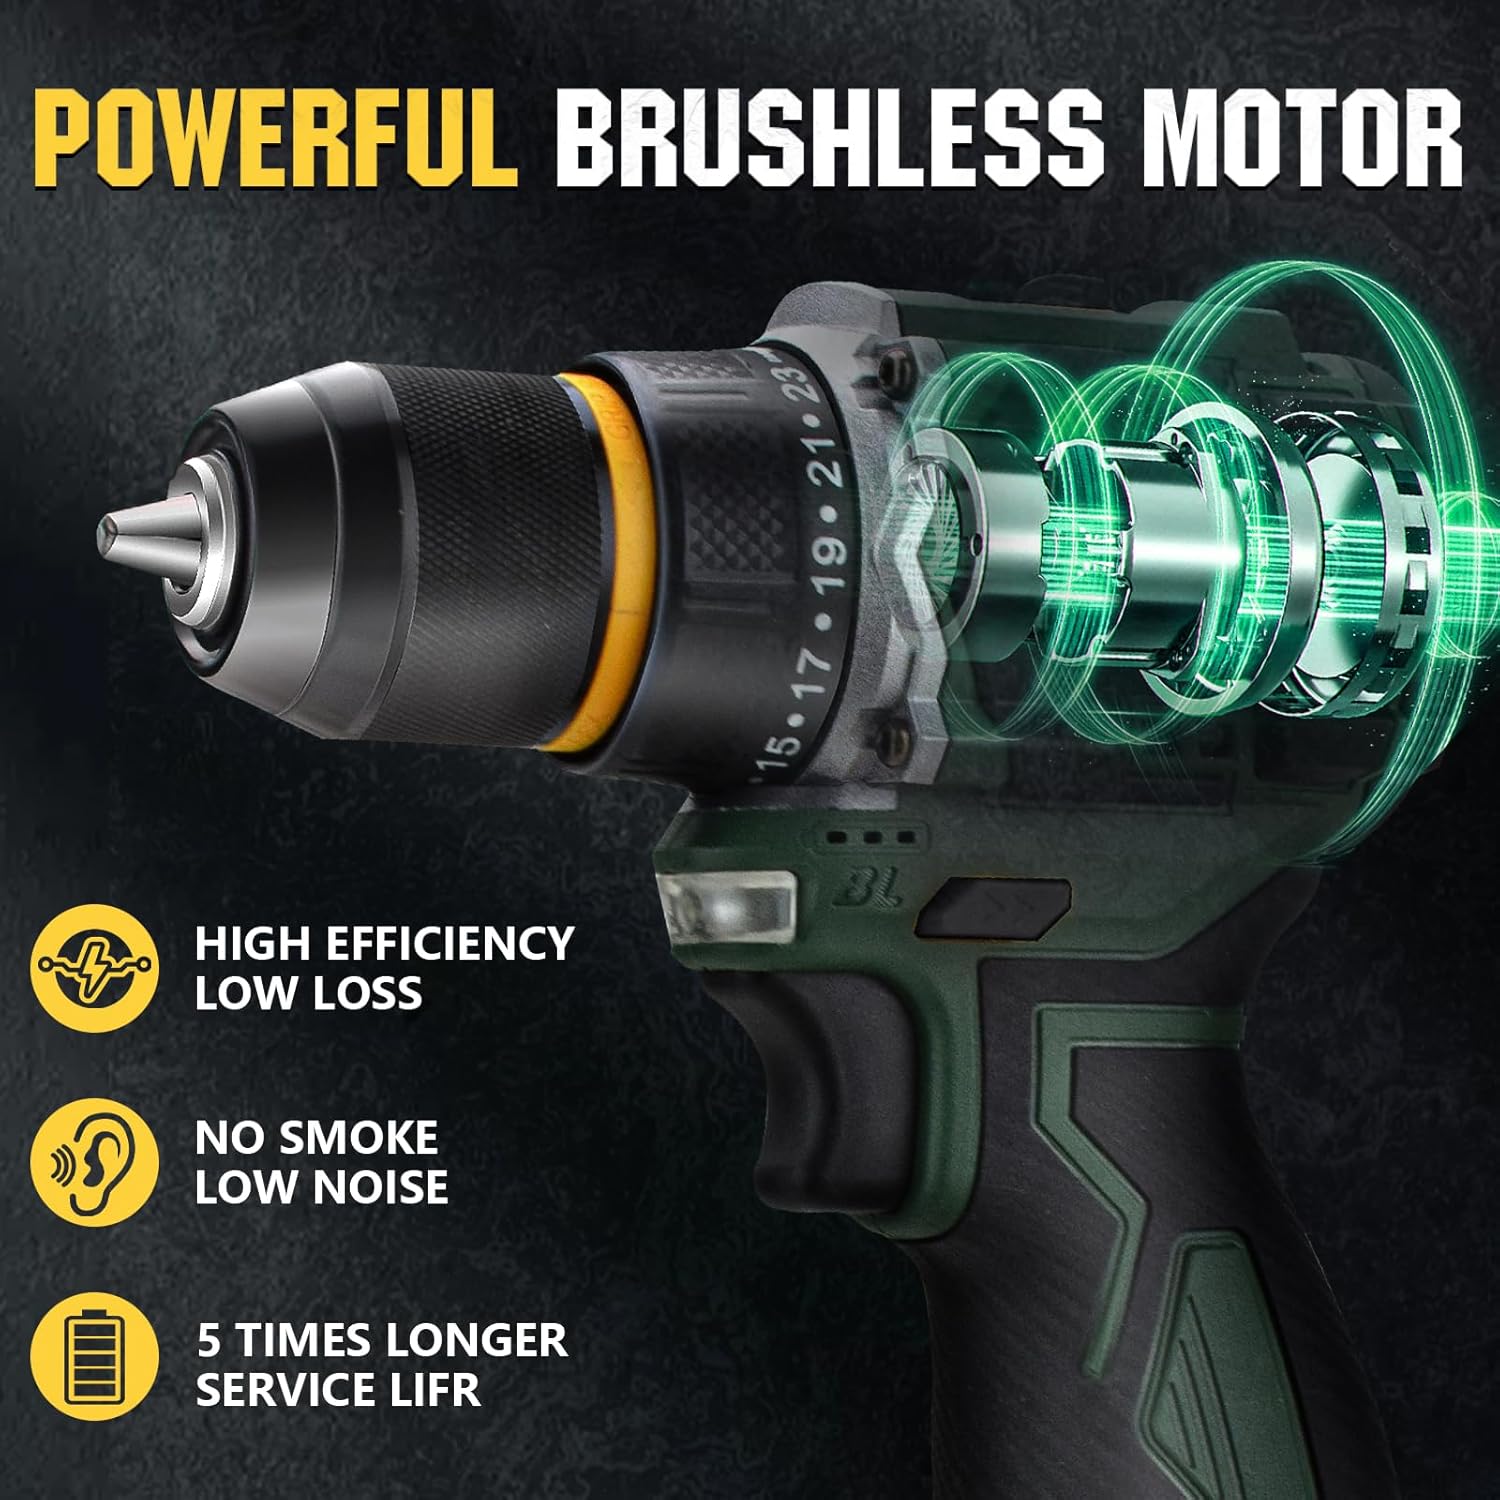
Figure 9.1: The brushless motor design contributes to high efficiency, low power loss, reduced noise, and extended service life.
10. Warranty and Support
Gisam provides a 2-year after-sales warranty for this product. If you encounter any issues or have questions regarding your Gisam 16.8V Cordless Drill Driver, please contact customer support through the 'Contact Seller' option on your order page. We aim to respond within 12 hours on working days.