
1. Introduction
Thank you for choosing the AECOJOY 123-inch Chicken Coop. This manual provides essential information for the safe assembly, operation, and maintenance of your new chicken coop. Please read these instructions thoroughly before assembly and retain them for future reference.
This extra-large chicken coop is designed to provide a secure and comfortable habitat for your poultry. It features a double-layer design with a main house for roosting and a wire-fenced run for outdoor activity. Key features include four nesting boxes, a removable tray for easy cleaning, and roosting bars.
2. Safety Information
- Adult Assembly Required: This product requires adult assembly. Keep children and pets away during the assembly process.
- Inspect All Parts: Before assembly, carefully inspect all components for any damage. Do not proceed with assembly if any parts are damaged. Contact customer support for replacement parts.
- Stable Placement: Ensure the chicken coop is placed on a flat, level, and stable surface to prevent tipping or instability.
- Secure All Fasteners: Ensure all screws, bolts, and latches are securely tightened during assembly and checked periodically during use.
- Animal Safety: Regularly check the coop for any sharp edges, loose wires, or gaps that could harm your poultry or allow predators entry.
- Weather Protection: While the roof is waterproof, consider additional measures to protect the coop and its inhabitants during extreme weather conditions.
3. Components Overview
Familiarize yourself with the various parts of your AECOJOY chicken coop before beginning assembly. Refer to the detailed parts list and diagrams provided in your physical assembly manual.
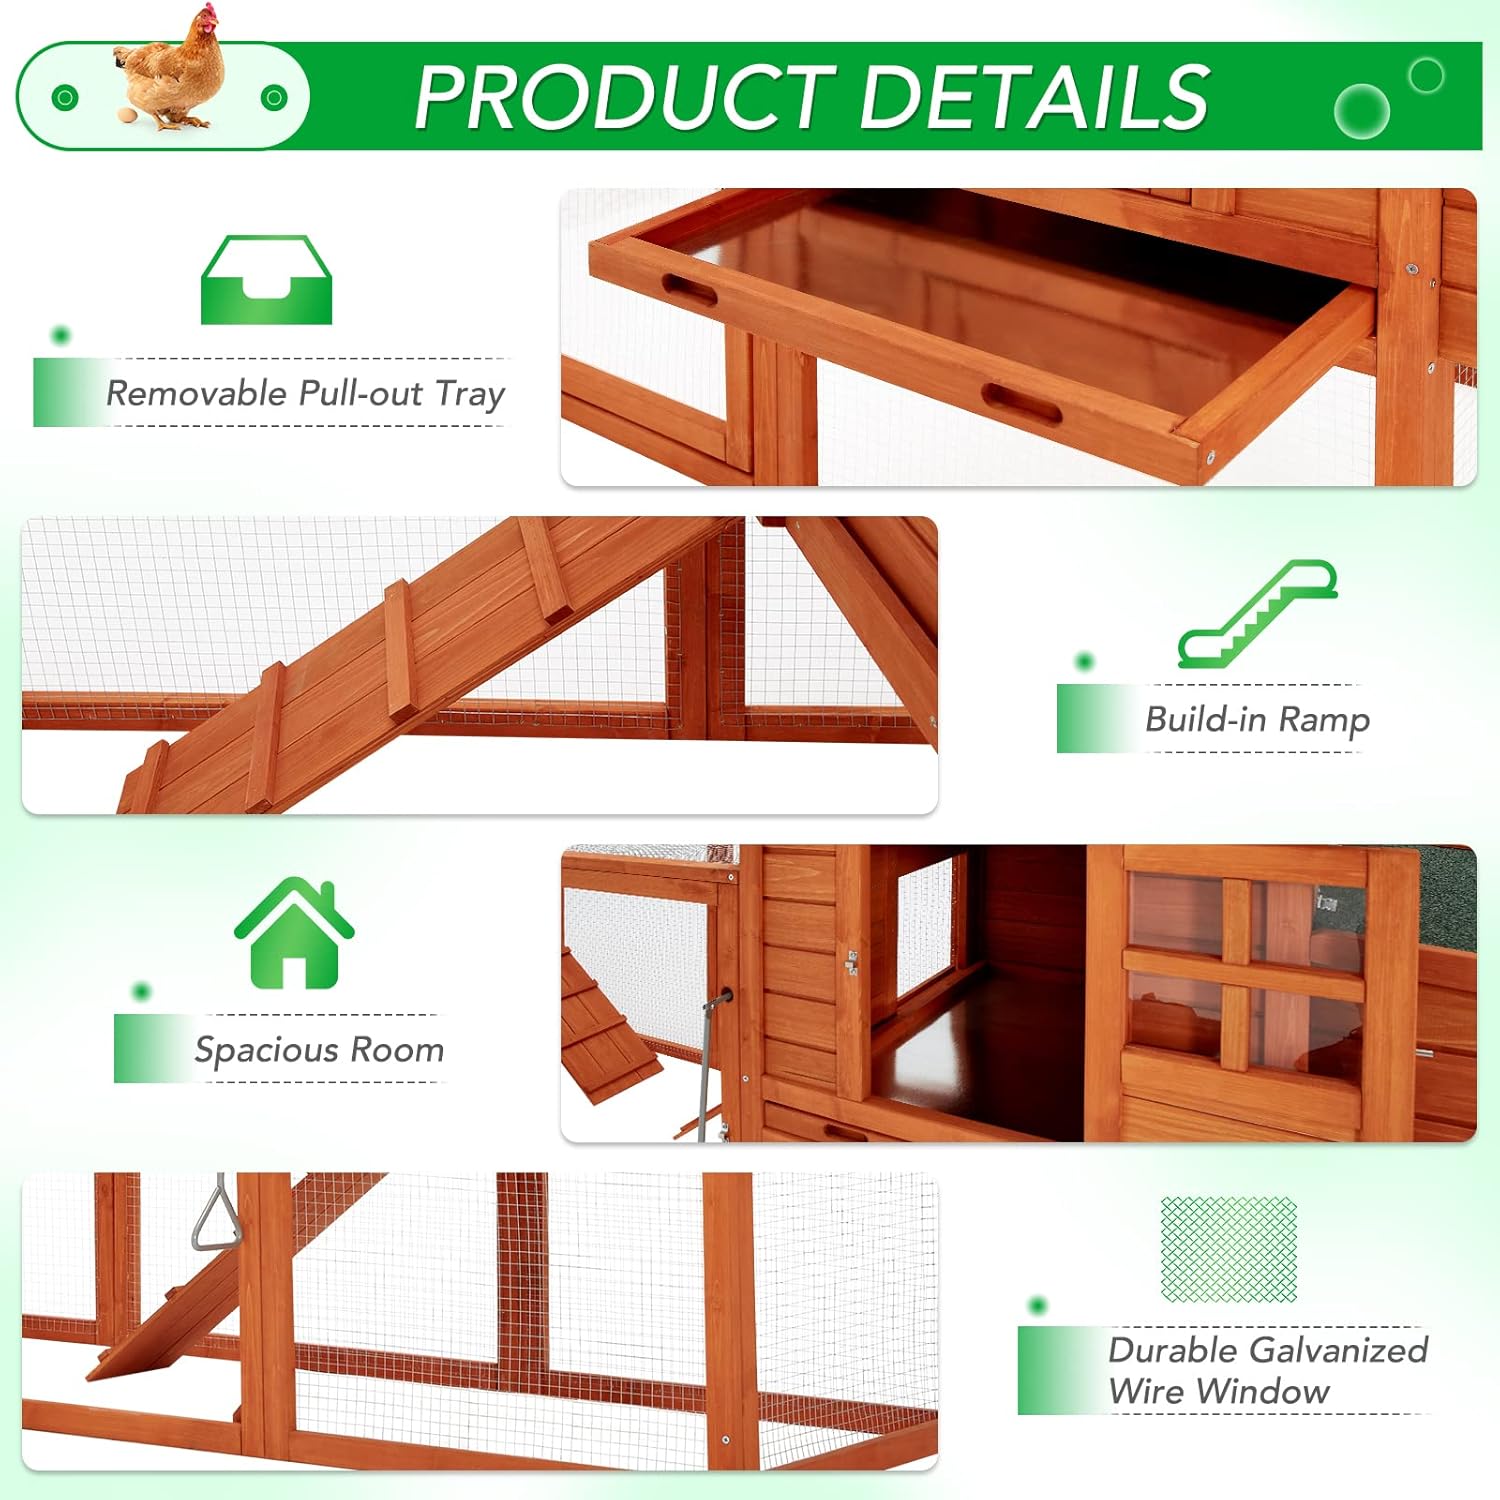
Figure 3.1: Key components including the removable pull-out tray, built-in ramp, spacious interior, and durable galvanized wire window. These elements contribute to the functionality and ease of maintenance of the coop.
The coop is constructed from natural fir wood with a waterproof varnish and features galvanized wire mesh for the run areas.
4. Setup and Assembly
Assembly of the AECOJOY chicken coop requires careful attention to the provided instructions. It is recommended to have at least two adults for assembly.
4.1 Pre-Assembly Steps
- Unpack all components and verify against the parts list in your physical manual.
- Ensure you have all necessary tools (typically a screwdriver and possibly a hammer).
- Choose a suitable location for the coop. Consider factors like sunlight, shade, drainage, and protection from wind.
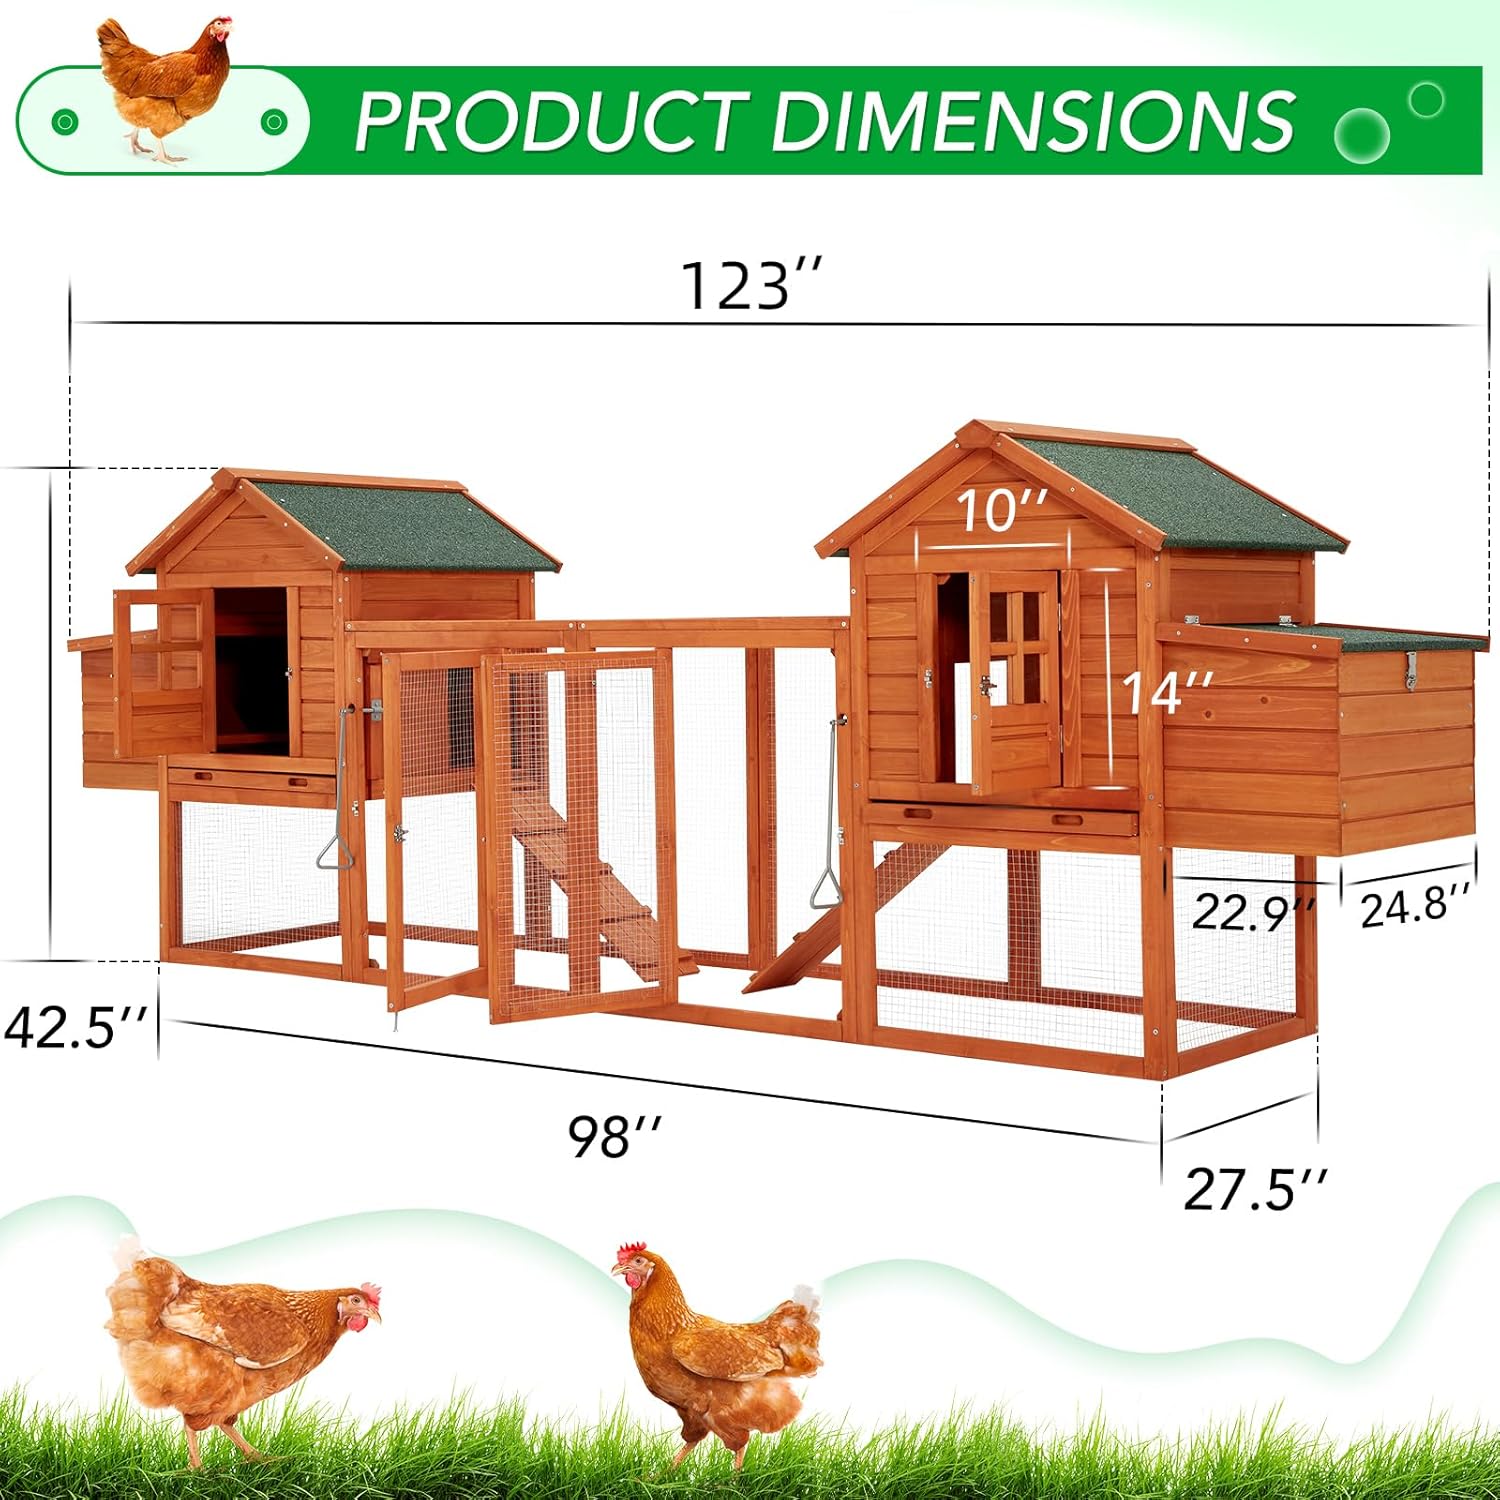
Figure 4.1: Overall dimensions of the chicken coop. The coop measures 123 inches in length, 27.5 inches in width, and 42.5 inches in height. This diagram is crucial for planning the placement of the coop in your yard.
4.2 Assembly Instructions
Follow the step-by-step diagrams and instructions provided in your physical assembly manual. Pay close attention to the orientation of each piece and the type of fasteners used for each connection.
- Begin by assembling the main house sections, then connect the run components.
- Install the nesting boxes and removable trays as indicated.
- Ensure all doors and access points operate smoothly and can be securely locked.

Figure 4.2: The assembled chicken coop featuring multiple entrances and lockable doors. This image demonstrates the various access points for cleaning and tending to chickens, along with the security features.
5. Operation
This section details how to utilize the features of your AECOJOY chicken coop for optimal poultry care.
5.1 Access and Security
The coop is designed with multiple access points for convenience and security. All doors are equipped with locks to protect your chickens from predators.

Figure 5.1: Operation of the steel slide handle to control the door between the run and the resting room. This handle allows for easy opening and closing, ensuring the safety of your pets at night.
5.2 Nesting Boxes
The coop includes four nesting boxes for egg laying. These boxes are designed to be easily accessible for egg collection.

Figure 5.2: The large nesting box features a lockable lid to prevent predators and a removable divider to adjust the size. This design facilitates egg collection and provides a secure space for hens.
5.3 Roosting Bars and Ramp
Internal roosting bars provide a place for chickens to perch. A built-in ramp allows chickens to move between the upper main house and the lower run area.
6. Maintenance
Regular maintenance will extend the life of your chicken coop and ensure a healthy environment for your poultry.
- Cleaning the Removable Tray: The coop features removable trays for easy cleaning of droppings. Pull out the trays, empty them, clean with a mild disinfectant, and allow to dry completely before reinserting. This should be done regularly to maintain hygiene.
- Wood Inspection: Periodically inspect the wooden structure for any signs of wear, rot, or damage. Apply a non-toxic, pet-safe wood sealant annually to protect the wood from moisture and prolong its lifespan.
- Roof Maintenance: Check the asphalt roof covering for any tears or damage, especially after strong winds or storms. Repair as needed to maintain its waterproof integrity.
- Wire Mesh: Inspect the galvanized wire mesh for any bends, breaks, or rust. Repair or replace damaged sections to prevent escapes or predator entry.
- Hardware Check: Ensure all locks, hinges, and fasteners are secure and functioning correctly. Tighten any loose screws.
7. Troubleshooting
This section addresses common issues you might encounter with your chicken coop.
- Difficulty with Assembly: If you encounter difficulties during assembly, double-check the diagrams in your physical manual. Ensure all parts are correctly oriented and that you are using the correct fasteners for each step. Sometimes, parts may require slight adjustment to fit properly.
- Doors Not Closing/Locking Properly: Check for any obstructions in the door tracks or hinges. Ensure the coop is on a level surface, as uneven ground can cause misalignment. Lubricate hinges if necessary.
- Wood Splitting: If minor wood splitting occurs during assembly, it may be due to overtightening screws. Avoid excessive force. For existing splits, a wood filler or sealant can be used for repair.
- Pest/Predator Entry: Regularly inspect the entire coop for any small gaps or holes, especially at ground level or where different sections meet. Reinforce weak points with additional wire mesh or wood. Ensure all locks are engaged nightly.
If you experience persistent issues not covered here, please contact AECOJOY customer support.
8. Specifications
| Feature | Detail |
|---|---|
| Model Number | 12033BR-04 |
| Brand | AECOJOY |
| Product Dimensions (L x W x H) | 123" x 27.5" x 42.5" |
| Material | Natural Fir Wood, Galvanized Wire Mesh, Asphalt Roof |
| Number of Levels | 2 |
| Number of Doors | 3 (main access points) |
| Nesting Boxes | 4 (with removable divider) |
| Removable Tray | Yes |
| Roosting Bars | Yes |
| Color | Natural Wood |
9. Warranty and Support
For warranty information, please refer to the documentation included with your purchase or visit the official AECOJOY website. If you have any questions, require replacement parts, or need assistance with assembly or operation, please contact AECOJOY customer support.
AECOJOY Customer Support:
- Refer to your purchase documentation for specific contact details.
- Visit the AECOJOY official website for FAQs and support resources.