1. Introduction
This manual provides detailed instructions for the installation, adjustment, and maintenance of your maXpeedingrods T6 Coilover Suspension Kit. Designed for the Nissan Sentra B16 (2007-2012), these coilovers offer 24 levels of damper adjustment and adjustable ride height for enhanced driving performance. Please read this manual thoroughly before beginning any work to ensure proper installation and safe operation.
2. Safety Information
- Professional installation is highly recommended. Improper installation can lead to vehicle damage or serious injury.
- Always use appropriate safety equipment, including eye protection, gloves, and sturdy footwear.
- Ensure the vehicle is securely supported on jack stands or a lift before working underneath it. Never rely solely on a jack.
- Do not modify any components of the coilover kit.
- After installation, perform a wheel alignment to ensure proper vehicle handling and tire wear.
- Regularly inspect all suspension components for wear, damage, or loose fasteners.
3. Package Contents
Verify that all components listed below are present and undamaged before beginning installation.

Image: Packaging list showing 2x Front coil-overs, 2x Rear shock absorbers, 2x Rear spring kits, 2x Allen wrench, and 2x C spanners.
- 2x Front Coil-overs
- 2x Rear Shock Absorbers
- 2x Rear Spring Kits
- 2x Allen Wrenches
- 2x C Spanners
4. Product Overview and Features
The maXpeedingrods T6 Coilover Suspension Kit is engineered for performance and adjustability, featuring:
- 24 Levels Adjustable Damper: Allows fine-tuning of damping force for various driving conditions. Levels 0-8 are suggested for street use, 9-16 for mountain roads, and 17-24 for race tracks.
- Adjustable Height: Independent ride height and spring tension settings allow for 1-3 inches of height adjustment, enabling a more aggressive stance.
- High Tensile Springs: Front spring rate: 8kg/mm (448lbs/in); Rear spring rate: 5kg/mm (280 lbs/in). Stress-tested over 600,000 times with less than 0.04% distortion.
- Upgraded Version: Features track-grade springs, high-viscosity damping oil for improved adhesion and corrosion resistance, and enhanced damping across temperature ranges.
- Adjustable Camber Plates: Provides sharp and precise handling.
- Full-Length Dust Boot: Protects the rod and piston from dust and debris.
- High Rigid Piston Rod: Constructed from high-frequency heat-treated steel for durability and high toughness.

Image: Detailed diagram illustrating key components of the coilover, including the camber plate, upper spring seat with radial bearing, full-length dust boot, 6061-T6 AL perch, anodized shock body, powder-coated lower mount, and 24 clicks of rebound damping force adjustment.

Image: Close-up view of the high rigid piston rod, highlighting its 22mm front rod diameter for long-lasting lifetime and high-frequency heat treatment for rigidity and toughness.

Image: Adjustable camber plates providing sharp and precise handling, shown on the top mount of the coilover.

Image: Illustration of a full-length dust boot designed to protect the rod and piston from dust and debris, shown alongside a smaller image of the coilover.

Image: Diagram illustrating the height adjustable feature of the coilovers, allowing for independent ride height and spring tension settings.

Image: Close-up of a coilover highlighting the 24 clicks damping adjustable feature and the radial bearing for smooth operation.
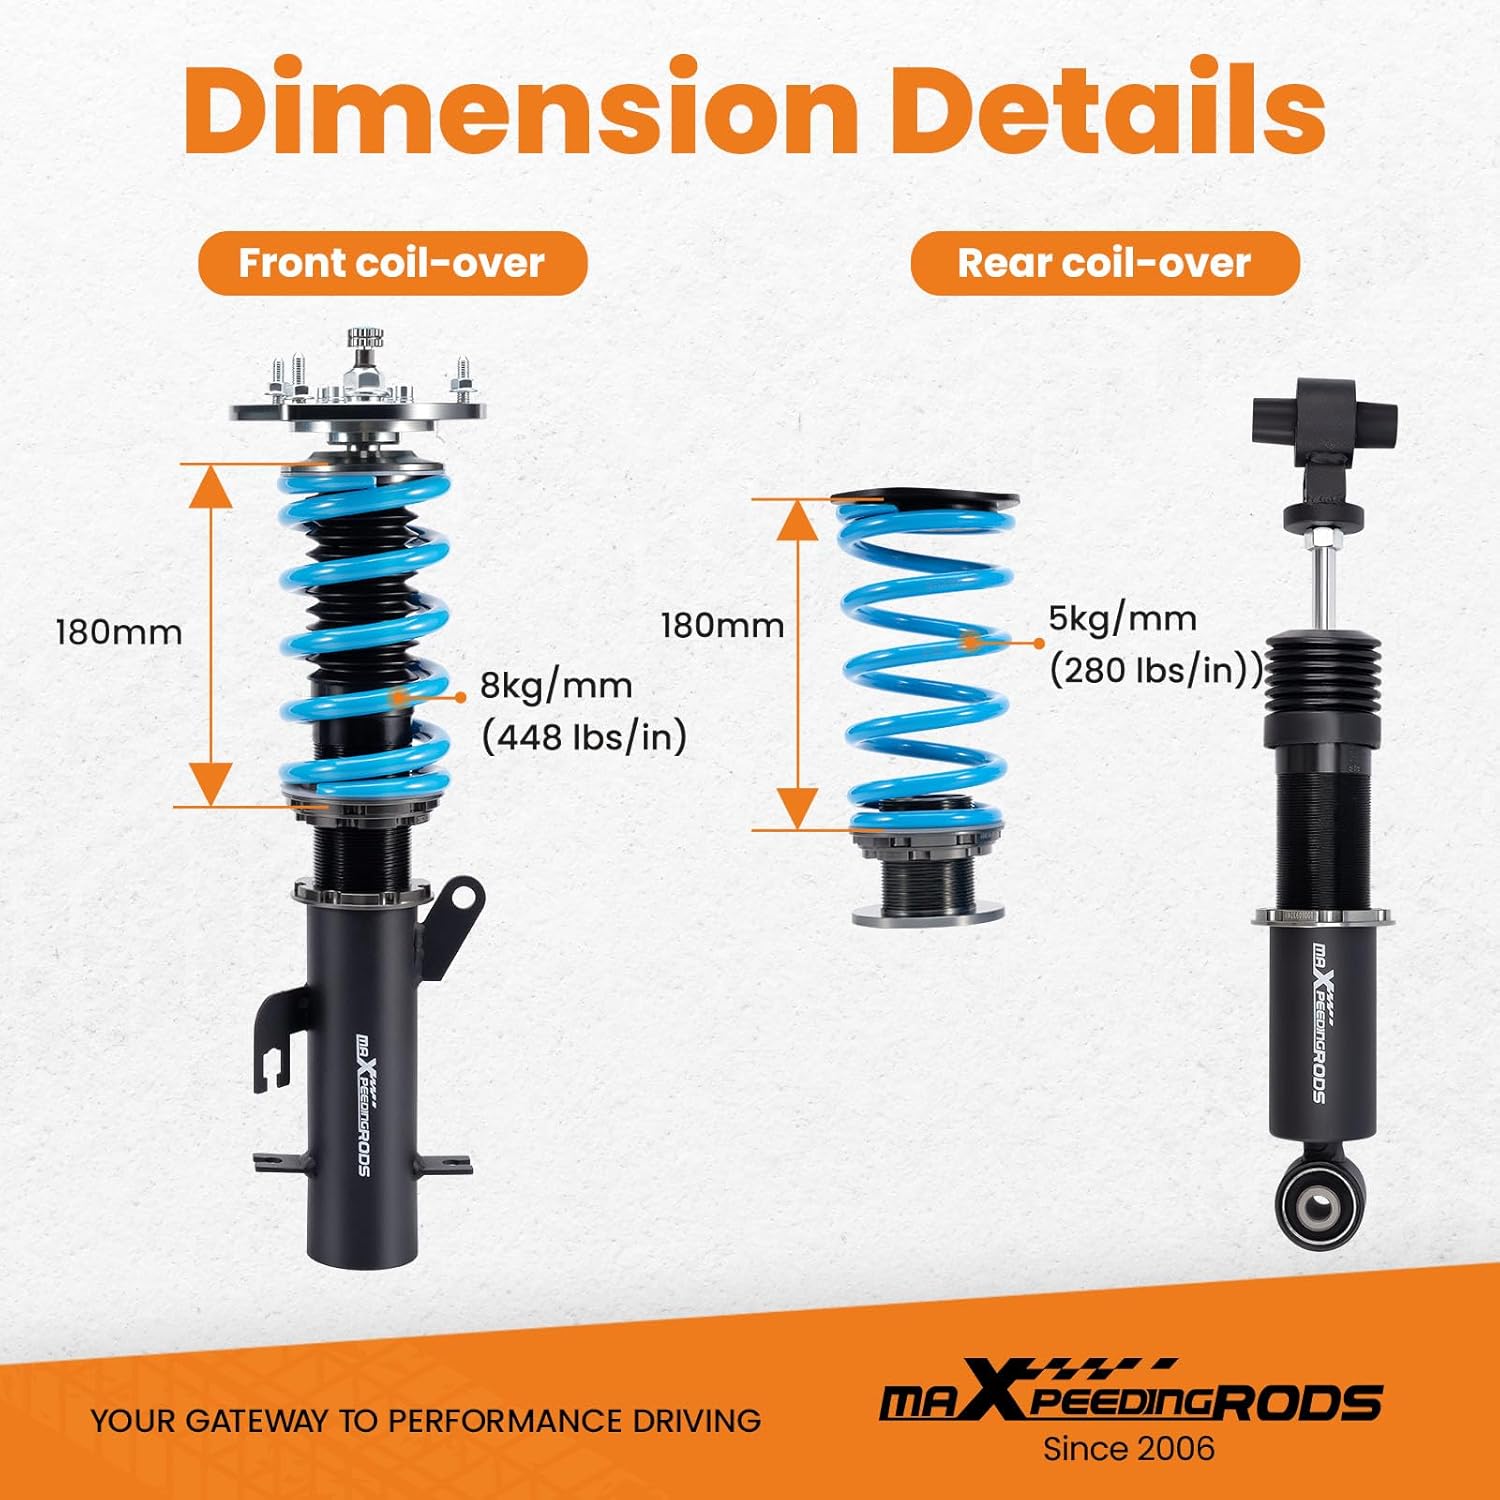
Image: Dimension details for both front and rear coilovers, specifying spring rates (Front: 8kg/mm, Rear: 5kg/mm) and overall lengths.
5. Installation Guide
Installation of coilovers requires specialized tools and automotive knowledge. It is strongly recommended that installation be performed by a qualified professional. The following steps provide a general overview.
5.1. Pre-Installation Checks
- Ensure the vehicle is on a level surface and securely lifted.
- Remove wheels and any necessary brake components or suspension links to access the OEM struts.
- Familiarize yourself with the coilover components and their assembly.
5.2. Coilover Assembly (General)
Before installing on the vehicle, the coilover components need to be assembled correctly. This video demonstrates the general assembly process for a coilover unit.
Video: "How to Assemble Coilover" by maXpeedingrods-us. This video demonstrates the step-by-step assembly of a coilover unit, including attaching the spring seat, upper and lower lockers, dust boot, spring, and top mount, followed by spring preload adjustment.
5.3. Vehicle Installation Overview
This video provides an overview of the installation process of T6 coilovers on a vehicle, showcasing the removal of old components and fitting of the new suspension kit.
Video: "T6 Upgrade Coilovers for Comfortable Driving" by maXpeedingrods-us. This video highlights the features and installation process of the T6 coilovers on a vehicle, demonstrating the removal of existing suspension and fitting of the new coilover units.
6. Adjustment Guide
6.1. Spring Preload Adjustment
Proper spring preload is crucial for optimal performance and ride quality. This video guides you through the process of adjusting the spring preload.
Video: "How to adjust spring preload" by maXpeedingrods-us. This video demonstrates how to set the spring at "0" preload by adjusting the spring seat, measuring the spring length, and then tightening the lock ring to secure the preload.
- Set the spring at "0" preload by adjusting the spring seat so the spring sits correctly, without being loose or compressed.
- Measure the spring length to confirm it matches the original length (often marked on the spring).
- Adjust the spring seat by 7-10mm from the "0" preload position.
- Tighten the lock ring using the provided C spanners to secure your desired preload setting.
6.2. Ride Height Adjustment
Adjusting the ride height allows you to customize your vehicle's stance. This video explains how to adjust the coilover height.
Video: "How to adjust coilover height" by maXpeedingrods-us. This video demonstrates how to loosen the lower locker using spanners and then turn the lower mount clockwise to lower the car or counter-clockwise to raise it, followed by tightening the locker.
- Loosen the lower locker using the provided C spanners.
- Turn the lower mount clockwise to lower the vehicle or counter-clockwise to raise it.
- Measure the desired ride height.
- Tighten the lower locker with the C spanners to secure the new ride height.
6.3. Damper Adjustment
The 24-level adjustable damper allows you to fine-tune the ride comfort and handling characteristics. The adjustment knob is typically located at the top of the coilover (for front) or bottom (for rear).
- Turn the adjustment knob clockwise for a stiffer ride (harder damping).
- Turn the adjustment knob counter-clockwise for a softer ride (softer damping).
- Suggested settings:
- Levels 0-8: Street use (comfortable)
- Levels 9-16: Mountain use (balanced performance)
- Levels 17-24: Race tracks use (firm, responsive)
7. Maintenance
- Regularly clean coilovers to prevent dirt and debris buildup, especially around threads and seals.
- Inspect for any signs of leaks, corrosion, or damage to the shock body, springs, and mounts.
- Check all bolts and nuts for proper torque periodically, especially after initial installation and after significant driving.
- Ensure dust boots are intact to protect the piston rod.
8. Troubleshooting
If you experience issues with your coilovers, consider the following:
- Unusual Noises (clunking, squeaking): Check for loose bolts, improper spring preload, or damaged bushings.
- Poor Ride Quality (too stiff/soft): Adjust damper settings according to your preference and driving conditions. Verify spring preload is set correctly.
- Uneven Ride Height: Re-measure and adjust ride height on all four corners. Ensure lock rings are tightened.
- Leaking Shock Absorber: A leaking shock absorber indicates a seal failure and requires replacement.
For persistent issues, contact maXpeedingrods customer support or consult a professional mechanic.
9. Specifications
| Feature | Specification |
|---|---|
| Product Model | DS25HUN |
| Application | Nissan Sentra B16 (2007-2012) |
| Damper Adjustment | 24 Levels Rebound Damping Adjustable |
| Height Adjustment | 1-3 inches Lowering (does not keep original ride height) |
| Front Spring Rate | 8 kg/mm (448 lbs/in) |
| Rear Spring Rate | 5 kg/mm (280 lbs/in) |
| Spring Preload | 7-10 mm |
| Material | High Tensile Performance Spring, 6061-T6 Aluminum Components |
| Item Weight | 54.2 pounds |
| Product Dimensions | 25.2 x 19.69 x 7.87 inches |
10. Warranty and Support
maXpeedingrods products are backed by a manufacturer's warranty. For specific warranty details, claims, or technical support, please refer to the official maXpeedingrods website or contact their customer service directly. Keep your purchase receipt as proof of purchase.


