
1. Introduction
This manual provides comprehensive instructions for the installation, operation, and maintenance of your SmartStandard 24in x 84in Double Glass Sliding Barn Door with 5FT Bypass Hardware Kit. Please read these instructions carefully before beginning installation to ensure proper assembly and safe operation. Retain this manual for future reference.

Image: SmartStandard 24in x 84in Double Glass Sliding Barn Door installed in a home setting, showcasing its modern design and frosted glass panels.
2. Safety Information
Always follow basic safety precautions when installing or operating this product to reduce the risk of injury or damage.
- Ensure all components are present and undamaged before installation.
- Wear appropriate safety gear, including gloves and eye protection, during installation.
- This product is heavy. Two or more people are recommended for lifting and installation.
- Verify that the wall structure can support the weight of the doors and hardware.
- Keep children and pets away from the installation area.
- Do not modify the product or its components, as this may compromise safety and void the warranty.
3. Package Contents
Your SmartStandard Double Glass Sliding Barn Door kit includes the following items. Please check all packages upon receipt to ensure all parts are accounted for.
- 2 x 24" (W) x 84" (H) Glass Barn Doors
- 1 x 5FT Bypass Sliding Barn Door Hardware Kit
- Installation Manual
Note:
- The product is shipped in three separate packages: two for the doors and one for the sliding hardware kit.
- Assembly of the doors is required.

Image: An exploded view diagram illustrating the individual components of the barn door panels and the complete hardware kit, including the track, hangers, and fasteners.
4. Specifications
| Feature | Detail |
|---|---|
| Brand | SMARTSTANDARD |
| Model Number | 24G5-JBPSKITJ |
| Door Dimensions (each) | 24 inches (W) x 84 inches (H) |
| Track Kit Length | 5 feet |
| Material | Glass, Polyvinyl Chloride (PVC) |
| Color | White |
| Style | Modern |
| Item Weight | 53.7 pounds |
| Assembly Required | Yes |
The frosted glass design enhances transparency while maintaining privacy. The high-quality prefinished PVC surface provides waterproof protection, scratch resistance, and a smooth, easy-to-clean finish.

Image: Detailed view highlighting the frosted glass, which is frosted on one side and transparent on the other for privacy and light transmission, and the waterproof, scratch-resistant PVC material bonded to MDF wood board.
5. Setup and Installation
The SmartStandard bypass barn door hardware kit is designed to save approximately 50% of wall space compared to traditional double barn door hardware. This allows for flexible door movement and efficient use of your living area.

Image: A visual comparison demonstrating how the bypass barn door kit saves approximately 50% of wall space compared to traditional double barn door hardware, illustrating the compact design.
5.1. Pre-Installation Considerations
- Door Opening Measurement: Carefully measure your door opening width and height. Refer to the sizing chart below to select the correct door and track kit size.
- Wall Structure: Ensure the wall above the door opening is structurally sound and can support the weight of the doors and hardware. A header board may be required if studs do not align with track mounting points.
- Ceiling Clearance: A minimum distance of 6 inches from the rail hole to the ceiling is required.
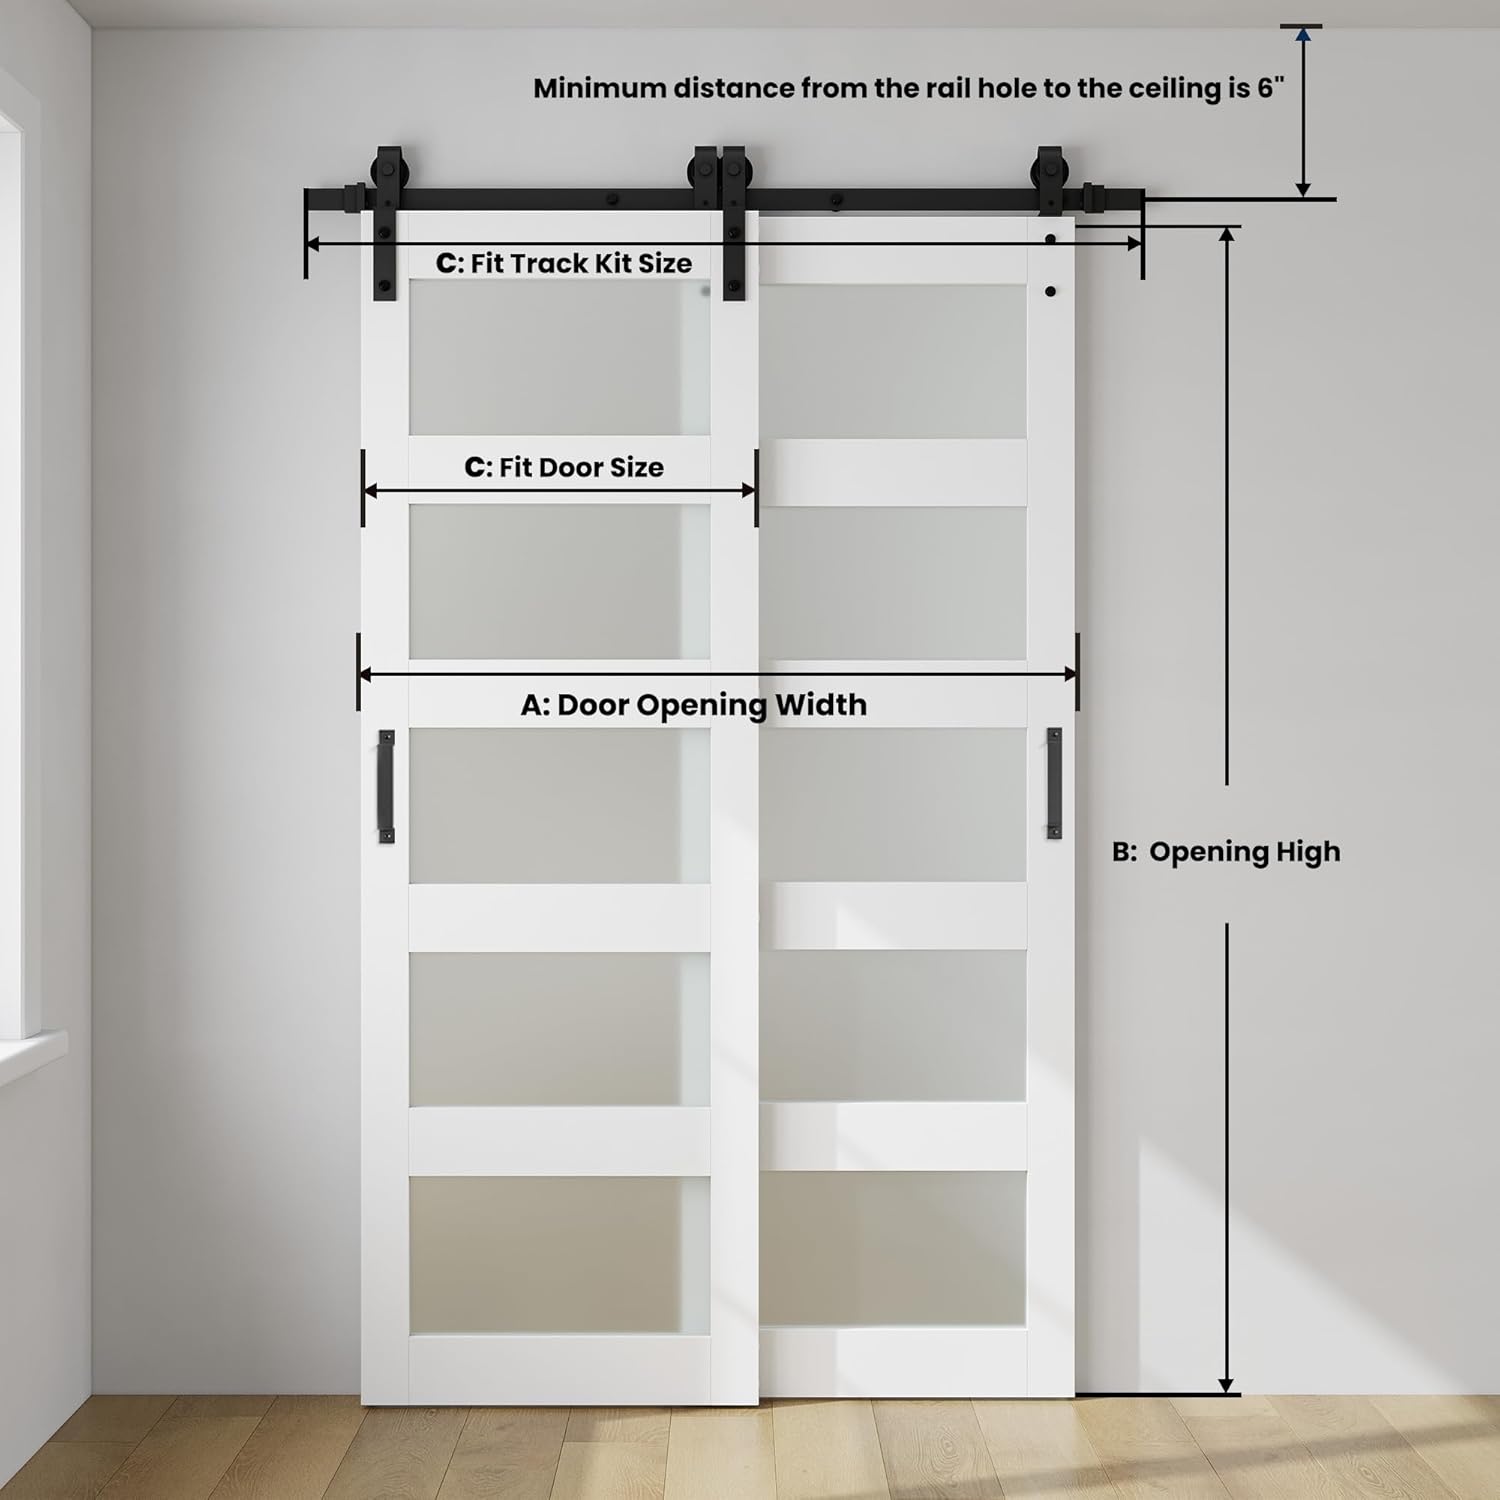
Image: A diagram showing critical measurements for installation, including door opening width (A), opening height (B), and fit door kit size (C), along with the required 6-inch minimum clearance from the rail hole to the ceiling.
5.2. Installation Steps
The doors are pre-drilled and ready for assembly. All necessary screws are included. Refer to the detailed graphic text installation manual provided in your package for complete instructions. A summary of the steps is provided below:
- Assemble the Door: Follow the instructions to assemble the individual door panels.
- Mark and Drill Holes: Mark the positions for the track holes on the wall. Attach a headboard if necessary to ensure secure mounting.
- Install the Track: Securely install the track using the provided spacers and lag bolts.
- Attach Door Hangers and Anti-Jumpers: Fasten the hangers to the top of the assembled doors and install anti-jumper discs.
- Hang Doors: Carefully hang the inside and outside doors onto the track.
- Mount Floor Guides: Install the floor guides to prevent the doors from swinging out.
- Adjust Door Stoppers: Position and tighten the door stoppers to control the door's travel.
- Final Check: Ensure all components are secure and the doors slide smoothly.

Image: An eight-step visual guide demonstrating the installation process, from door assembly to mounting the track, hanging doors, and adjusting stoppers, ensuring a complete and functional setup.
6. Operation
Your SmartStandard Double Glass Sliding Barn Door is designed for smooth and flexible operation, allowing you to open the doors to the left or right freely.
- To open the door, gently push or pull the door panel along the track in the desired direction.
- The bypass design allows one door to slide in front of the other, maximizing space utilization.
- Ensure the floor guides are properly installed to maintain door alignment during operation.

Image: Three panels demonstrating the flexible operation of the bypass barn doors: one showing the doors opened to the right, one fully closed, and one opened to the left, illustrating the space-saving functionality.
7. Maintenance
Regular maintenance will ensure the longevity and optimal performance of your barn door system.
- Cleaning: The high-quality PVC surface is waterproof and easy to clean. Use a soft, damp cloth with mild soap and water to wipe down the door panels and hardware. Avoid abrasive cleaners or harsh chemicals.
- Track and Rollers: Periodically inspect the track for any debris or obstructions. Clean the track and rollers to ensure smooth gliding. Lubricate rollers with a silicone-based spray if necessary.
- Hardware Check: Regularly check all screws and bolts for tightness. Retighten any loose fasteners to prevent sagging or misalignment.
- Glass Care: Clean the frosted glass panels with a glass cleaner and a soft cloth.

Image: A close-up of a hand wearing yellow gloves cleaning the door surface with a blue cloth, illustrating the ease of cleaning due to the waterproof and smooth finish.
8. Troubleshooting
If you encounter issues with your barn door, refer to the following common problems and solutions:
- Doors do not slide smoothly:
- Check the track for debris or obstructions and clean if necessary.
- Ensure rollers are clean and lubricated.
- Verify that the track is level and securely mounted.
- Doors are misaligned or rub:
- Check that all hangers are properly attached and tightened.
- Adjust the door stoppers and floor guides to ensure correct positioning.
- Confirm the track is installed straight and level.
- Door swings out from the wall:
- Ensure floor guides are securely mounted and properly adjusted to engage the bottom of the doors.
9. Warranty and Support
SmartStandard is committed to providing high-quality products. While specific warranty details are not provided in this manual, please retain your proof of purchase. For any questions, missing parts, or technical support, please contact SmartStandard customer service through the retailer where the product was purchased or visit the official SmartStandard website for contact information.
You can also find professional support from our online service as mentioned in the product features.
For more information, visit the SMARTSTANDARD Store.