
1. Introduction
This manual provides essential information for the safe assembly, operation, and maintenance of your new Nasitip 24V Electric Go Kart. Please read all instructions carefully before use to ensure proper function and to prevent injury. Retain this manual for future reference.
The Nasitip 24V Electric Go Kart is designed for children aged 6-16 years, with a maximum weight capacity of 110 lbs. It features a 24V battery system with dual 150W motors, offering speeds up to 8 MPH, and includes both Drift and Sport modes for varied driving experiences.
2. Product Overview and Key Features
The Nasitip 24V Electric Go Kart combines robust construction with engaging features for an enjoyable driving experience. Key features include:
- Dual 150W Motors: Provides power for speeds up to 8 MPH.
- Drift/Sport Modes: Selectable driving modes for different terrains and styles.
- Adjustable Length: 3-level length adjustment to accommodate various rider heights.
- Safety Features: Equipped with a slow start function and a seat belt.
- Multifunctional Console: Includes music playback, one-touch start, USB interface, and high/low gear adjustment.
- EVA Tires: Durable tires designed for performance.

Figure 2.1: Front-side view of the Nasitip 24V Electric Go Kart.

Figure 2.2: Overview of key functions including 24V battery, 150W motors, charging time, and drift key.
Video 2.1: A brief overview of the 24V Go Kart's features and capabilities.
3. Assembly Instructions
Follow these steps carefully to assemble your Nasitip 24V Electric Go Kart. It is recommended to have two adults for assembly.
- Unpack Components: Carefully remove all parts from the packaging. Verify all components are present against the packing list.
- Attach Front Axle: Secure the front axle to the main chassis using the provided hardware.
- Install Steering Column: Insert the steering column into its designated slot and secure it.
- Connect Wiring: Connect the necessary electrical wires for the steering wheel and main body.
- Attach Wheels: Install the front and rear wheels, ensuring they are securely fastened.
- Install Seat: Place the seat onto the chassis and secure it.
- Attach Rear Spoiler: Fasten the rear spoiler to the back of the go-kart.
Video 3.1: Detailed installation guide for the 24V Go Kart.
4. Operating Instructions
Familiarize yourself with the controls before operating the go-kart.
4.1 Starting and Stopping
- One-Touch Start: Press the red power button on the console to turn the go-kart ON. The go-kart will emit a starting sound.
- Acceleration: Press the accelerator pedal (right pedal) to move forward.
- Braking: Release the accelerator pedal to engage braking and slow down.
- Turning Off: Press and hold the red power button to turn the go-kart OFF.
4.2 Driving Modes and Speed
- Forward/Reverse: Use the shifter lever to select Forward (F), Neutral (N), or Reverse (R).
- High/Low Speed: Use the speed switch (green/red) to select between high and low-speed settings.
- Drift/Sport Mode: Use the mode selection switch to toggle between Drift mode (for controlled slides) and Sport mode (for standard driving).
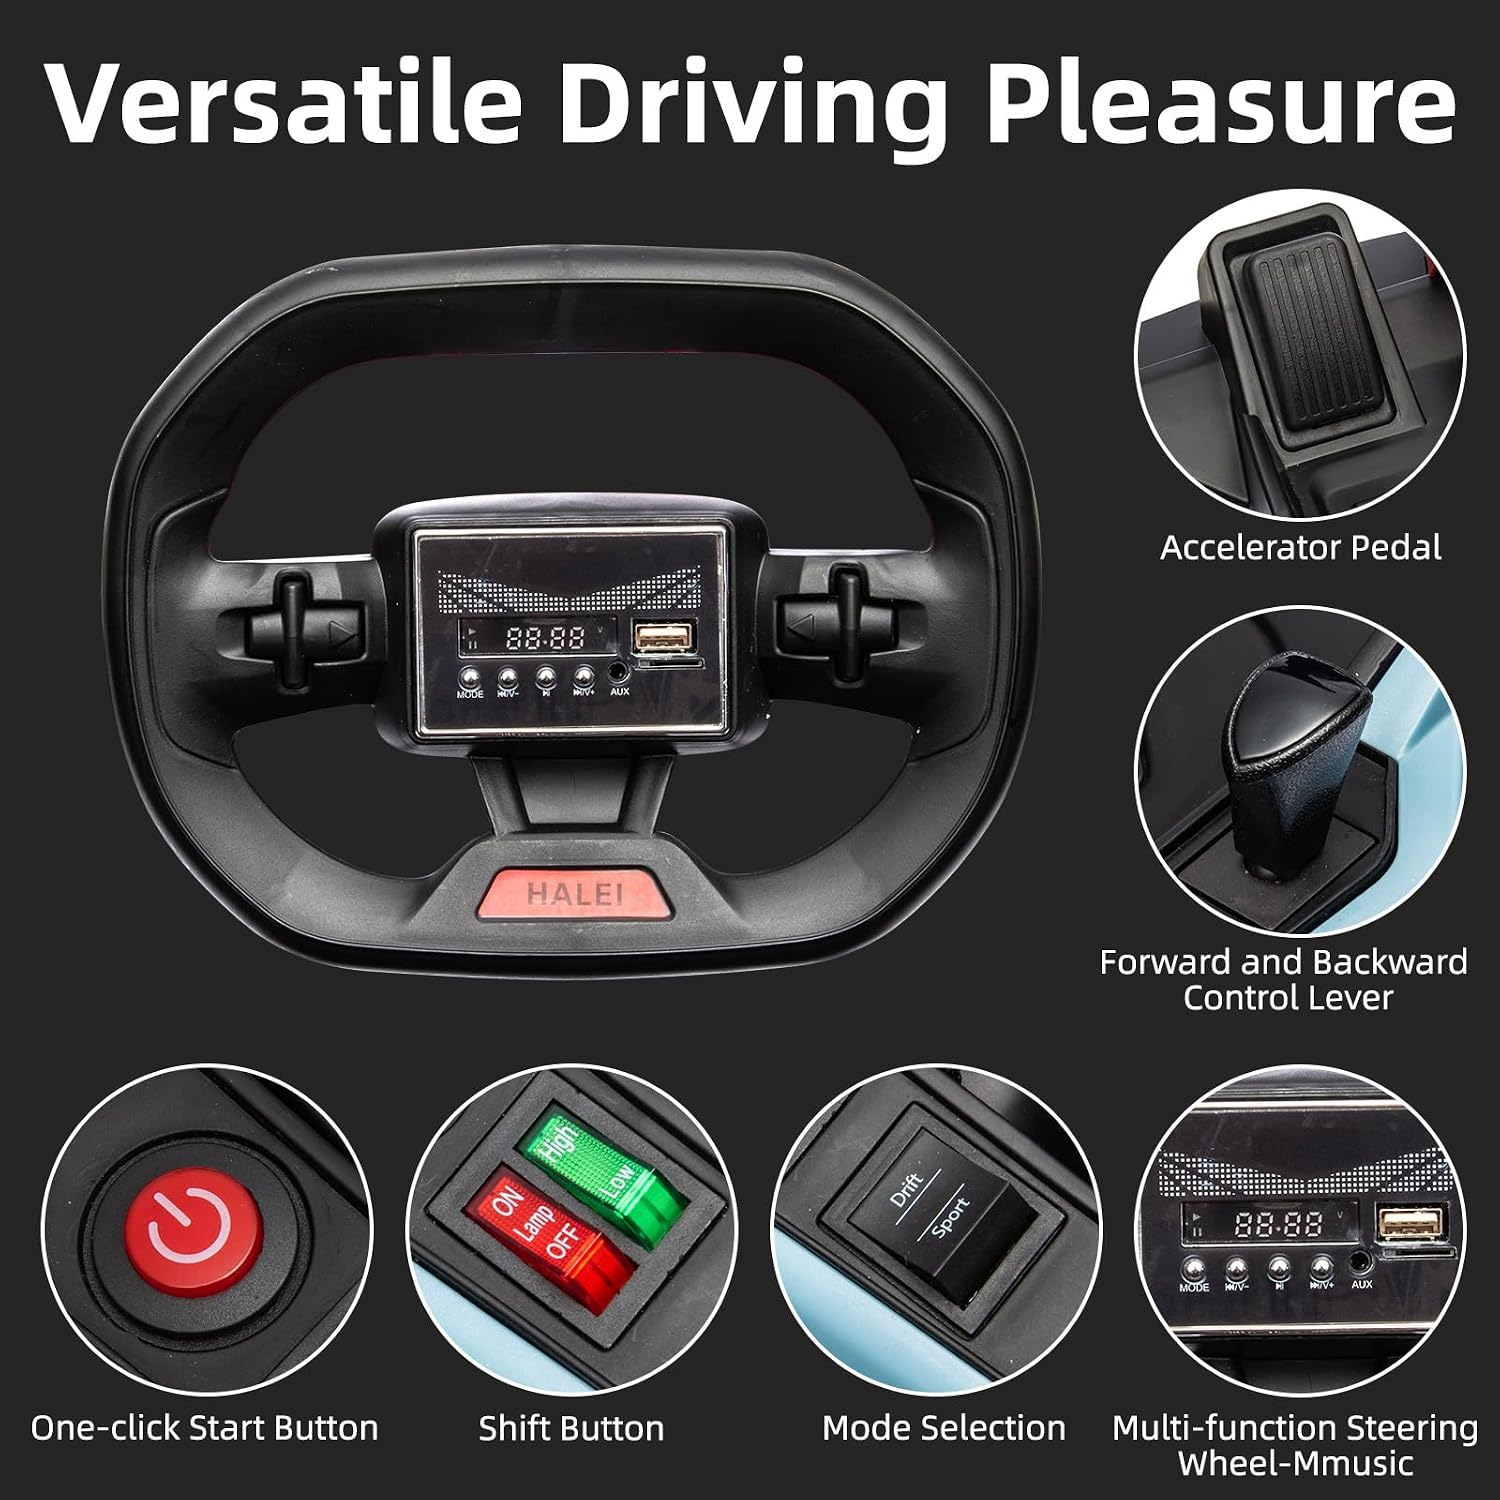
Figure 4.1: Overview of the control panel, including one-click start, shift button, mode selection, and multi-function steering wheel.
Video 4.1: Demonstrates how to operate the 24V Go Kart, including starting, driving, and mode selection.
Video 4.2: Shows the go-kart in operation, highlighting various play scenarios and features.
5. Charging and Battery Care
The go-kart is powered by two 12V batteries (included). Proper charging and battery care are essential for longevity and performance.
- Charging Time: A full charge typically takes 8-12 hours. Do not overcharge.
- First Use: Charge the battery for a full 18 hours before the first use.
- Charger: Use only the charger provided with the go-kart.
- Storage: If storing the go-kart for an extended period, charge the battery fully every 3 months to maintain battery health.
6. Maintenance and Storage
- Cleaning: Wipe the go-kart with a damp cloth. Do not use abrasive cleaners or submerge in water.
- Inspection: Regularly check all screws, nuts, and bolts to ensure they are tight. Inspect tires for wear and tear.
- Storage: Store the go-kart in a dry, cool place away from direct sunlight and moisture.
7. Troubleshooting
If you encounter issues with your go-kart, refer to the following common solutions:
- Go-Kart Not Starting: Ensure the battery is fully charged and properly connected. Check the power button.
- Reduced Speed/Power: The battery may need recharging. Ensure the go-kart is not overloaded beyond its weight capacity.
- Unusual Noises: Inspect for loose parts or obstructions in the wheels or motor area.
For persistent issues, contact customer support.
8. Specifications
| Feature | Detail |
|---|---|
| Product Dimensions | 47.24 x 29.92 x 21.06 inches |
| Item Weight | 54.1 pounds |
| Item Model Number | V94pNQq1z1R1LDn16k-7LgijVUw8F |
| Recommended Age | 6 - 16 years |
| Batteries | 2 x 12V batteries (included) |
| Max Speed | Up to 8 MPH |
| Max Weight Capacity | 110 lbs |
| Manufacturer | Nasitip |

Figure 8.1: Detailed dimensions of the go-kart, including length adjustment options.
9. Safety Guidelines
Your safety and the safety of others are paramount. Always follow these guidelines when operating the go-kart:
- Adult Supervision: Always operate under direct adult supervision.
- Protective Gear: Always wear a helmet and appropriate safety gear (e.g., knee pads, elbow pads) when riding.
- Seat Belt: Ensure the seat belt is securely fastened before each ride.
- Operating Environment: Ride on flat, dry surfaces away from traffic, steep inclines, water, and other hazards.
- Weight and Age Limits: Do not exceed the maximum weight capacity of 110 lbs or allow riders outside the recommended age range of 6-16 years.
- Slow Start Function: The go-kart is equipped with a slow start function to prevent sudden acceleration.
- No Passengers: This go-kart is designed for a single rider only.

Figure 9.1: Emphasizing safety features like helmet use and seat belt for riders.
10. Warranty and Customer Support
For warranty information, replacement parts, or technical assistance, please contact Nasitip customer support through your retailer or the official Nasitip website. Please have your model number (V94pNQq1z1R1LDn16k-7LgijVUw8F) and purchase date available.