
Greluma W3230
Greluma W3230 Digital Temperature Controller Instruction Manual
Model: W3230 | Brand: Greluma
1. Introduction
This instruction manual provides essential information for the safe and effective operation of your Greluma W3230 Digital Temperature Controller. Please read this manual thoroughly before installation and use, and retain it for future reference.
The Greluma W3230 is a versatile digital thermostat designed for precise temperature control in various applications. It supports both heating and cooling modes, offering a wide temperature control range and high accuracy.
Applications
The W3230 temperature control unit can be widely used in:
- Air conditioning systems
- Incubators
- Equipment boxes
- Aquariums and aquaculture
- Greenhouses
- Warehouses
- Other temperature control protection scenarios

This image illustrates the versatility of the Greluma W3230 Digital Temperature Controller, showing its use in diverse environments such as greenhouses for plant growth, aquaculture for maintaining water temperature, warehouses for climate control, and aquariums for aquatic life.
2. Safety Information
To ensure safe operation and prevent damage, please observe the following safety precautions:
- Electrical Safety: Ensure all wiring is performed by a qualified professional and adheres to local electrical codes. Disconnect power before making any connections or performing maintenance.
- Voltage Compatibility: This device operates on AC 110-220V. Verify your power supply matches this requirement. Incorrect voltage can damage the unit.
- Load Capacity: The temperature control output is a 10A relay. Do not exceed this current rating to avoid overheating and potential damage to the device or connected equipment.
- Sensor Connection: Ensure the NTC temperature sensor is correctly connected and not damaged before use. A missing or faulty sensor will prevent proper operation.
- Environmental Conditions: Operate the device within the specified environmental requirements (-10 to 60°C, humidity 20%-85%RH) to ensure optimal performance and longevity.
- Waterproof Probe: The NTC probe is waterproof, but the main controller unit is not. Protect the main unit from moisture.
3. Package Contents
Upon opening the package, you should find the following items:
- 1 x Greluma W3230 Digital Temperature Controller
- 1 x NTC10K Waterproof Temperature Probe (1 meter length, stainless steel)
4. Product Overview
The Greluma W3230 features a clear digital display and intuitive controls for easy operation.
Components and Display
- Digital Display: Two digital tubes display temperature values. The upper display (PV) shows the actual measured temperature, while the lower display (SV) shows the preset temperature.
- Indicator Light (OUT): This light indicates the status of the relay. When the light is off, the relay is disconnected. When the light is on, the relay is closed (output is active).
- Buttons: The control panel includes three buttons: 'SET', 'Up' (▲), and 'Down' (▼). There is also a 'Restart' button.

This composite image provides detailed views of the W3230 controller. It highlights the digital display, the 'SET', 'Up', 'Down', and 'Restart' buttons, and an internal view of the circuit board, demonstrating the device's construction and user interface.
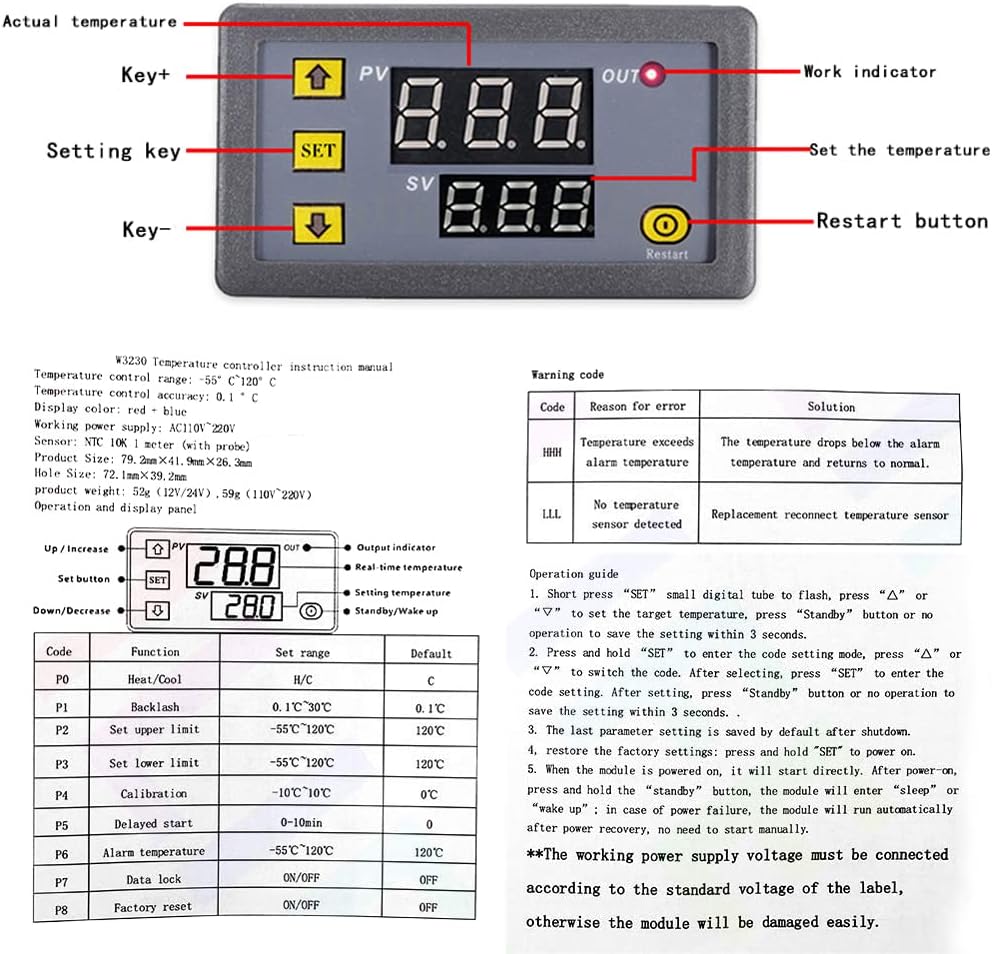
This image presents a comprehensive guide to the W3230's operation. It labels the 'Key+', 'Setting key', 'Key-', 'Work indicator', 'Set the temperature', and 'Restart button' on the control panel. It also includes a 'Warning code' table with reasons for errors and their corresponding solutions, alongside a detailed 'Operation guide' for setting parameters (P0-P7).
5. Specifications
| Feature | Specification |
|---|---|
| Model | W3230 (ZL967LUM) |
| Power Supply | AC 110-220V |
| Control Accuracy | 0.1°C |
| Measurement Accuracy | 0.1°C |
| Temperature Control Range | -50°C to 110°C |
| Resolution | 0.1°C for -9.9 to 99.9°C; 1°C for other ranges |
| Measurement Input | NTC10K/B3435 (1M Waterproof Probe) |
| Output Capacity | 1 Channel Relay Output, 10A |
| Display Type | LED Digital Tube |
| Environmental Requirements | Temperature: -10°C to 60°C; Humidity: 20% to 85% RH |
| Product Dimensions | 17 x 14 x 2.7 cm (approx.) |
| Item Weight | 50 grams |
| Material | ABS (main unit), Stainless Steel (probe) |
| Batteries Required | No |

This image provides the physical dimensions of the Greluma W3230 controller in millimeters and inches.
6. Setup and Wiring
Proper wiring is crucial for the safe and correct operation of the temperature controller. Refer to the wiring diagram below.
Wiring Instructions
- Power Supply: Connect the AC 110-220V power source to the +VCC and -GND terminals. Ensure correct polarity if applicable, though for AC, typically live and neutral.
- Load Connection: Connect your heating or cooling device (load) to the S1 and S2 terminals. These terminals act as a switch controlled by the internal relay.
- Sensor Connection: Plug the NTC temperature probe into the designated sensor port. Ensure it is securely connected.
- Verification: Double-check all connections before applying power. Incorrect wiring can damage the device or connected equipment.
This image includes a clear wiring diagram showing connections for +VCC, -GND, S1, S2, and the load, indicating a 110V-220V AC power input.
7. Operating Modes and Settings
The W3230 controller offers two main operating modes: Heating (H) and Cooling (C).
Basic Operation
- Power On: After connecting the power, the upper digital tube (PV) will display the current measured temperature, and the lower digital tube (SV) will display the preset temperature.
- Set Temperature: Press the 'SET' button once. The lower digital tube (SV) will flash. Use the 'Up' (▲) and 'Down' (▼) buttons to adjust the desired temperature. Press 'SET' again to confirm and exit, or wait 3 seconds for automatic saving.
- Restart: The 'Restart' button can be used to reset the device.
Parameter Settings (P0-P8)
To access advanced settings, press and hold the 'SET' button for approximately 5 seconds until the display shows 'P0'. Use the 'Up' (▲) and 'Down' (▼) buttons to navigate through the parameters (P0-P8). Press 'SET' once to enter a parameter's setting, use 'Up'/'Down' to change the value, and press 'SET' again to confirm. Hold 'SET' for 3 seconds or wait for 10 seconds to exit the parameter setting mode.
| Code | Function | Set Range | Default | Description |
|---|---|---|---|---|
| P0 | Heat/Cool Mode | H/C | C | H (Heating): Start temperature < Stop temperature. C (Cooling): Start temperature > Stop temperature. |
| P1 | Return Difference (Hysteresis) | 0.1°C ~ 30°C | 0.1°C | The difference between the set temperature and the temperature at which the relay switches off/on again to prevent frequent cycling. |
| P2 | Set Upper Limit | -55°C ~ 120°C | 120°C | Sets the maximum adjustable temperature for the user. |
| P3 | Set Lower Limit | -55°C ~ 120°C | -55°C | Sets the minimum adjustable temperature for the user. |
| P4 | Temperature Correction | -10°C ~ 10°C | 0°C | Allows for fine-tuning the temperature reading to match a reference thermometer. |
| P5 | Delayed Start Time | 0 ~ 10 min | 0 | Sets a delay before the relay activates after reaching the set temperature, useful for compressors. |
| P6 | High Temperature Alarm | -55°C ~ 120°C | 120°C | Sets a temperature threshold. If the actual temperature exceeds this, an alarm (HHH) may trigger. |
| P7 | Data Lock | ON/OFF | OFF | Locks the settings to prevent accidental changes. |
| P8 | Factory Reset | ON/OFF | OFF | Resets all parameters to their default factory settings. |
8. Maintenance
To ensure the longevity and reliable performance of your Greluma W3230 Digital Temperature Controller, follow these maintenance guidelines:
- Cleaning: Wipe the device with a soft, dry cloth. Do not use abrasive cleaners or solvents. Ensure the device is powered off before cleaning.
- Probe Care: The stainless steel NTC probe is waterproof and resistant to rust. Periodically check the probe and its cable for any signs of damage or wear. Replace if necessary.
- Connections: Regularly inspect all wiring connections to ensure they are secure and free from corrosion.
- Environmental Protection: Keep the main controller unit away from direct water exposure, excessive dust, and extreme temperatures outside its operating range.
9. Troubleshooting
If you encounter issues with your temperature controller, refer to the following common problems and solutions:
| Display Code / Symptom | Reason for Error | Solution |
|---|---|---|
| "-- --" | Temperature sensor is missing or damaged. | Check if the temperature sensor is properly installed. Reconnect or replace the temperature sensor. |
| HHH | Temperature exceeds the high alarm temperature (P6 setting). | Allow the temperature to drop below the alarm threshold. Check the P6 setting if the alarm is triggered too easily. |
| LLL | No temperature sensor detected. | Reconnect or replace the temperature sensor. Ensure it is securely plugged in. |
| Relay does not activate in heating mode. | Current temperature is above the set temperature, or P0 is set to Cooling. | Ensure P0 is set to 'H' (Heating). Verify the set temperature is higher than the current temperature. Check P1 (Hysteresis) setting. |
| Relay does not activate in cooling mode. | Current temperature is below the set temperature, or P0 is set to Heating. | Ensure P0 is set to 'C' (Cooling). Verify the set temperature is lower than the current temperature. Check P1 (Hysteresis) setting. |
| Settings are lost after power cycle. | Settings were not saved correctly. | Ensure you press 'SET' to confirm changes after adjusting a parameter. Wait 3 seconds for automatic saving after setting the target temperature. |
Note: In protection mode (e.g., high/low temperature protection), the relay is automatically disconnected to prevent damage.
10. Warranty and Support
This product is covered by a standard manufacturer's warranty. For specific warranty terms and conditions, please refer to the product packaging or contact your retailer.
For technical support, troubleshooting assistance, or inquiries regarding product functionality, please contact Greluma customer service through your purchase platform or the official Greluma website.
Ask a question about this manual
Ask about setup, troubleshooting, compatibility, parts, safety, or missing instructions. Manuals+ will review the question and use this page’s manual context to help answer it.