
Laney LF-SUPER60-212
Laney LF Super 60-212 Combo Amplifier User Manual
Model: LF-SUPER60-212
Introduction
Thank you for purchasing the Laney LF Super 60-212 60-watt 2 x 12-inch Combo Amplifier. This amplifier is designed to deliver exceptional flexibility and power, featuring vertically aligned drivers for optimal sound projection on stage. This manual provides essential information for the safe and effective use of your amplifier, including setup, operation, maintenance, and troubleshooting.
Important Safety Instructions
- Read these instructions carefully before operating the amplifier.
- Keep these instructions for future reference.
- Heed all warnings on the amplifier and in this manual.
- Do not use this apparatus near water.
- Clean only with a dry cloth.
- Do not block any ventilation openings. Install in accordance with the manufacturer’s instructions.
- Do not install near any heat sources such as radiators, heat registers, stoves, or other apparatus (including amplifiers) that produce heat.
- Do not defeat the safety purpose of the polarized or grounding-type plug. A polarized plug has two blades with one wider than the other. A grounding type plug has two blades and a third grounding prong. The wide blade or the third prong are provided for your safety. If the provided plug does not fit into your outlet, consult an electrician for replacement of the obsolete outlet.
- Protect the power cord from being walked on or pinched, particularly at plugs, convenience receptacles, and the point where they exit from the apparatus.
- Only use attachments/accessories specified by the manufacturer.
- Unplug this apparatus during lightning storms or when unused for long periods of time.
- Refer all servicing to qualified service personnel. Servicing is required when the apparatus has been damaged in any way, such as power-supply cord or plug is damaged, liquid has been spilled or objects have fallen into the apparatus, the apparatus has been exposed to rain or moisture, does not operate normally, or has been dropped.
Setup
Unpacking and Placement
Carefully remove the amplifier from its packaging. Ensure all accessories, such as the power cord and footswitch (if included), are present. Place the amplifier on a stable, level surface. The vertically aligned drivers are designed to project sound effectively, so consider its position relative to your audience and stage presence.

Figure 1: Front view of the Laney LF Super 60-212 amplifier, showcasing its blue finish and tan grille cloth.
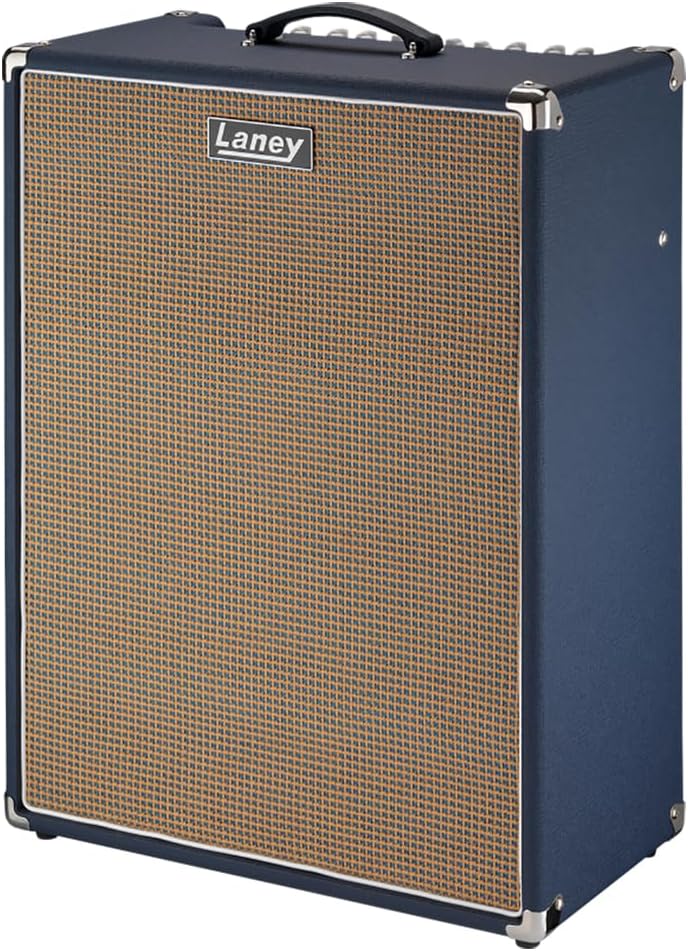
Figure 2: Angled front view of the amplifier, highlighting its compact vertical design.
Connections
Before connecting any cables, ensure the amplifier is turned off and unplugged from the mains power supply.
- Power Connection: Connect the supplied power cord to the IEC inlet on the rear panel of the amplifier and then to a suitable mains power outlet.
- Instrument Input: Plug your guitar or bass into the 'INPUT' jack on the front panel using a high-quality instrument cable.
- Footswitch: Connect the optional footswitch to the 'REMOTE' jack on the rear panel for hands-free channel and effects switching.
- Effects Loop: Use the 'FX SEND' and 'FX RETURN' jacks on the rear panel to connect external effects pedals or processors.
- DI Out: The 'DI OUT' (XLR) on the rear panel allows direct connection to a mixing console or recording interface. Use the 'GROUND LINK LIFT' switch to eliminate hum if present.
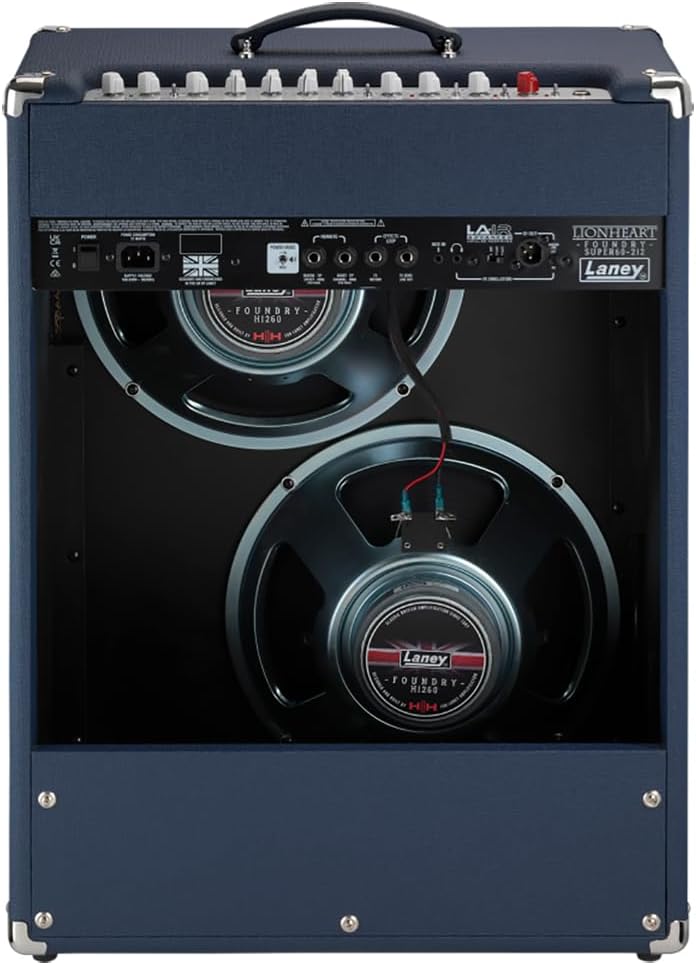
Figure 3: Rear view of the amplifier, showing the two 12-inch speakers and various input/output jacks.

Figure 4: Detail of the DI Out (XLR) and Ground Link Lift switch for direct recording or PA connection.

Figure 5: Detail of the Effects Loop jacks for integrating external effects units.

Figure 6: Detail of the Remote jacks for connecting the optional footswitch.
Operating Instructions
Front Panel Controls Overview
The front panel of the LF Super 60-212 features intuitive controls for shaping your tone across two channels, along with built-in effects.

Figure 7: Overview of the amplifier's top control panel, showing all knobs and switches.
Powering On/Off
After all connections are made, ensure the 'POWER' switch is in the OFF position. Plug the amplifier into a grounded power outlet. Flip the 'POWER' switch to the ON position. The indicator light will illuminate. To power off, reverse this process.
Channels and Tone Shaping
The amplifier features two distinct channels:
- Channel 1 (Clean): Offers pristine clean tones. Adjust 'CLEAN VOLUME' for overall output. The 'BRIGHT' switch adds high-end sparkle.
- Channel 2 (Lead): Provides versatile overdrive and distortion. Use 'LEAD GAIN' to control the amount of drive and 'LEAD VOLUME' for its output level. The 'BRIGHT' and 'DARK' switches offer additional tonal shaping for this channel.

Figure 8: Detail of the Channel 1 and Channel 2 controls, including volume and gain adjustments.

Figure 9: Closer look at the Channel 2 controls, showing the Lead Gain and Lead Volume knobs, and the Bright switch.
Equalization (EQ)
The shared EQ section allows you to fine-tune your overall sound:
- BASS: Adjusts the low-frequency response.
- MIDDLE: Controls the mid-range frequencies.
- TREBLE: Adjusts the high-frequency response.
- TONE: A global tone control that subtly shapes the overall character.
Effects
The LF Super 60-212 includes built-in Tremolo and Reverb effects:
- REVERB: Controls the amount of lush, versatile reverb.
- TREMOLO: Activates the tremolo effect, paying homage to classic vintage tube amps. Use 'RATE' to adjust the speed and 'DEPTH' to control the intensity of the tremolo.

Figure 10: Detail of the Reverb control knob.

Figure 11: Detail of the Tremolo/Chorus switch and associated Rate and Depth controls.

Figure 12: Another view of the effects section, focusing on the Rate and Depth controls for modulation effects.
Additional Features
- BOOST: Engages a boost function for increased volume or gain.
- Low Power Mode: The 'POWER MODE' switch on the rear panel allows you to switch between full power and a low power mode (<1W), ideal for practicing at lower volumes without sacrificing tone.

Figure 13: Detail of the Boost control knob.

Figure 14: Detail of the Power Mode switch, allowing selection between full power and low power operation.
Maintenance
Proper maintenance will ensure the longevity and optimal performance of your Laney LF Super 60-212 amplifier.
- Cleaning: Always unplug the amplifier before cleaning. Use a soft, dry cloth to wipe down the exterior. Do not use abrasive cleaners, solvents, or waxes, as they may damage the finish.
- Ventilation: Ensure that the ventilation openings are not blocked. Adequate airflow is crucial to prevent overheating.
- Storage: When not in use for extended periods, store the amplifier in a dry, temperature-controlled environment, away from direct sunlight and extreme temperatures.
- Transportation: When transporting the amplifier, use appropriate covers or cases to protect it from physical damage.
- Servicing: Do not attempt to service the amplifier yourself. Refer all servicing to qualified Laney service personnel. Opening the amplifier enclosure may expose you to dangerous voltages and will void your warranty.
Troubleshooting
This section addresses common issues you might encounter. If the problem persists after following these steps, please contact Laney support.
| Problem | Possible Cause | Solution |
|---|---|---|
| No sound output | Power not connected; Volume knobs are at zero; Instrument cable faulty; Speaker cable disconnected (internal); Effects loop issue. | Check power connection and switch; Increase Master Volume and Channel Volume; Test with a different instrument cable; Ensure speakers are connected (refer to Figure 3); Bypass effects loop or check external pedals. |
| Hum or Buzzing noise | Ground loop; Faulty instrument cable; Nearby electrical interference. | Engage 'GROUND LINK LIFT' switch on rear panel (Figure 4); Try a different instrument cable; Move amplifier away from other electronic devices. |
| Distorted or weak sound | Incorrect gain staging; Faulty instrument; Damaged speaker. | Adjust 'LEAD GAIN' and 'CLEAN VOLUME' appropriately; Test with a different instrument; Contact service if speaker damage is suspected. |
| Effects not working | Effect level set to zero; Footswitch not connected or faulty; External effects loop issue. | Increase 'REVERB' or 'RATE/DEPTH' knobs; Check footswitch connection (Figure 6); Ensure external effects are correctly connected and powered. |
Specifications
Technical specifications for the Laney LF Super 60-212 Combo Amplifier.
| Feature | Detail |
|---|---|
| Model | LF-SUPER60-212 |
| Output Wattage | 60 Watts |
| Speakers | 2 x 12-inch HH Custom Designed Drivers |
| Channels | 2 (Clean, Lead) |
| Effects | Tremolo, Reverb |
| EQ | Bass, Middle, Treble, Tone |
| Inputs | 1 x 6.35mm Jack (Instrument) |
| Outputs | DI Out (XLR), FX Send/Return |
| Footswitch | Yes (optional, for channel/effects switching) |
| Power Mode | Full Power / <1W Low Power Mode |
| Dimensions (H x W x D) | 29 x 22.5 x 13.3 inches (73.66 x 57.15 x 33.78 cm) |
| Weight | 41.3 pounds (18.76 kg) |
| Color | Blue |
Warranty Information
Laney products are designed for reliability and performance. This product is covered by a manufacturer's warranty against defects in materials and workmanship. The specific terms and duration of the warranty may vary by region and retailer. Please retain your proof of purchase for warranty claims. For detailed warranty information, please refer to the warranty card included with your product or visit the official Laney website.
Customer Support
If you require further assistance, have questions not covered in this manual, or need to arrange for service, please contact Laney customer support or your authorized Laney dealer.
- Laney Website: Visit www.laney.co.uk for product registration, FAQs, and support resources.
- Authorized Dealer: Contact the retailer from whom you purchased the amplifier. They can often provide immediate assistance or guide you to the nearest service center.
Related documentsLF-SUPER60-212


Ask a question about this manual
Ask about setup, troubleshooting, compatibility, parts, safety, or missing instructions. Manuals+ will review the question and use this page’s manual context to help answer it.