
AGCUT X695, X695D
AGCUT Infinix Note 10 Pro/NFC LCD Screen Replacement User Manual
Model: X695, X695D
Comprehensive guide for installation, maintenance, and troubleshooting.
1. Introduction
This user manual provides detailed instructions for the installation and proper handling of your AGCUT LCD Screen Replacement for Infinix Note 10 Pro/NFC (Models X695, X695D). This product is designed to replace defective LCD displays, touch screens, and digitizer assemblies, addressing issues such as incorrect screen response, display problems, pixel distortion, cracked screens, wrong colors, or frozen LCDs.
Please read this manual thoroughly before beginning the installation process to ensure a successful repair and to prevent damage to the new screen or your device.
2. Product Overview
The AGCUT LCD Screen Replacement is a high-quality component designed specifically for the Infinix Note 10 Pro and Infinix Note 10 Pro NFC models (X695, X695D). It features a 6.95-inch display with a resolution of 1080x2460 pixels, offering high brightness, high pixel density, and a wide color gamut for a clear and vibrant visual experience.
This replacement screen includes the LCD display and touch screen digitizer assembly. It does not include the home button, front camera, home button and front camera connecting cable, or earpiece speaker. These components must be carefully removed from your old screen and transferred to the new replacement screen.

Figure 2.1: AGCUT Infinix Note 10 Pro LCD Screen Replacement kit, showing the screen, packaging, and included tools.
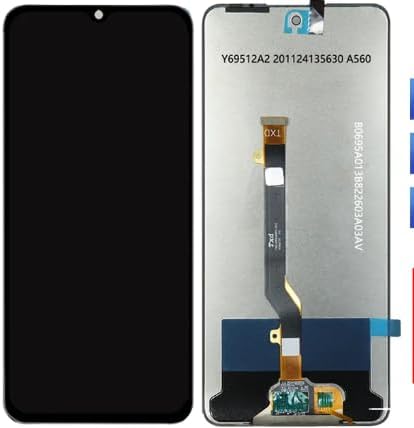
Figure 2.2: Rear view of the replacement screen, highlighting the flex cable connection points.
3. What's in the Box
Your AGCUT Infinix Note 10 Pro LCD Screen Replacement kit typically includes the following items:
- 1x for Infinix Note 10 Pro LCD screen touch screen digitizer replacement kit
- 1x Dust Removal Sticker
- 1x Free Tape (adhesive)
- 1x Set of Special Removal Tools for Infinix Note 10 Pro screen, which includes:
- 3x Screwdrivers (various types)
- 1x Plastic Dredger (pry tool)
- 2x Blue Open Shell Fragments (plastic opening tools)
- 1x Card Pin (SIM tray ejector tool)
- 1x Suction Cup

Figure 3.1: Visual representation of the contents included in the packing list.
4. Setup and Pre-Installation Checks
Before proceeding with the installation, it is crucial to perform the following checks and take necessary precautions to ensure a smooth and successful replacement.
4.1 Important Precautions:
- Static Electricity: Watch out for static issues. Static discharge can damage electronic components. Consider using an anti-static wrist strap or working on an anti-static mat.
- Fragility: The screen is made of glass and is a very fragile product. Handle it with extreme care to avoid breakage.
- Cable Bending: Do not bend the LCD cable. During installation and testing, ensure the LCD cable is not bent more than 90 degrees. Excessive bending can result in a black screen or display malfunction.
4.2 Pre-Installation Testing:
It is strongly recommended to test the new LCD screen before full installation. This ensures the product is in good working condition and helps identify any defects before committing to the full assembly process.
- Connect the new screen's flex cable to your phone's motherboard connector.
- Do NOT remove any protective film or labels from the screen during this testing phase.
- Power on your phone and check for display functionality, touch responsiveness, and the absence of any visual defects such as scratches, dead pixels, dead zones, or lines on the screen.
- Ensure high color saturation, high resolution, and smooth touch response.
- If any issues are observed during testing, contact customer support immediately before proceeding with installation.

Figure 4.1: Examples of screen quality checks, including testing for dead pixels, pixel lines, touch screen responsiveness, and overall display integrity.
5. Operating (Installation Guide)
The installation of an LCD screen replacement requires careful handling and precision. Non-professional installation is not recommended. If you are unsure, seek professional assistance or refer to detailed video guides available online (e.g., YouTube) for your specific phone model.
General Installation Steps (Summary):
- Power Off Device: Ensure your Infinix Note 10 Pro is completely powered off before starting.
- Remove Old Screen: Carefully use the provided tools (screwdrivers, pry tools, suction cup) to disassemble your phone and remove the damaged screen. Be mindful of any adhesive and internal components.
- Transfer Components: Transfer the home button, front camera, connecting cables, and earpiece speaker from your old screen to the new replacement screen.
- Connect New Screen: Carefully connect the flex cable of the new screen to the corresponding connector on the phone's motherboard. Ensure a secure and proper connection without bending the cable excessively.
- Test Again: Before fully reassembling, perform another quick test to ensure the screen functions correctly (as described in Section 4.2).
- Secure and Reassemble: Once tested and confirmed working, apply the provided adhesive tape to secure the new screen in place. Carefully reassemble the phone, ensuring all screws and components are correctly placed.
- Final Check: Power on your device and perform a final check of all functions.
6. Maintenance
To ensure the longevity and optimal performance of your new LCD screen, follow these maintenance guidelines:
- Avoid Drops and Impacts: The screen is made of glass and can break if dropped or subjected to strong impacts.
- Clean Gently: Use a soft, lint-free cloth, slightly dampened with water or a screen cleaner, to gently wipe the screen. Avoid harsh chemicals or abrasive materials.
- Protect from Scratches: Consider using a screen protector to prevent scratches from daily use.
- Temperature Extremes: Avoid exposing your device to extreme temperatures, as this can affect screen performance and lifespan.
7. Troubleshooting
This section addresses common issues you might encounter during or after installation.
7.1 Black Screen After Installation:
If your phone displays a black screen after connecting the new LCD, this often indicates that the main flex cable is not properly installed or connected.
- Check Cable Connection: Power off your phone. Carefully disconnect and then reconnect the main flex cable of the LCD screen to the motherboard. Ensure it is seated firmly and correctly.
- Force Restart: After reconnecting, try pressing and holding the power key and volume key (usually volume down) simultaneously for several seconds. If the phone vibrates, it suggests the phone is powering on but the display connection is faulty.
- Re-installation: If the issue persists, it is recommended to carefully re-open the phone and re-install the product, paying close attention to all cable connections.
7.2 Other Display Issues (Incorrect Response, Pixels, Lines):
If you experience issues like incorrect touch response, dead pixels, lines on the screen, or wrong colors, this could indicate a defective screen or damage during installation.
- Re-check Connections: Ensure all flex cables are securely connected and not bent or damaged.
- Pre-Installation Test: If you skipped the pre-installation test, it's harder to determine if the issue is with the screen or installation.
- Contact Support: If the screen was tested prior to full installation and worked, but now shows issues, re-check your installation steps. If the screen showed issues during pre-installation testing, contact customer support for assistance.
8. Specifications
| Feature | Description |
|---|---|
| Product Type | LCD Display Touch Screen Digitizer Assembly Replacement Kit |
| Compatible Models | Infinix Note 10 Pro, Infinix Note 10 Pro NFC (X695, X695D) |
| Screen Size | 6.95 Inches |
| Resolution | 1080x2460 pixels |
| Manufacturer | AGCUT |
| ASIN | B0D76NKK5M |
9. Warranty and Support
AGCUT ensures that all Infinix Note 10 Pro LCD replacements undergo strict Quality Control (QC) testing before shipment to guarantee 100% intact products without scratches, dead zones, dot pixels, or lines.
For any issues encountered during installation or operation, or if you require further assistance, please contact AGCUT customer support. While professional installation is recommended, many helpful installation videos can be found on platforms like YouTube by searching for "Infinix Note 10 Pro LCD replacement" or "X695 screen replacement".
Ask a question about this manual
Ask about setup, troubleshooting, compatibility, parts, safety, or missing instructions. Manuals+ will review the question and use this page’s manual context to help answer it.