
1. Introduction
Thank you for choosing the Truglo Apex AEGIS PRO 2-DOT LED Bow Sight. This advanced archery sight is designed to enhance your accuracy and performance with its patented micro-LED technology, multi-plex ADC reticle, and robust construction. This manual provides detailed instructions for the proper installation, operation, and maintenance of your new sight. Please read this manual thoroughly before use to ensure safe and optimal performance.
Safety Information
- Always ensure your bow is unloaded and pointed in a safe direction when installing or adjusting the sight.
- Do not look directly into the LED light source for extended periods.
- Keep batteries out of reach of children.
- Dispose of used batteries responsibly according to local regulations.
2. Package Contents
Verify that all items are present in your package:
- Truglo Apex AEGIS PRO 2-DOT LED Bow Sight
- Mounting Hardware (screws, washers)
- Hex Wrenches (for adjustments)
- Instruction Manual (this document)
3. Components Identification
Familiarize yourself with the various parts of your AEGIS PRO sight:

Figure 3.1: Front view of the Truglo Apex AEGIS PRO 2-DOT LED Bow Sight, showing the 1.8" aperture with the multi-plex ADC reticle and the LED housing on the left, and the mounting bracket with yardage indicators on the right.

Figure 3.2: Side view of the Truglo Apex AEGIS PRO 2-DOT LED Bow Sight, illustrating the mounting system, windage and elevation adjustment mechanisms, and the sight housing with the Apex Gear logo.
- Aperture: 1.8" diameter housing the reticle.
- Multi-plex ADC Reticle: Advanced aiming pattern for various distances.
- LED Housing: Contains the micro-LED illumination system.
- Brightness Control Dial: Adjusts LED intensity.
- Windage Adjustment Knob: For horizontal aiming adjustments.
- Elevation Adjustment Knob: For vertical aiming adjustments.
- Mounting Bracket: Attaches the sight to your bow.
- Dual Yardage Pointers: Indicators for setting specific distances.
4. Setup
4.1 Mounting the Sight
The AEGIS PRO sight is designed for ambidextrous use, allowing for left or right-hand mounting.
- Align the mounting bracket of the sight with the mounting holes on your bow's riser.
- Insert the provided mounting screws through the bracket and into the riser.
- Hand-tighten the screws initially, ensuring the sight is level.
- Adjust the sight to one of the three available mounting positions for optimal eye relief and clearance.
- Once positioned, securely tighten the mounting screws using an appropriate hex wrench. Do not overtighten.
4.2 Battery Installation
The AEGIS PRO LED sight requires batteries (not included) for illumination.
- Locate the battery compartment on the LED housing.
- Unscrew the battery cap.
- Insert the required batteries, ensuring correct polarity (+/-). Refer to the battery compartment for specific battery type and orientation.
- Replace the battery cap and tighten it securely to ensure a watertight seal.
5. Operating Instructions
5.1 Power On/Off and Brightness Adjustment
The sight features 11 brightness settings for various lighting conditions.
- To power on the LED, rotate the brightness control dial located on the LED housing.
- Continue rotating the dial to cycle through the 11 brightness settings.
- To power off, rotate the dial until it clicks into the "OFF" position.
5.2 Auto Shut-Off Feature
To conserve battery life, the AEGIS PRO LED sight is equipped with an automatic shut-off feature. The LED illumination will automatically turn off after approximately 4 hours of continuous operation if no adjustments are made.
5.3 Windage Adjustment
Micro-adjustable windage allows for precise horizontal aiming adjustments.
- Loosen the windage locking screw (if present).
- Turn the windage adjustment knob to move the reticle left or right.
- Rule of Thumb: If your arrow hits left, move the sight body left. If your arrow hits right, move the sight body right.
- Once adjusted, tighten the windage locking screw.
5.4 Elevation Adjustment
The helical elevation gear provides smooth and precise vertical aiming adjustments.
- Loosen the elevation locking screw (if present).
- Turn the elevation adjustment knob to move the reticle up or down.
- Rule of Thumb: If your arrow hits low, move the sight body down. If your arrow hits high, move the sight body up.
- Once adjusted, tighten the elevation locking screw.
5.5 Dual Yardage Pointers and Multi-plex ADC Reticle
The sight features dual yardage pointers for quick reference and a multi-plex ADC reticle for advanced aiming. Consult your bow's specific ballistics and practice at various distances to calibrate your yardage pointers and understand the reticle's aiming points.
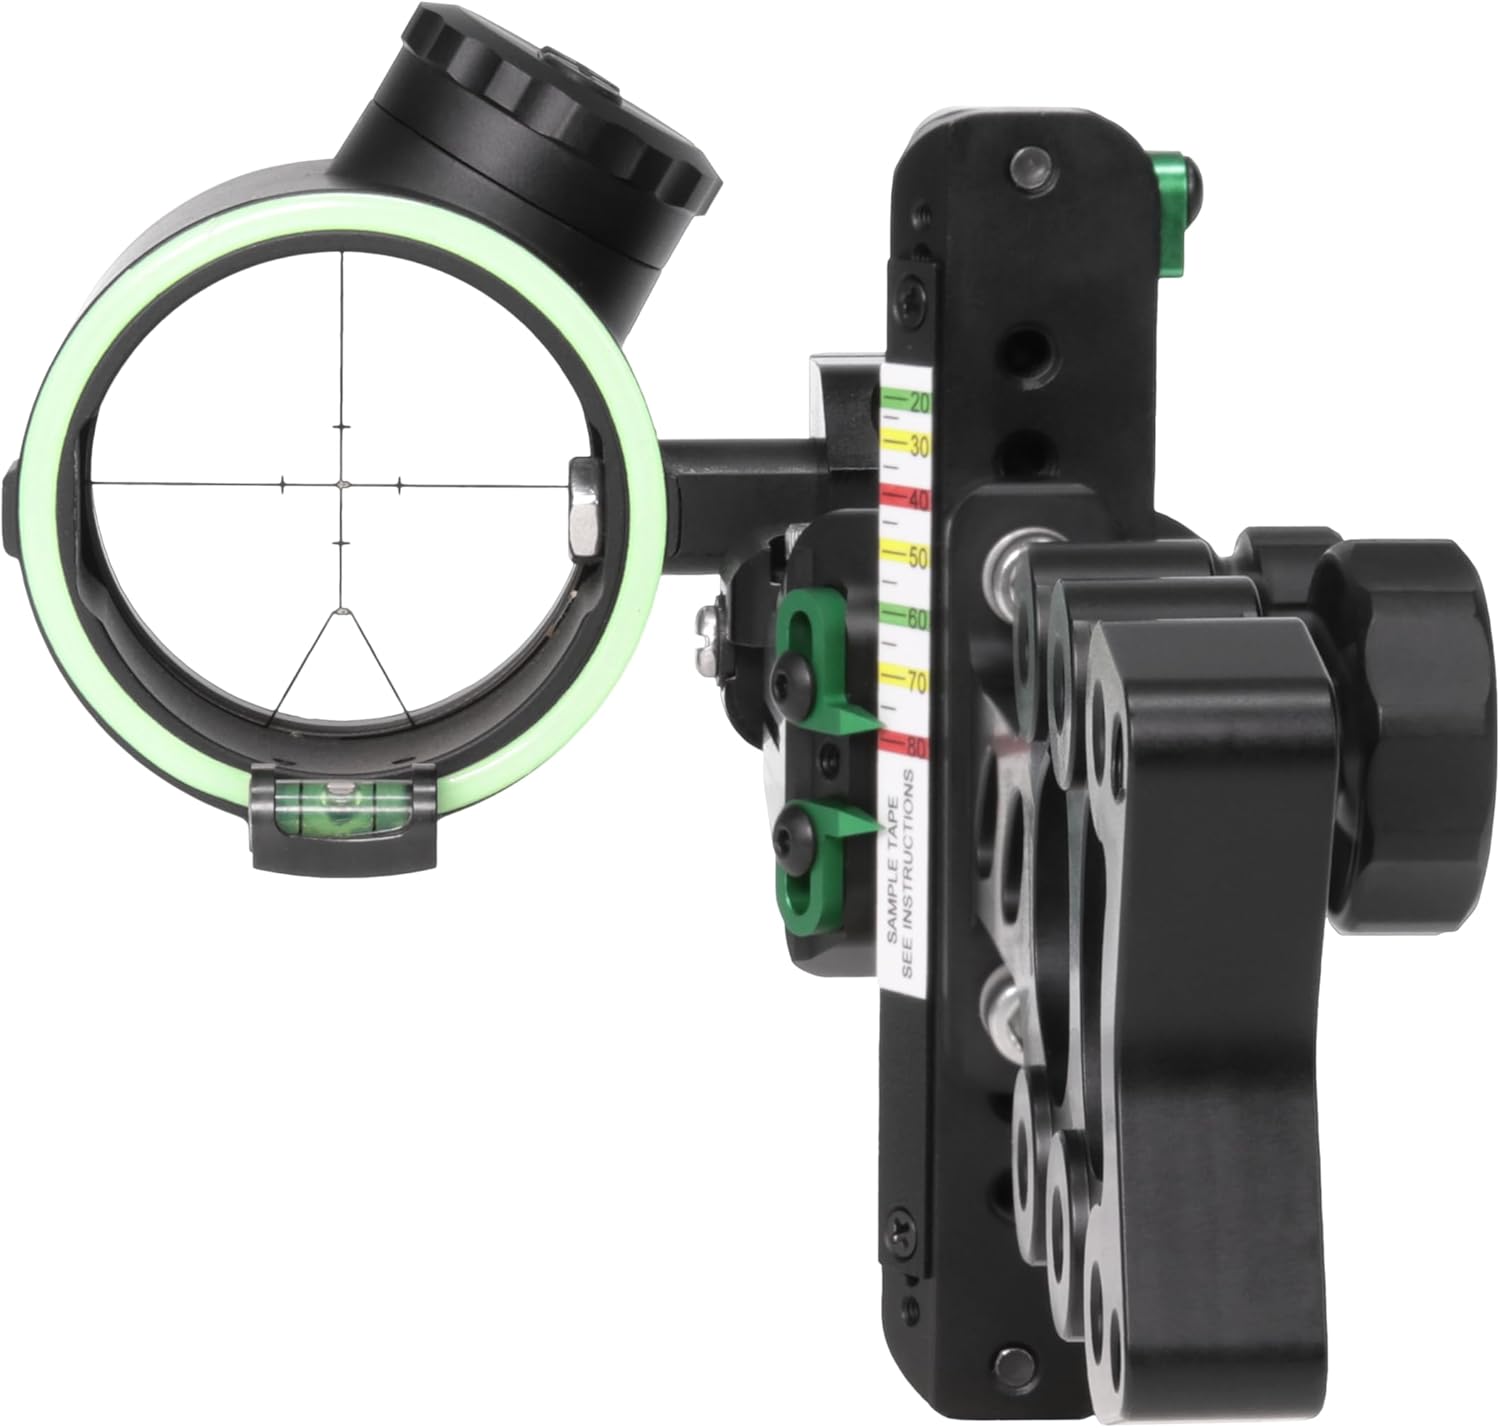
Figure 5.1: Angled view of the Truglo Apex AEGIS PRO 2-DOT LED Bow Sight, highlighting the sight pins and the yardage tape on the side, which can be customized for different distances.
6. Maintenance
- Cleaning: Use a soft, clean cloth to wipe down the sight body. For the lens, use a lens cleaning cloth and solution specifically designed for optics. Avoid abrasive materials or harsh chemicals.
- Battery Replacement: Replace batteries when the LED illumination becomes dim or stops working. Always use fresh, high-quality batteries of the specified type.
- Inspection: Periodically check all screws and fasteners to ensure they are tight. Inspect the sight for any signs of damage or wear.
- Storage: Store the sight in a dry, cool place away from direct sunlight and extreme temperatures.
7. Troubleshooting
| Problem | Possible Cause | Solution |
|---|---|---|
| LED does not illuminate. | Dead or incorrectly installed batteries. | Check battery polarity. Replace with fresh batteries. |
| LED is dim. | Low battery power. | Replace batteries. |
| Sight pins are loose. | Mounting screws are loose. | Tighten all mounting and adjustment screws. |
| Inaccurate aiming. | Sight not properly calibrated or loose. | Ensure sight is securely mounted. Re-calibrate windage and elevation. |
8. Specifications
| Feature | Detail |
|---|---|
| Model Number | TG-AG2202GB |
| Aperture Size | 1.8 inches |
| Reticle Type | Multi-plex ADC |
| Brightness Settings | 11 |
| Battery Life | Approximately 700 hours |
| Auto Shut-off | After 4 hours |
| Windage Adjustment | Micro-adjustable |
| Elevation Adjustment | Helical gear |
| Hand Orientation | Ambidextrous |
| Material | Plastic |
| Product Dimensions | 2.54 x 5.08 x 2.54 cm (1 x 2 x 1 inches) |
| Item Weight | 1.36 kg (3 lbs) |
| UPC | 888151046623 |
9. Warranty and Support
Truglo stands behind the quality of its products. For specific warranty information and customer support, please refer to the warranty card included with your purchase or visit the official Truglo website. Keep your proof of purchase for any warranty claims.
For technical assistance or inquiries, please contact Truglo customer service through their official channels. When contacting support, please have your model number (TG-AG2202GB) and purchase date available.