
1. Introduction
The TIMEMOON 7-inch Digital Clock is designed to display time, date, month, and year with large, easy-to-read fonts. It features a dynamic photo frame display, multiple alarm settings, and automatic dimming for enhanced user experience, particularly beneficial for the elderly. This manual provides instructions for setup, operation, and maintenance of your digital clock.
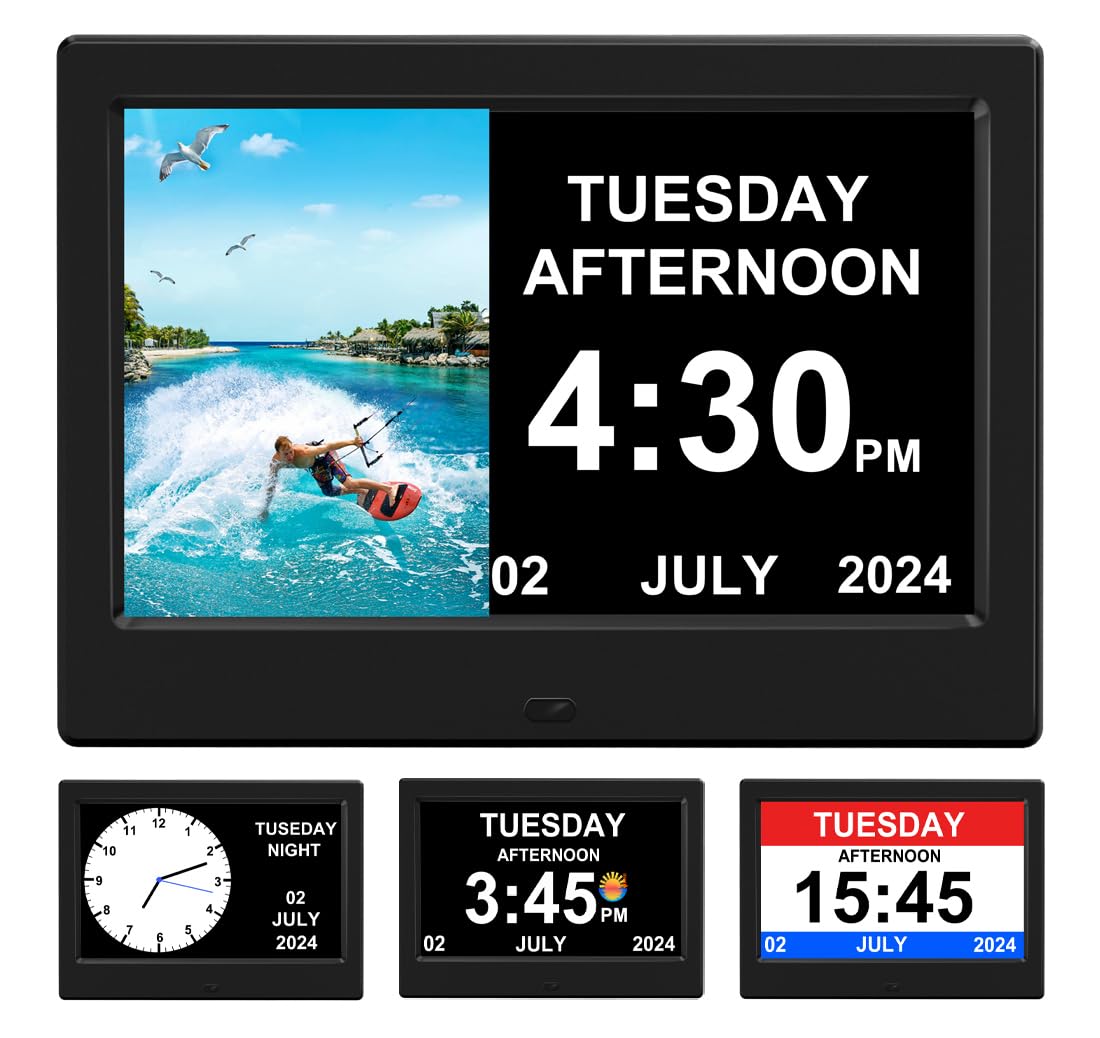
Figure 1: TIMEMOON 7-inch Digital Clock (Model TMN-CL-0)
2. Safety Information
- Ensure the power adapter is connected to a compatible power source.
- Do not expose the device to water or excessive moisture.
- Avoid placing the clock in direct sunlight or near heat sources.
- Keep out of reach of children.
- Use only the provided power adapter.
3. Package Contents
Verify that all items are present in your package:
- TIMEMOON 7-inch Digital Clock
- Power Adapter
- User Manual
- Remote Control (if included with your model)
4. Product Overview
The TIMEMOON Digital Clock offers a range of features for convenience and readability:
- Display: 7-inch high-contrast digital display with large fonts.
- Display Interfaces: 3 fixed display interfaces + 1 split-screen dynamic photo display.
- Automatic Dimming: Screen brightness adjusts automatically for day and night.
- Multilingual Support: Supports 10 national system languages (English, German, Spanish, Portuguese, French, Italian, Dutch, Czech, Polish, Swedish).
- Alarms: Up to 12 daily alarms and 3 dedicated medication reminders.
- Font Colors: Adjustable font colors (white, green, blue, red).
- Connectivity: USB port for dynamic photo frame feature.
- Optional Feature: Support for indoor temperature and humidity display with a separately purchased sensor.

Figure 2: Multiple Display Interfaces
5. Setup
5.1 Power Connection
- Connect the power adapter to the DC 5V input port on the back of the clock.
- Plug the adapter into a standard electrical outlet. The clock will power on automatically.
5.2 Initial Settings (Language, Time, Date)
Upon first power-on, you may need to set the language, time, and date. Use the buttons on the back of the clock or the remote control to navigate the menu.
- Press the 'Menu' button to access settings.
- Use the 'Up/Down' arrows to select options and 'OK' to confirm.
- Set the desired language from the available 10 options.
- Adjust the time (12-hour or 24-hour format) and date.

Figure 3: Multilingual Support
5.3 Inserting SD Card for Photos
To use the dynamic photo frame feature, you will need an SD card or USB drive with your desired photos.
- Copy your favorite photos (JPEG format recommended) to an SD card or USB drive.
- Locate the SD card slot or USB port on the side/back of the clock.
- Insert the SD card or USB drive firmly into the corresponding slot. The clock will automatically detect the media.
Video 1: Demonstrates changing display themes and inserting an SD card for photo display.
6. Operating Instructions
6.1 Basic Display Modes
The clock offers various display modes. You can cycle through them using the 'Mode' button on the remote or the corresponding button on the back of the unit.
- Digital Time Display: Shows time, day, date, month, and year in large digital format.
- Analog Clock Display: Displays time with an analog clock face alongside digital date information.
- Split-Screen Display: Combines digital time/date with a dynamic photo carousel from your inserted media.
6.2 Automatic Brightness Adjustment
The clock is equipped with an auto-dimming feature. It will automatically brighten during the day (e.g., 7:00 AM - 6:59 PM) and dim at night (e.g., 7:00 PM - 6:59 AM) to ensure optimal visibility without causing disturbance.

Figure 4: Automatic Brightness Adjustment
7. Alarms and Reminders
The clock supports up to 12 daily alarms and 3 dedicated medication reminders. These can be customized for specific times and recurrence.
7.1 Setting Alarms
- Access the 'Alarm Settings' menu using the remote control or buttons on the clock.
- Select an alarm slot (Alarm 1-12 or Medication Reminder 1-3).
- Set the desired time for the alarm.
- Choose the alarm mode: 'Once' for a single event, or 'Repeat' for daily recurrence.
- Confirm settings.
When an alarm sounds, press any button to stop it.

Figure 5: Alarm and Medication Reminder Screens
8. Dynamic Photo Frame Feature
The clock can display a carousel of images from an inserted SD card or USB drive on a split screen, alongside the time and date.
- Ensure your photos are loaded onto an SD card or USB drive (refer to Section 5.3).
- Insert the media into the clock.
- Select the split-screen display interface from the display modes. The photos will automatically play in a carousel on the left side of the screen.

Figure 6: Dynamic Photo Frame Display
9. Display Customization
9.1 Font Colors
You can adjust the font colors of the display to white, green, blue, or red to suit personal preference or visibility needs.
- Navigate to 'Display Settings' in the menu.
- Select 'Font Color' and choose your desired color.

Figure 7: Adjustable Font Colors
9.2 Display Themes
The clock offers various display themes, including different layouts for time and date. These can be changed via the settings menu or dedicated buttons on the remote/unit.
10. Temperature and Humidity Display (Optional)
This clock supports the display of indoor temperature and humidity. To utilize this feature, you must purchase a compatible sensor separately and connect it to the clock as per the sensor's instructions. Once connected, the clock will obtain and display the environmental values.
11. Maintenance
- Cleaning: Use a soft, dry cloth to clean the screen and body of the clock. Do not use abrasive cleaners or solvents.
- Storage: If storing the clock for an extended period, unplug it from the power source and store it in a cool, dry place.
- Battery: The clock contains an internal battery to retain settings during power outages. This battery is not user-replaceable.
12. Troubleshooting
| Problem | Possible Cause | Solution |
|---|---|---|
| Clock does not power on. | Power adapter not connected or faulty. | Ensure the power adapter is securely plugged into the clock and a working electrical outlet. Try a different outlet. |
| Display is too dim or too bright. | Automatic dimming is active or brightness settings need adjustment. | Check the 'Display Settings' menu to adjust brightness manually or ensure 'Auto Dimming' is enabled/disabled as desired. |
| Time/Date is incorrect. | Settings were not saved or power interruption. | Re-enter the correct time and date in the 'Time Settings' menu. The internal battery should retain settings during brief power cuts. |
| Alarms do not sound. | Alarm is disabled or volume is too low. | Check 'Alarm Settings' to ensure the alarm is enabled and the volume is set to an audible level. |
| Photos are not displaying. | SD card/USB drive not inserted correctly, or incompatible file format. | Ensure the SD card/USB drive is fully inserted. Verify photos are in JPEG format. Try reformatting the media (this will erase all data). |
13. Specifications
- Brand: TIMEMOON
- Model Number: TMN-CL-0
- Display Type: Digital
- Screen Size: 7 Inches
- Product Dimensions: 7"W x 4.9"H
- Item Weight: 9.6 ounces
- Material Type: Acrylonitrile Butadiene Styrene (ABS)
- Frame Material: Plastic
- Power Source: Corded Electric (5V 1000mA)
- Mounting Type: Tabletop
- Special Features: Adjustable Volume, Alarm, Auto Dimmable, Loud Alarm, Night Mode, Dynamic Photo Frame, Multilingual
- Connectivity Technology: USB
14. Warranty and Support
This TIMEMOON Digital Clock comes with a Limited Warranty. For detailed warranty information, product support, or technical assistance, please refer to the contact information provided with your purchase or visit the official TIMEMOON website.