
1. Important Safety Information
Please read all instructions carefully before using this device. Failure to follow safety instructions may result in injury, electric shock, fire, or damage to the device.
1.1 Laser Safety
This device emits a Class II laser. Avoid direct eye exposure to the laser beam. Do not stare into the beam. Do not aim the laser at people or animals. Use caution when operating the device in areas where reflective surfaces may be present.
- Do not attempt to disassemble or modify the device.
- Keep the device out of reach of children.
- Do not use the device in explosive atmospheres or near flammable materials.
1.2 General Safety
- Ensure the device is clean and dry before use.
- Do not expose the device to extreme temperatures or humidity.
- Handle the tape measure carefully to prevent cuts or injuries from the tape edge.
2. Product Overview
The MiBoce 3-in-1 Laser Tape Measure combines a digital laser rangefinder, a traditional 5-meter tape measure, and a laser crosshair function into a single compact device. It features an LCD display with backlight for clear readings in various lighting conditions.

Figure 2.1: Overview of the 3-in-1 functionality, highlighting the laser, tape, and crosshair features.
2.1 Key Features
- 3-in-1 Design: Integrates laser rangefinder (up to 60m), 5m tape measure, and laser cross marking.
- LCD Display: Backlit display for clear visibility of measurement data.
- Durable Construction: High elasticity and toughness ABS + TPR case for anti-slip, drop resistance, and dustproof protection.
- Self-locking Tape: Automatically locks the tape in position when pulled out, with an unlock button for safe retraction.
- Dual Scale Tape: 5m coated manganese steel tape with both imperial and metric scales.
2.2 Device Components
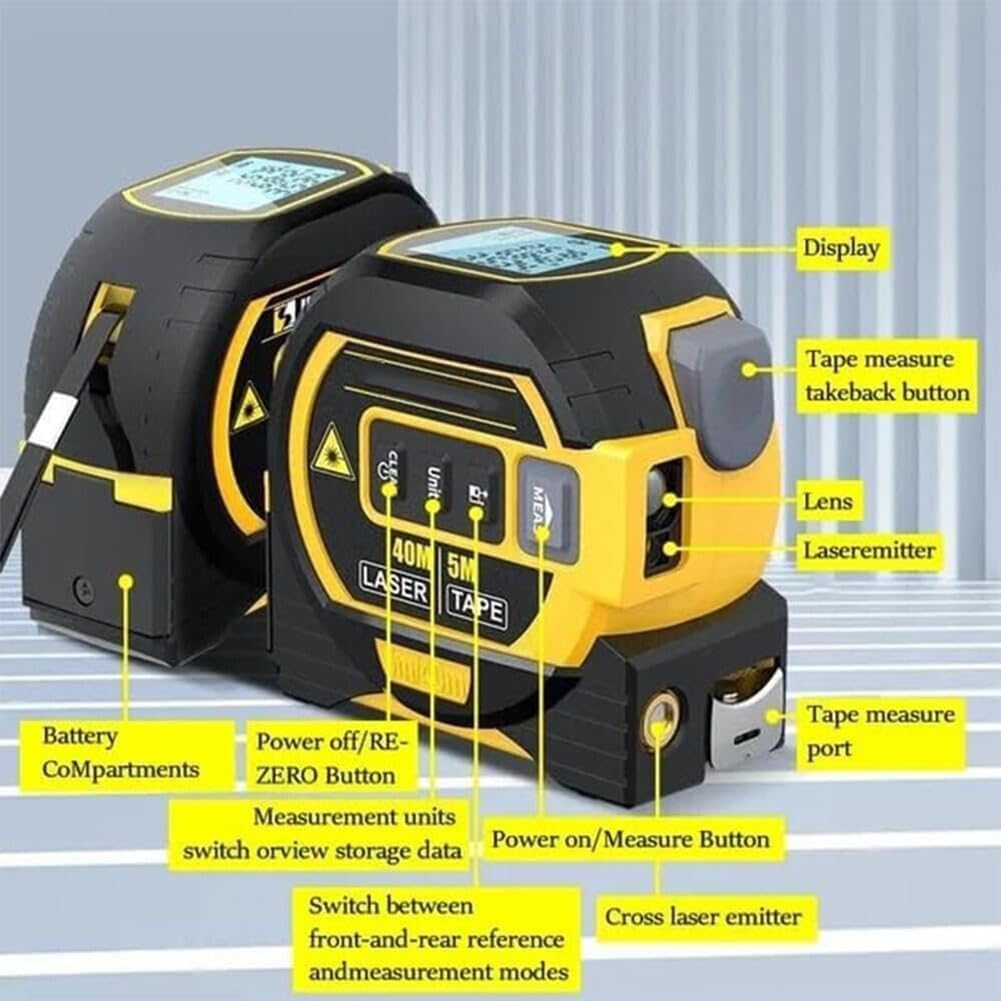
Figure 2.2: Labeled diagram showing the display, tape measure takeback button, lens, laser emitter, battery compartment, power off/re-zero button, measurement units switch, power on/measure button, switch between front-and-rear reference, and cross laser emitter.
- Display: Shows measurement data, unit, and mode.
- Tape Measure Takeback Button: Retracts the steel tape.
- Lens: Laser receiver lens.
- Laser Emitter: Emits the main laser beam for distance measurement.
- Battery Compartment: Houses the batteries.
- Power Off/RE-ZERO Button (CLEAR): Clears current measurement or powers off.
- Measurement Units Switch (UNIT): Changes measurement units (m/in/ft).
- Power On/Measure Button (MEAS): Powers on the device and initiates laser measurement.
- Reference Point/Mode Switch: Switches between front/rear reference and measurement modes.
- Cross Laser Emitter: Projects the crosshair laser.
- Tape Measure Port: Where the steel tape extends from.
3. Setup
3.1 Battery Installation
The device requires [Insert Battery Type, e.g., 2 x AAA batteries] for operation. To install or replace batteries:
- Locate the battery compartment (5) on the side or back of the device.
- Open the battery compartment cover.
- Insert the batteries, ensuring correct polarity (+/-).
- Close the battery compartment cover securely.
Note: Remove batteries if the device will not be used for an extended period to prevent leakage.
4. Operating Instructions
4.1 Power On/Off and Unit Selection
- Power On: Press the MEAS button (8) to turn on the device. The LCD display will illuminate.
- Power Off: Press and hold the CLEAR button (6) for a few seconds to turn off the device. The device will also automatically power off after a period of inactivity.
- Change Units: Press the UNIT button (7) to cycle through measurement units: meters (m), inches (in), and feet (ft).
4.2 Laser Rangefinder Mode
This mode uses the laser to measure distances, areas, and volumes.
4.2.1 Single Distance Measurement
- Ensure the device is powered on.
- Press the MEAS button (8) once to activate the laser. A red laser dot will appear.
- Aim the laser dot at the target point.
- Press the MEAS button (8) again to take the measurement. The distance will be displayed on the LCD.
4.2.2 Continuous Measurement (Tracking)
- Press and hold the MEAS button (8) for approximately 2 seconds. The device will enter continuous measurement mode, displaying real-time distance as you move the device.
- Press MEAS again to stop continuous measurement and hold the last reading.
4.2.3 Area Measurement
- Press the Reference Point/Mode Switch button (9) until the area icon (e.g., a square) appears on the display.
- Take the first measurement (length) by pressing MEAS twice.
- Take the second measurement (width) by pressing MEAS twice.
- The device will automatically calculate and display the area.
4.2.4 Volume Measurement
- Press the Reference Point/Mode Switch button (9) until the volume icon (e.g., a cube) appears on the display.
- Take three consecutive measurements (length, width, height) by pressing MEAS twice for each dimension.
- The device will automatically calculate and display the volume.
4.2.5 Pythagorean Measurement
This mode allows indirect measurement using the Pythagorean theorem (e.g., height of an object). Refer to the display icons for specific Pythagorean modes (e.g., two-point or three-point measurement).
- Press the Reference Point/Mode Switch button (9) until the desired Pythagorean icon appears.
- Follow the on-screen prompts to take the required measurements (e.g., hypotenuse, base).
- The device will calculate and display the unknown side.
4.2.6 Reference Point Selection
Press the Reference Point/Mode Switch button (9) to toggle between measuring from the front edge of the device or the rear edge of the device. An icon on the display will indicate the current reference point.
4.3 Tape Measure Mode
The integrated 5-meter steel tape measure is suitable for short-range measurements.

Figure 4.1: The tape measure features both inch and metric scales for versatile measurements.
- Extending the Tape: Pull the tape from the tape measure port (11). The tape will automatically lock at the desired length due to the self-locking mechanism.
- Retracting the Tape: Press the Tape Measure Takeback Button (2) to safely retract the tape. Guide the tape back into the device to prevent sudden retraction.

Figure 4.2: Demonstrating the self-locking tape design and the button for safe retraction.
4.4 Laser Crosshair Mode
The device can project a horizontal and vertical laser line simultaneously, creating a crosshair for alignment tasks.

Figure 4.3: The device projecting a laser crosshair, useful for leveling and alignment.
- Activating Crosshair: Press the Cross Laser Emitter button (10) to turn on the crosshair laser.
- Deactivating Crosshair: Press the Cross Laser Emitter button (10) again to turn off the crosshair laser.
5. Maintenance
5.1 Cleaning
- Wipe the device with a soft, damp cloth. Do not use abrasive cleaners or solvents.
- Keep the laser lens (3) clean and free of dust for accurate measurements. Use a lens cleaning cloth if necessary.
- Ensure the tape measure is clean before retracting it fully into the housing.
5.2 Storage
- Store the device in a cool, dry place, away from direct sunlight and extreme temperatures.
- Remove batteries if storing for extended periods to prevent corrosion.

Figure 5.1: The durable ABS + TPR casing provides environmental protection, making the device strong, wear-resistant, and dustproof.
6. Troubleshooting
| Problem | Possible Cause | Solution |
|---|---|---|
| Device does not power on. | Low or dead batteries; incorrect battery installation. | Replace batteries; check battery polarity. |
| Laser beam is weak or not visible. | Low batteries; dirty laser lens. | Replace batteries; clean the laser lens (3). |
| Inaccurate laser measurements. | Dirty laser lens; unstable measuring surface; incorrect reference point. | Clean the laser lens (3); ensure a stable measurement; verify reference point (front/rear). |
| Tape measure does not retract smoothly. | Tape is dirty or obstructed; retraction mechanism issue. | Clean the tape; ensure no obstructions. Do not force retraction. |
| LCD display is blank or flickering. | Low batteries; device malfunction. | Replace batteries. If problem persists, contact customer support. |
7. Specifications
| Product Name | MiBoce 3-in-1 Laser Tape Measure |
| Model | 3-in-1 Laser Tape Measure 60m |
| Laser Rangefinder Range | Up to 60 meters |
| Tape Measure Length | 5 meters |
| Measurement Units | Meters (m), Inches (in), Feet (ft) |
| Laser Class | Class II |
| Display | LCD with backlight |
| Power Source | [Insert Battery Type, e.g., 2 x AAA batteries] |
| Material | ABS + TPR casing, Manganese steel tape |
| Dimensions (Approx.) | 8.5cm x 8.2cm x 5.6cm (interpreted from image 51RXpXZ0K5L.jpg) |

Figure 7.1: Approximate dimensions of the device.
8. Warranty and Support
MiBoce products are manufactured to high-quality standards. For warranty information, technical support, or service inquiries, please contact your retailer or the manufacturer directly.
- Keep your purchase receipt as proof of purchase.
- Do not attempt to repair the device yourself, as this may void the warranty.