
1. Introduction
This manual provides essential information for the safe and efficient operation of your AENBUSLM 80W Laser Module with 10W optical output power. Please read these instructions thoroughly before installation and use to ensure proper functionality and safety.
2. Safety Information
WARNING: This is a Class 4 laser product. Direct exposure to the laser beam can cause severe eye and skin damage. Always wear appropriate laser safety goggles (OD 6+) when operating the laser module. Never look directly into the laser beam or its reflection.
- Ensure the work area is well-ventilated to dissipate fumes generated during engraving or cutting.
- Keep flammable materials away from the laser's operating path.
- The laser module features a built-in safety protection mechanism: if the laser is tilted during operation, it will automatically shut off to prevent accidental exposure and ensure user safety.
- Always disconnect power before performing any maintenance or adjustments.
3. Product Overview
3.1 Key Features
- Powerful Laser Output: 40W machine power with 10W (10000mW) optical output.
- Precision Engraving: Capable of directly engraving mirror stainless steel without prior black coating.
- High-Speed Cutting: Achieves speeds up to 300mm/s on 304 stainless steel (45mm focus length) and cuts 8mm plywood in a single pass at 1.5mm/s (47mm focus length).
- Advanced Diode Technology: Features an original diode with built-in FAC (Fast Axis Collimation) for a small beam size (0.08*0.08mm) at focus, ensuring high precision.
- Integrated Air Assist: Enhances cutting performance by providing cleaner edges and deeper cuts, improving efficiency.
- Efficient Heat Dissipation: Equipped with a built-in fan cooling system (10000 rpm) to maintain stable performance even during prolonged use.
- Detachable Eye Protection: Includes a protective cover to filter blue light effectively.
- Wide Compatibility: Compatible with various laser engraving machines, laser cutting machines, CNC machines, and 5D printers.
3.2 Component Identification
The AENBUSLM 80W Laser Module package includes the following components:

Figure 1: Laser Module and Accessories
- Laser Module (Main Unit)
- External Power Cord
- First to Second Line + External Power Cord
- 3P Line
- Focus Fixing Plate
- Replaceable Protective Lens
- Snap Accessories
- Lens Replacement Tool + 1.5mm# L Wrench
- Slide Rail + Fixing Screws
4. Setup Instructions
4.1 Connecting the Laser Module
Proper connection of the laser module to your engraving machine's motherboard is crucial for operation. Ensure the voltage of your engraving machine matches the laser module's requirements (24V for this model).
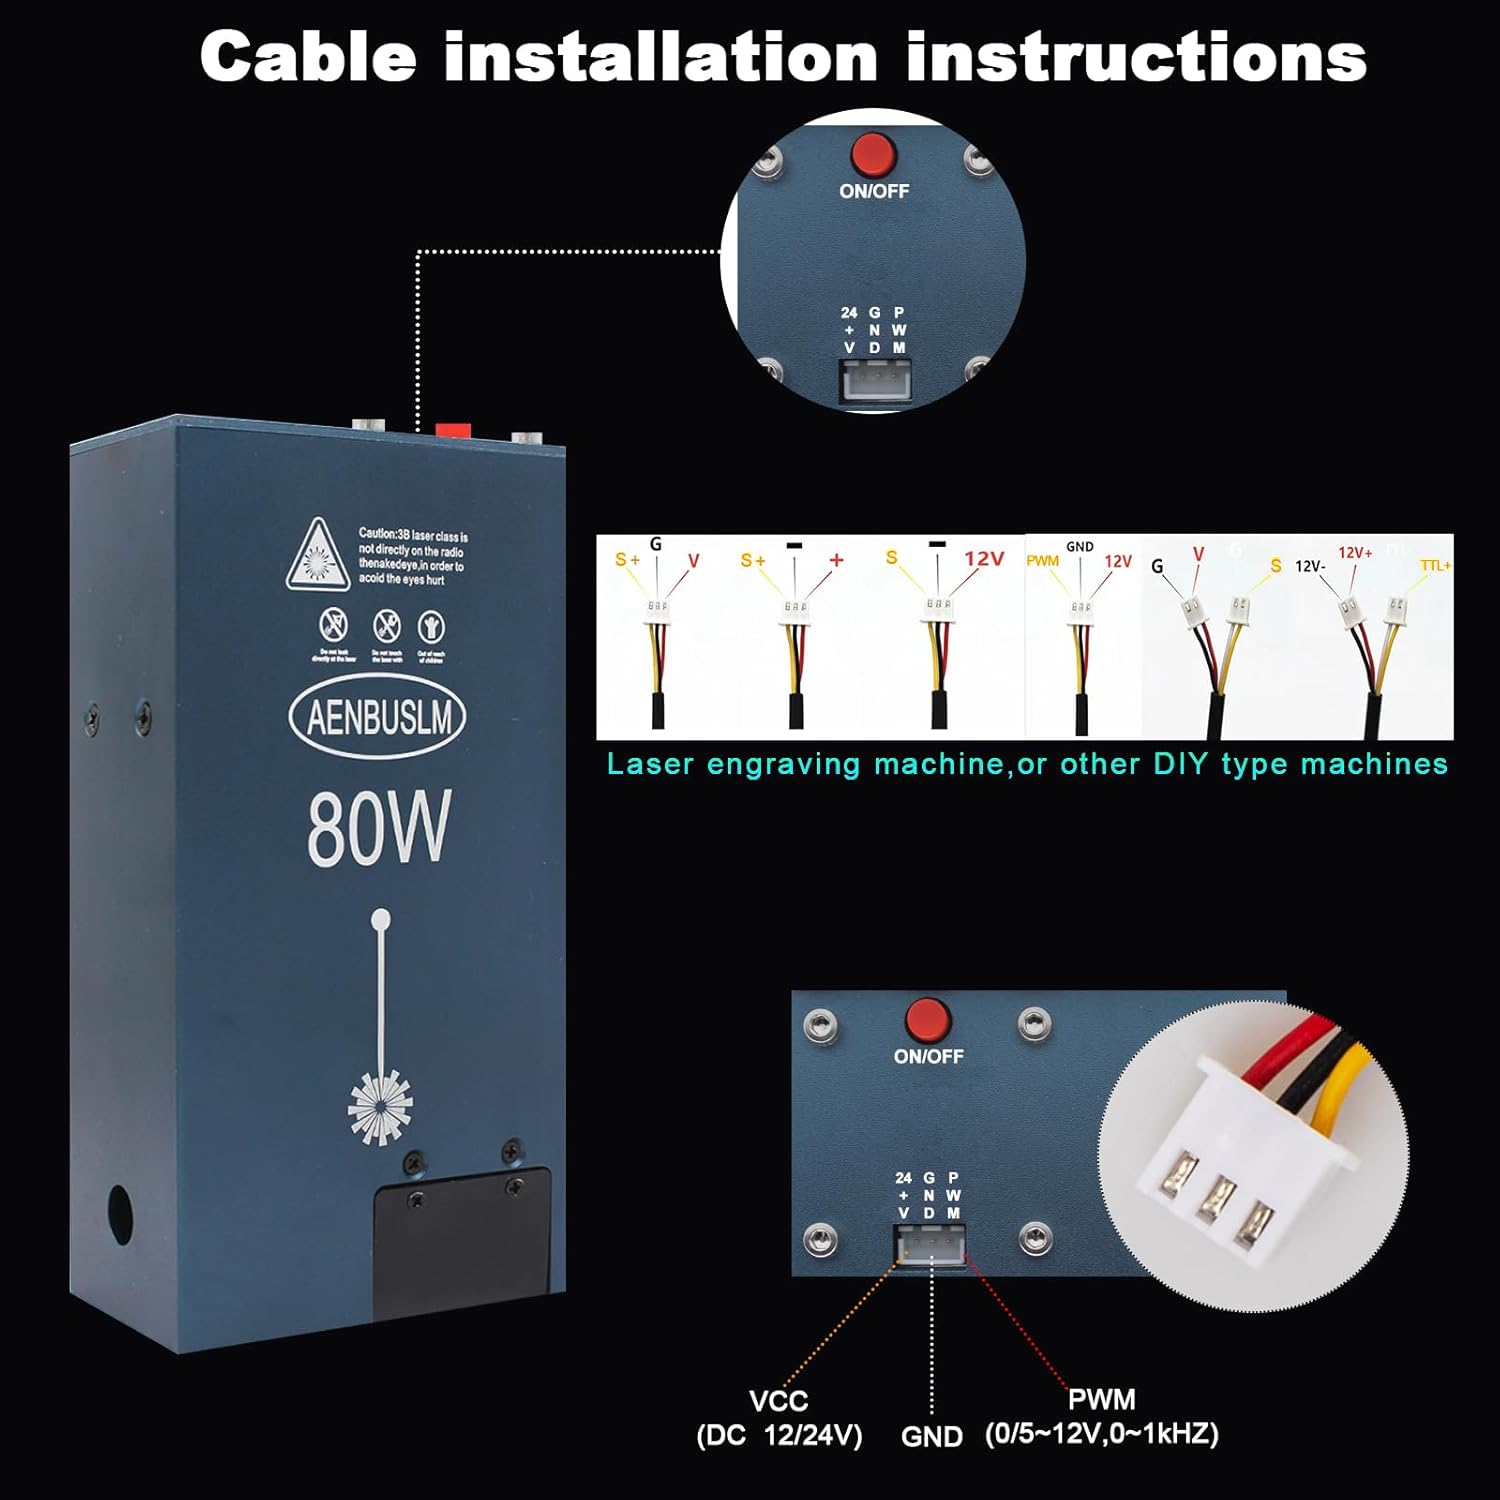
Figure 2: Cable Installation Diagram
Refer to the diagram above for connecting the VCC (DC 12/24V), GND, and PWM (0/5~12V, 0~1kHz) lines to your laser engraving machine or DIY machine's motherboard.
Video 1: How to Connect the Laser to the Motherboard
This video demonstrates the correct procedure for connecting the AENBUSLM laser module to a compatible motherboard, illustrating both methods for voltage matching.
4.2 Focusing the Laser
This laser module features a fixed-focus design. To achieve optimal focus, use the provided focus fixing plate. Place the plate on your material, lower the laser module until it touches the plate, then secure the module in position. Remove the plate before starting any operation.
Video 2: Fixed Focus and Cutting Demonstration
This video illustrates the fixed-focus procedure using the provided tool and demonstrates the laser module's cutting capabilities on wood, highlighting the clean cuts achieved with the built-in air assist.
5. Operating Instructions
5.1 General Operation
- Ensure the laser module is securely mounted and correctly connected to your machine.
- Place the material to be processed on the work surface.
- Adjust the laser focus as described in Section 4.2.
- Load your design file into the compatible software (e.g., SRWOR, LaserGRBL, LightBurn).
- Set appropriate power and speed parameters for your material and desired outcome.
- Initiate the engraving or cutting process. Always monitor the operation.
5.2 Supported Materials
The AENBUSLM 80W Laser Module is versatile and supports a wide range of materials for both engraving and cutting:

Figure 3: Supported Engraving Materials
Materials include pine board, wood, stone, bamboo, basswood, black acrylic, plywood, coated glass, lacquered metal, plastic, leather, aluminum oxide, ceramics, and stainless steel.

Figure 4: Supported Cutting Materials
Materials include plywood, black acrylic, leather, and other similar materials.
Video 3: Laser Module Engraving Demonstration
This video showcases the AENBUSLM laser module performing an engraving task on a piece of cardboard, demonstrating the precision and detail achievable.
6. Maintenance
Regular maintenance ensures the longevity and optimal performance of your laser module.
- Lens Cleaning: Periodically clean the protective lens using the provided lens replacement tool and a soft, lint-free cloth. Ensure the laser is off and cooled before cleaning.
- Air Assist System: The built-in air assist system requires minimal maintenance. Ensure the air intake is free from obstructions.
- General Cleaning: Keep the exterior of the laser module clean and free of dust and debris.
- Heat Dissipation: The integrated fan cooling system is designed for efficient heat management. Avoid blocking the fan vents to ensure proper airflow.
7. Troubleshooting
If you encounter issues with your AENBUSLM laser module, consider the following common troubleshooting steps:
- Laser Not Firing: Check all cable connections (power, signal). Ensure the machine's voltage matches the laser module's requirement. Verify the laser safety tilt sensor is not activated.
- Poor Engraving/Cutting Quality: Re-check the laser focus. Adjust power and speed settings in your software. Ensure the material is clean and properly secured.
- Overheating: Ensure the fan vents are clear and the built-in fan is operating. Operate the laser within recommended parameters.
- Software Communication Issues: Verify software compatibility and driver installation. Check USB or other connection cables.
For further assistance, please contact AENBUSLM customer support.
8. Specifications
| Feature | Specification |
|---|---|
| Product Dimensions | 1.57 x 1.57 x 5.71 inches |
| Item Model Number | DLC-JG-3.0 |
| Item Weight | 1.92 pounds |
| Manufacturer | AENBUSLM |
| Optical Output Power | 10W (10000mW) |
| Machine Power | 80W |
| Laser Wavelength | 450nm |
| Input Voltage | DC 24V 3.2A |
| Input Socket | XH2.54-3P |
| Beam Size at Focus | 0.08*0.08mm |
| Fan Speed | 10000 rpm |
| Software Compatibility | SRWOR, LaserGRBL, LightBurn |
| Supported File Formats | JPEG, BMP, TIF, SVG |
| Supported Operating Systems | WIN7, WIN8, WIN10, Android, MAC, iOS |
9. Warranty and Support
AENBUSLM is committed to providing high-quality after-sales service. If you encounter any problems while using this product, please contact our customer service team. Our professional technicians are available to provide solutions and assistance promptly.
For more information and support, visit the official AENBUSLM Store: AENBUSLM Store on Amazon.