
1. Introduction
This manual provides detailed instructions for the safe and efficient operation of your PACUM Wanptek NPS-W series Universal Switching DC Power Supply. This miniature switching DC power supply offers precise control over output voltage and current, making it suitable for various laboratory, industrial, and DIY applications. It features a high-precision four-window digital tube display for voltage, current, and power, providing clear real-time operational status.
Key features include:
- Complete operating protection functions: over temperature, overload, and short circuit protection.
- Compact size, low ripple, lightweight, and high power density for efficient operation.
- Voltage stabilization and current limiting capabilities.
- Automatic switching between constant voltage (CV) and constant current (CC) modes.
- High-precision four-digit LED display for voltage, current, and power.

Figure 1: Front view of the PACUM Wanptek NPS-W series DC power supply, showing the digital display and control knobs.
2. Product Overview
Familiarize yourself with the components and controls of your power supply.

Figure 2: Front panel layout with labeled controls and displays. This includes the voltage display, current display, power display, voltage coarse and fine adjustments, current coarse and fine adjustments, power switch, and output terminals (positive and negative).

Figure 3: Rear panel layout, highlighting the cooling fan, AC input voltage switch (115V/230V), AC input socket, and fuse holder. The cooling window for airflow is also indicated.
3. Setup Instructions
Follow these steps to set up your power supply for first use.
- Unpacking: Carefully remove the power supply and all accessories from the packaging. Inspect for any signs of damage during transit.
- Placement: Place the power supply on a stable, level surface with adequate ventilation. Ensure the cooling fan at the rear is not obstructed.
- AC Input Voltage Selection: Before connecting to mains power, verify the AC input voltage switch on the rear panel (Figure 3) is set to match your local mains voltage (115V or 230V). Incorrect setting can damage the unit.
- Power Connection: Connect the provided AC power cord to the AC input socket on the rear panel and then to a grounded wall outlet.
- Output Connections: Ensure the power supply is OFF. Connect your load to the output terminals on the front panel. The red terminal is positive (+), and the black terminal is negative (-). Use appropriate cables for your application.
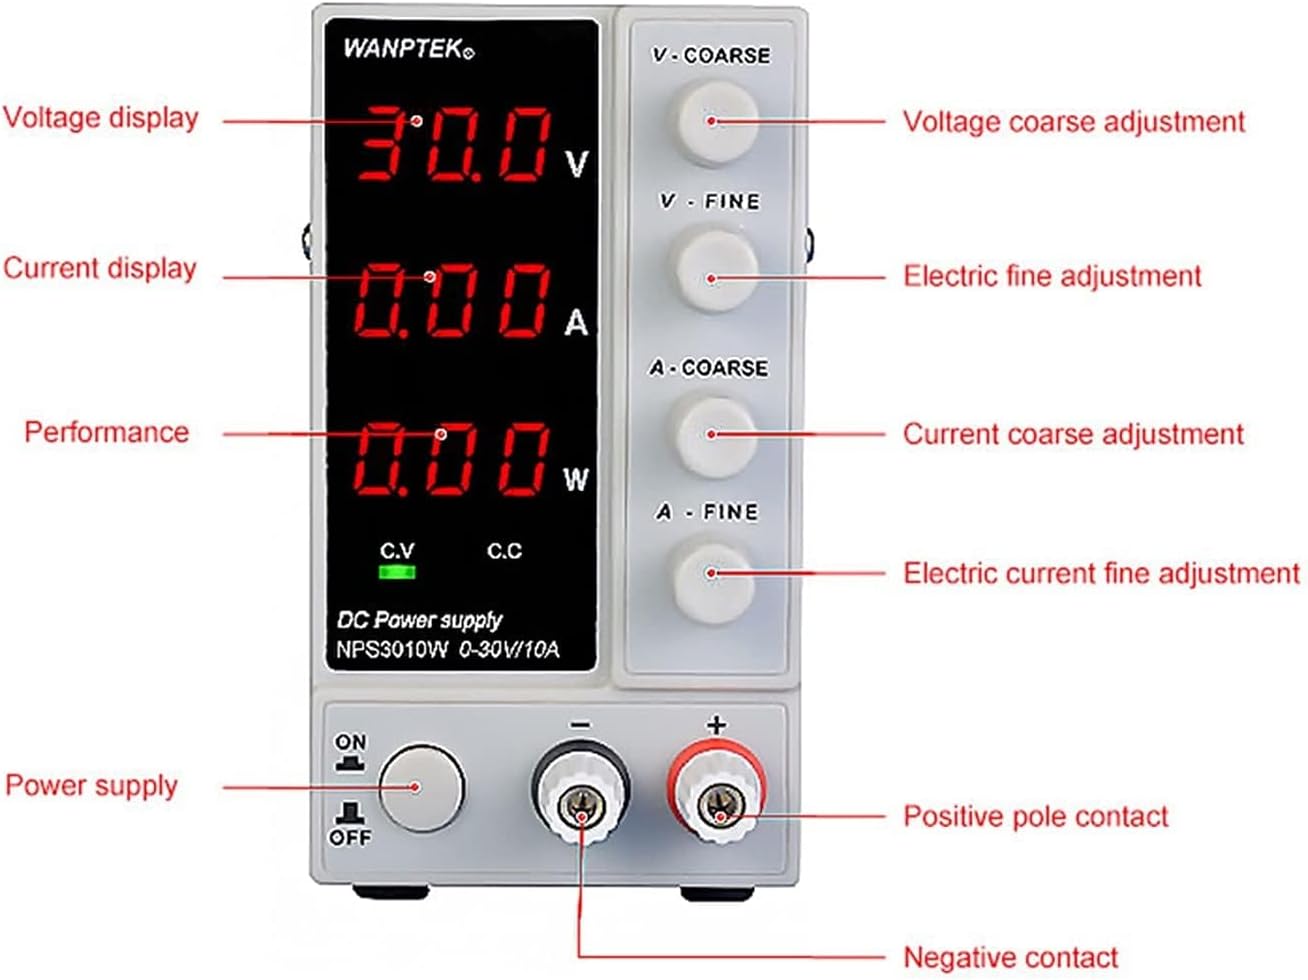
Figure 4: Physical dimensions of the power supply unit (70mm width, 130mm height, 230mm depth).
4. Operating Instructions
This section details how to operate the power supply to achieve desired voltage and current outputs.
- Power On: Press the ON/OFF button on the front panel to turn on the power supply. The digital displays will illuminate.
- Voltage Adjustment:
- Use the "V - COARSE" knob for large adjustments of the output voltage.
- Use the "V - FINE" knob for precise, small adjustments of the output voltage.
- Observe the voltage display to set the desired output voltage.
- Current Adjustment:
- Use the "A - COARSE" knob for large adjustments of the output current limit.
- Use the "A - FINE" knob for precise, small adjustments of the output current limit.
- Observe the current display to set the desired current limit. This setting determines the maximum current the power supply will deliver before entering constant current (CC) mode.
- Constant Voltage (CV) and Constant Current (CC) Modes:
- The power supply automatically switches between CV and CC modes.
- When the load resistance is high, the output current is less than the set current limit, and the power supply operates in Constant Voltage (CV) mode. The "C.V" indicator will be lit.
- When the load resistance is low, causing the output current to reach the set current limit, the power supply enters Constant Current (CC) mode. The "C.C" indicator will be lit, and the output voltage will drop to maintain the set current.
- Power Display: The "W" display shows the real-time output power (Voltage x Current).
- Power Off: Press the ON/OFF button to turn off the power supply.

Figure 5: Front view of the power supply, demonstrating the clarity of the digital voltage, current, and power displays during operation.
5. Maintenance
Proper maintenance ensures the longevity and reliable operation of your power supply.
- Cleaning: Disconnect the power supply from the mains before cleaning. Use a soft, dry cloth to wipe the exterior. Do not use abrasive cleaners or solvents.
- Ventilation: Ensure the ventilation openings and the cooling fan on the rear panel (Figure 3) are free from dust and obstructions. Periodically clean dust from the fan area using compressed air if necessary, ensuring the unit is unplugged.
- Storage: When not in use for extended periods, store the power supply in a cool, dry place, away from direct sunlight and excessive humidity.
- Fuse Replacement: If the unit does not power on, check the fuse located in the fuse holder on the rear panel (Figure 3). Replace with a fuse of the same type and rating only.
6. Troubleshooting
This section addresses common issues you might encounter.
| Problem | Possible Cause | Solution |
|---|---|---|
| No power/Unit does not turn on |
|
|
| Output voltage/current unstable or zero |
|
|
| "C.C" indicator is lit, voltage drops |
|
|
7. Technical Specifications
Detailed specifications for the PACUM Wanptek NPS-W series power supply.
| Parameter | Value (NPS3010W 4 Digits 30V 6A model) |
|---|---|
| Model | NPS3010W (4 Digits 30V 6A) |
| Output Voltage | 0-30V (Adjustable) |
| Output Current | 0-6A (Adjustable) |
| Display Type | 4-Digit LED (0.01V/0.001A precision) |
| Protection Functions | Over temperature, Overload, Short circuit |
| Operating Modes | Constant Voltage (CV), Constant Current (CC) |
| Dimensions (L x W x H) | Approx. 230mm x 70mm x 130mm (9.06 x 2.76 x 5.12 inches) |
| Item Weight | Approx. 3 kg (6.61 pounds) |
| Manufacturer | PACUM |
8. Typical Applications
The versatility of the PACUM Wanptek NPS-W series power supply makes it suitable for a wide range of applications, including but not limited to:
- Circuit Board Repair
- Electronic Production and Testing
- Laboratory Measurements and Experiments
- Computer Repair
- School and Educational Experiments
- Phone Repair
- DIY Testing and Prototyping
- Ageing Tests for Electronic Components
- Battery Charging (with appropriate charging circuit/monitoring)
- Factory Assembly Line Testing

Figure 6: Visual representation of common applications for the DC power supply, including electronics repair, laboratory use, and production testing.
9. Package Contents
Upon opening the package, you should find the following items:
- 1 x PACUM Wanptek NPS-W Series DC Power Supply Unit
- 1 x AC Power Cord
- 1 x Output Test Lead (Alligator Clips)
- 1 x User Manual (this document)

Figure 7: Image showing the power supply unit, power cord, test leads, and user manual as included in the product package.
10. Warranty and Support
Your PACUM Wanptek DC Power Supply is covered by a manufacturer's warranty. For specific warranty terms and conditions, please refer to the warranty card included in your package or contact your point of purchase.
For technical support, troubleshooting assistance beyond this manual, or inquiries regarding parts and service, please contact PACUM customer service through the contact information provided with your product or on the official PACUM website.
Please have your model number (NPS3010W) and purchase details ready when contacting support.


