
1. Introduction
This manual provides comprehensive instructions for the installation, operation, and maintenance of your BESTZHEYU 4 Inch 60W LED Pods with 2.5 Inch Tow Hitch Mounting Brackets. These LED pods are designed to enhance visibility for backup, reverse, and rear lighting applications on various vehicles including pickups, ATVs, SUVs, trucks, trailers, and boats. Please read this manual thoroughly before installation and use to ensure proper function and safety.

Image: The BESTZHEYU 4 Inch 60W LED Pods mounted on a 2.5 Inch Tow Hitch Bracket, showing the dual light pods and the hitch receiver.
2. Safety Information
- Always disconnect the vehicle's battery before performing any electrical work to prevent electrical shock or short circuits.
- Ensure all wiring connections are secure and properly insulated to prevent corrosion and electrical hazards.
- Mount the lights securely to avoid detachment during vehicle operation.
- Verify that the installed lights do not obstruct any existing vehicle lighting, license plates, or safety equipment.
- Consult a professional if you are unsure about any installation steps or electrical connections.
- Adhere to all local and national regulations regarding auxiliary lighting on vehicles.
3. Package Contents
Verify that all components are present before beginning installation:
- 2 x 4-inch 60W LED Pods (Amber and White Beam)
- 1 x 2.5 Inch Tow Hitch Mounting Bracket
- 1 x Wiring Harness with On/Off and Mode Switch
- Necessary Mounting Accessories (bolts, nuts, washers, Allen wrench)
4. Specifications
| Feature | Specification |
|---|---|
| Light Source Type | LED |
| Wattage | 60 Watts per pod |
| Brightness | 6000 Lumens |
| Beam Angle | 60 Degrees (Flood) & 30 Degrees (Spot) Combo |
| Light Color | White (6000K) and Amber (3500K) |
| Material | Black Heavy Duty Aluminum Alloy Housing, Polycarbonate Lenses |
| Finish Type | Black Aluminum |
| Waterproof Rating | IP68 |
| Lifespan | Over 50,000 hours |
| Product Dimensions (Light Pod) | Approximately 3.74"L x 2.56"W x 3.15"H |
| Product Dimensions (Hitch Bracket) | Approximately 11"L x 4.3"H (for 2.5 inch receiver) |
| Power Source | Car (DC 12V/24V compatible) |
| Bracket Construction | Carbon Steel with Electro-galvanized "E-coat" Layer |

Image: Detailed dimensions of the LED light pods and the tow hitch mounting bracket.

Image: Diagram showing the carbon steel and electro-galvanized "E-coat" layers of the hitch bracket for enhanced durability.
5. Setup and Installation
Follow these steps for proper installation:
- Prepare the Hitch Receiver: Ensure your vehicle's tow hitch receiver is clean and free of debris. Verify that there is at least 1.02 inches of clearance behind the hitch receiver to accommodate the mounting bracket. Also, confirm that the bracket will not interfere with safety chains or bumper components.
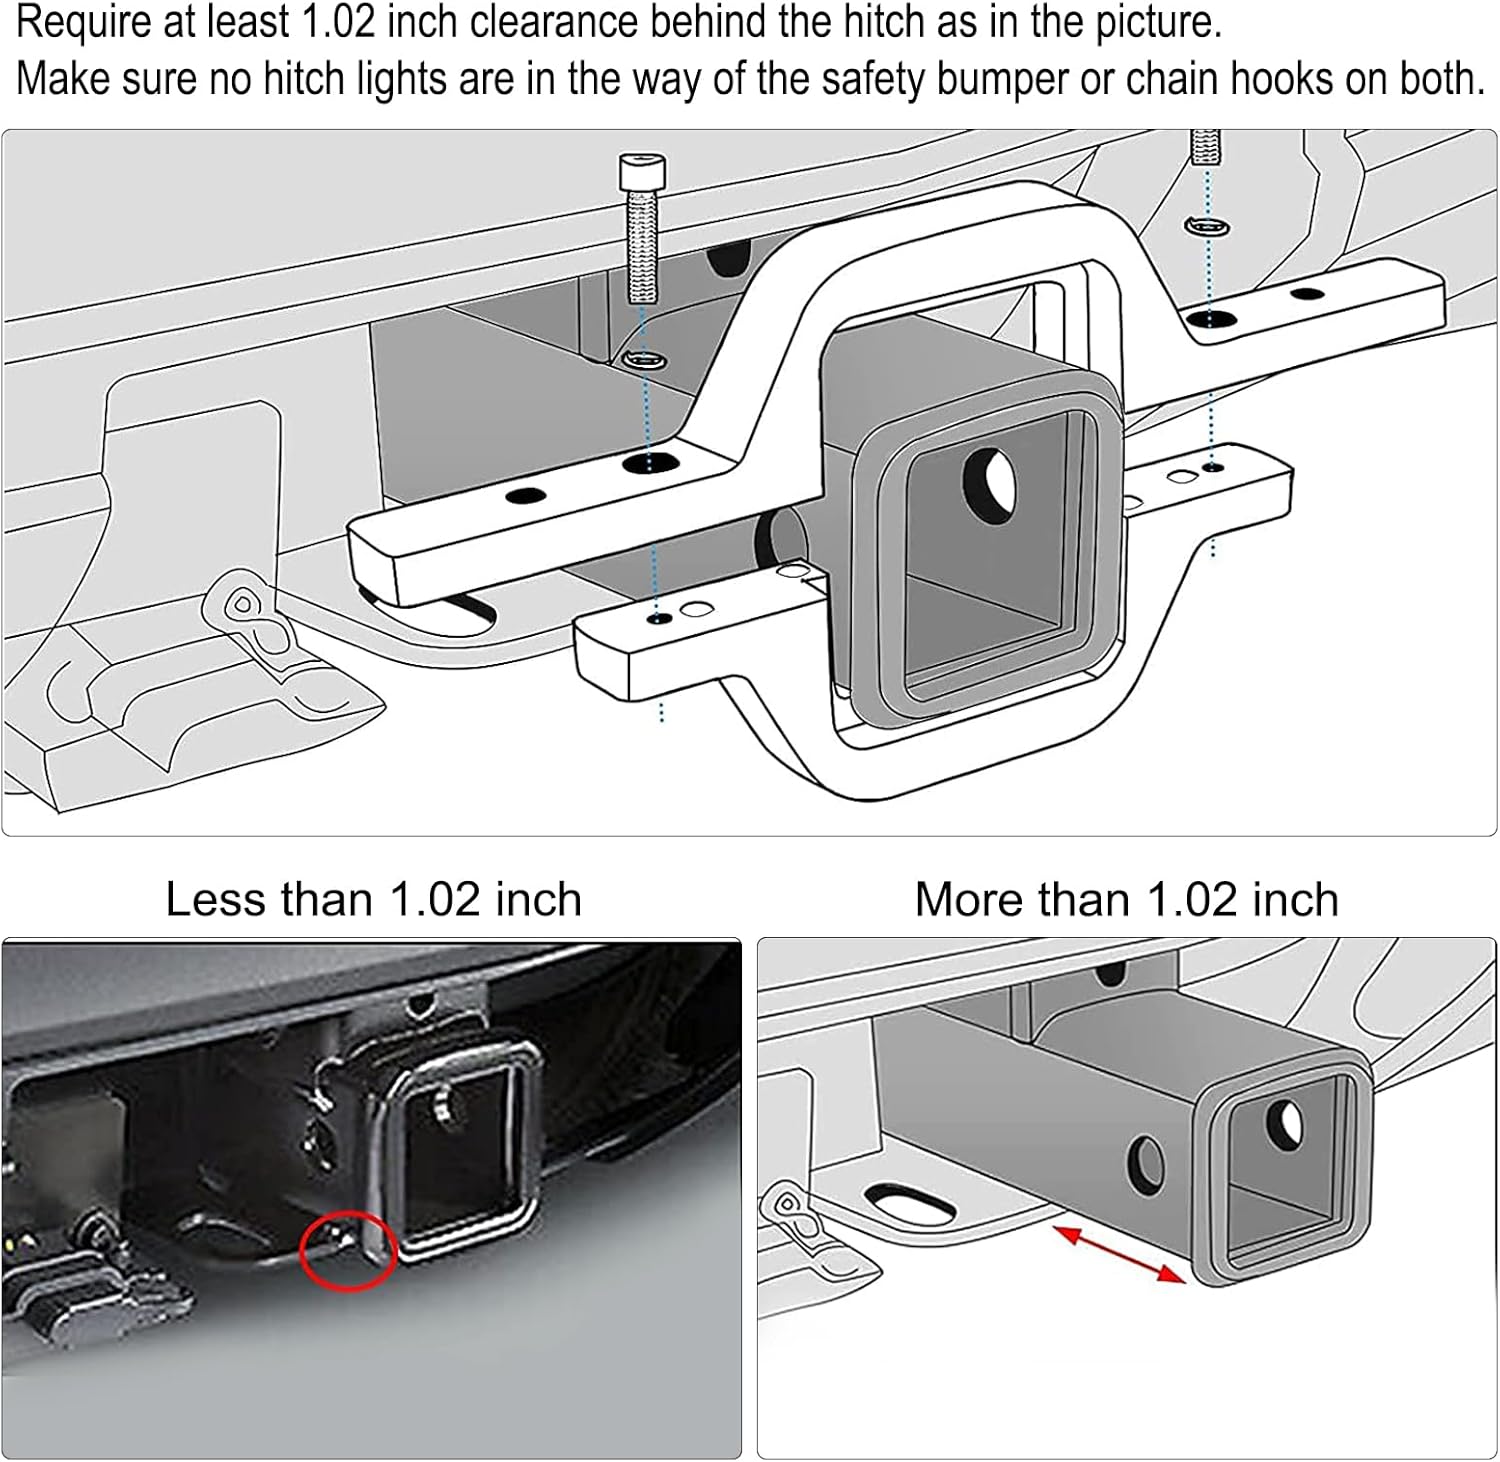
Image: Diagram illustrating the required clearance behind the hitch receiver for proper bracket installation.
- Assemble the Light Pods to the Bracket: Attach the two LED light pods to the 2.5-inch tow hitch mounting bracket using the provided bolts, nuts, and washers. The adjustable mounting bracket allows for angle adjustment. Ensure the pods are securely fastened but allow for minor adjustments later.
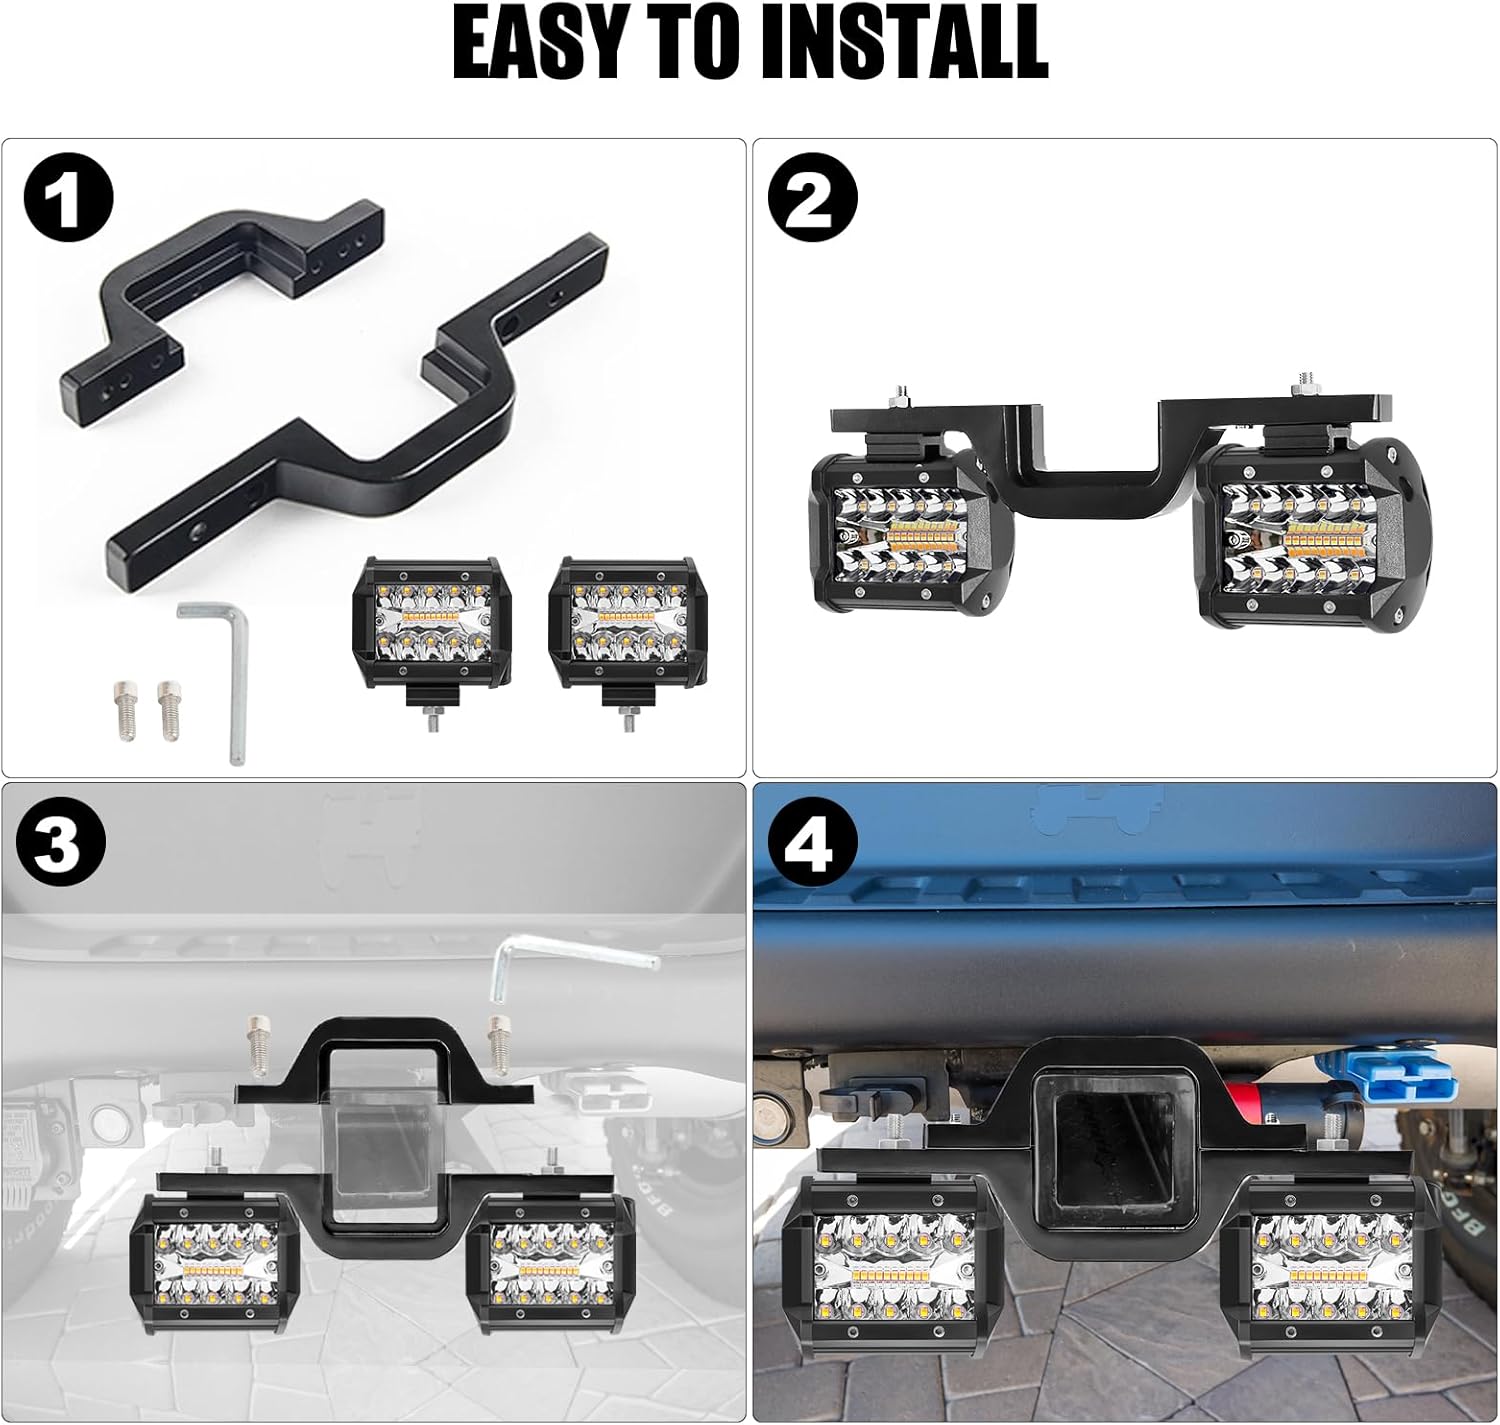
Image: Step-by-step visual guide for assembling the LED pods onto the hitch bracket.
- Mount the Assembly to the Hitch: Slide the assembled bracket into your vehicle's 2.5-inch tow hitch receiver. Secure it using the hitch pin (not included, typically part of your vehicle's hitch system) or other appropriate hitch locking mechanism.
- Wiring Connection:
- Connect the wiring harness to the LED pods.
- Identify the positive (+) and negative (-) terminals on your vehicle's electrical system. For reverse lights, connect the positive wire to the vehicle's reverse light circuit. For constant power, connect to a fused 12V/24V source.
- Connect the negative wire to a suitable ground point on the vehicle chassis.
- Route the wiring harness safely, away from hot or moving parts, and secure it with zip ties.
- Install the included fuse in the positive line of the wiring harness.
- Mount the On/Off and Mode switch in an accessible location within the vehicle's cabin.
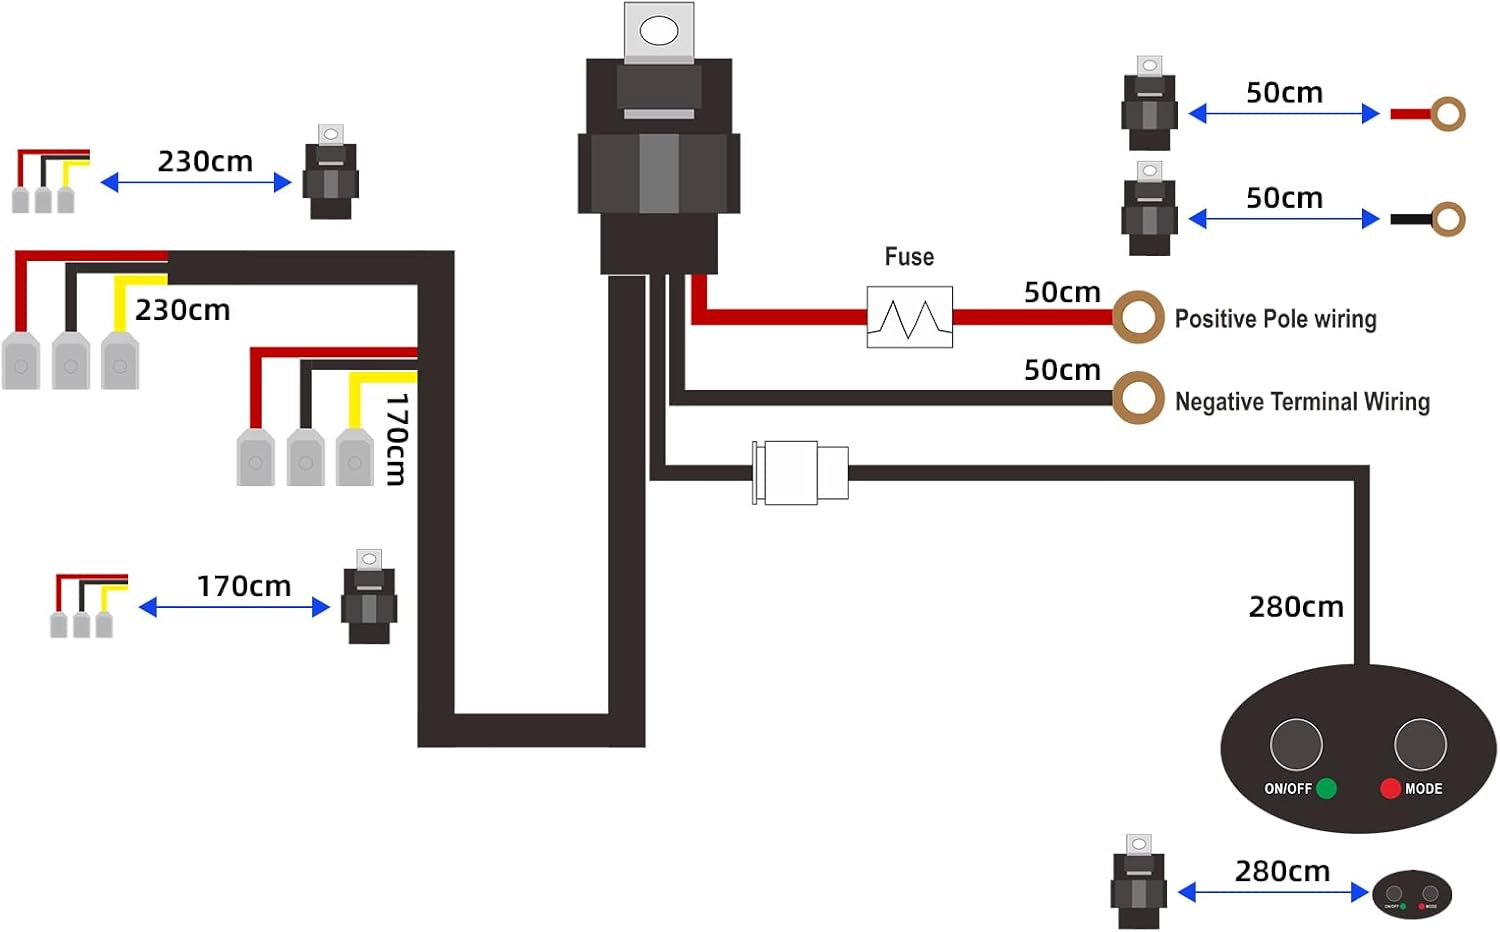
Image: Detailed wiring diagram showing connections for the LED pods, relay, fuse, and control switch.
- Test and Adjust: Reconnect the vehicle's battery. Turn on the lights and test all modes. Adjust the angle of the LED pods to achieve the desired light spread and direction. Tighten all mounting bolts once adjustments are complete.
6. Operating Instructions
The BESTZHEYU LED Pods feature a multi-function switch for easy control:
- On/Off Button: Press to turn the lights on or off.
- Mode Button: Press to cycle through the available lighting modes:
- White Beam
- Amber Beam
- White + Amber Beam
- White Flashing
- Amber Flashing
- White & Amber Flashing
- Power-off Memory Function: The lights will automatically restore to the last used working mode when powered on again.
- Reset Function: Press and hold the Mode button for 3 seconds to reset the light modes to their default sequence.

Image: The BESTZHEYU LED Pods displaying various light modes: white, amber, white+amber, and flashing combinations.
7. Maintenance
- Cleaning: Periodically clean the lenses of the LED pods with a soft cloth and mild soap and water to ensure maximum light output. Avoid abrasive cleaners.
- Connection Check: Regularly inspect all wiring connections for corrosion, fraying, or looseness. Tighten any loose connections and replace damaged wiring as needed.
- Mounting Security: Check the mounting bolts and the hitch pin periodically to ensure they remain tight and secure.
- Housing Inspection: Inspect the aluminum housing for any signs of damage or cracks that could compromise the waterproof seal.
8. Troubleshooting
| Problem | Possible Cause | Solution |
|---|---|---|
| Lights do not turn on. | No power, loose connection, blown fuse, faulty switch. | Check battery connection. Verify all wiring connections are secure. Inspect the fuse and replace if blown. Test the switch for functionality. |
| Lights flicker or are dim. | Poor electrical connection, insufficient voltage, damaged wiring. | Ensure all connections are tight and clean. Check vehicle's voltage. Inspect wiring for damage and repair/replace as necessary. |
| Water inside the light housing. | Compromised waterproof seal, improper installation. | If possible, open the housing to dry it out. Inspect seals and gaskets for damage. Ensure all screws are tightened evenly. If damage is significant, replacement may be necessary. |
| Hitch bracket does not fit or interferes with vehicle components. | Incorrect hitch receiver size, insufficient clearance. | Verify your hitch receiver size (this product is for 2.5-inch receivers). Check for adequate clearance behind the hitch. Some vehicle models may require minor modifications or alternative mounting solutions. |
9. Warranty and Support
For warranty information, please refer to the product packaging or contact BESTZHEYU customer service directly. Keep your purchase receipt as proof of purchase.
For technical support or further assistance, please contact the seller or manufacturer through their official channels. When contacting support, please provide your product model number (BESTZHEYU) and a detailed description of the issue.