
AGCUT NV126B5M-N41
AGCUT NV126B5M-N41 LCD Screen and Controller Board User Manual
Model: NV126B5M-N41
Introduction
This manual provides detailed instructions for the setup, operation, maintenance, and troubleshooting of your AGCUT NV126B5M-N41 LCD IPS eDP Screen with its accompanying 2 HDMI Mini LCD Controller. Please read this manual thoroughly before installation and use to ensure proper functionality and longevity of the product.
Package Contents
Verify that all items listed below are included in your package:
- 1x 12.6-inch NV126B5M-N41 1920x515 IPS LCD Screen
- 1x 2 HDMI Mini LCD Controller (Model: VS-RTD2556HM-V1)
- 1x Signal Cable (eDP cable for connecting screen to controller)
- 1x Keyboard with Cable (for controller board navigation)
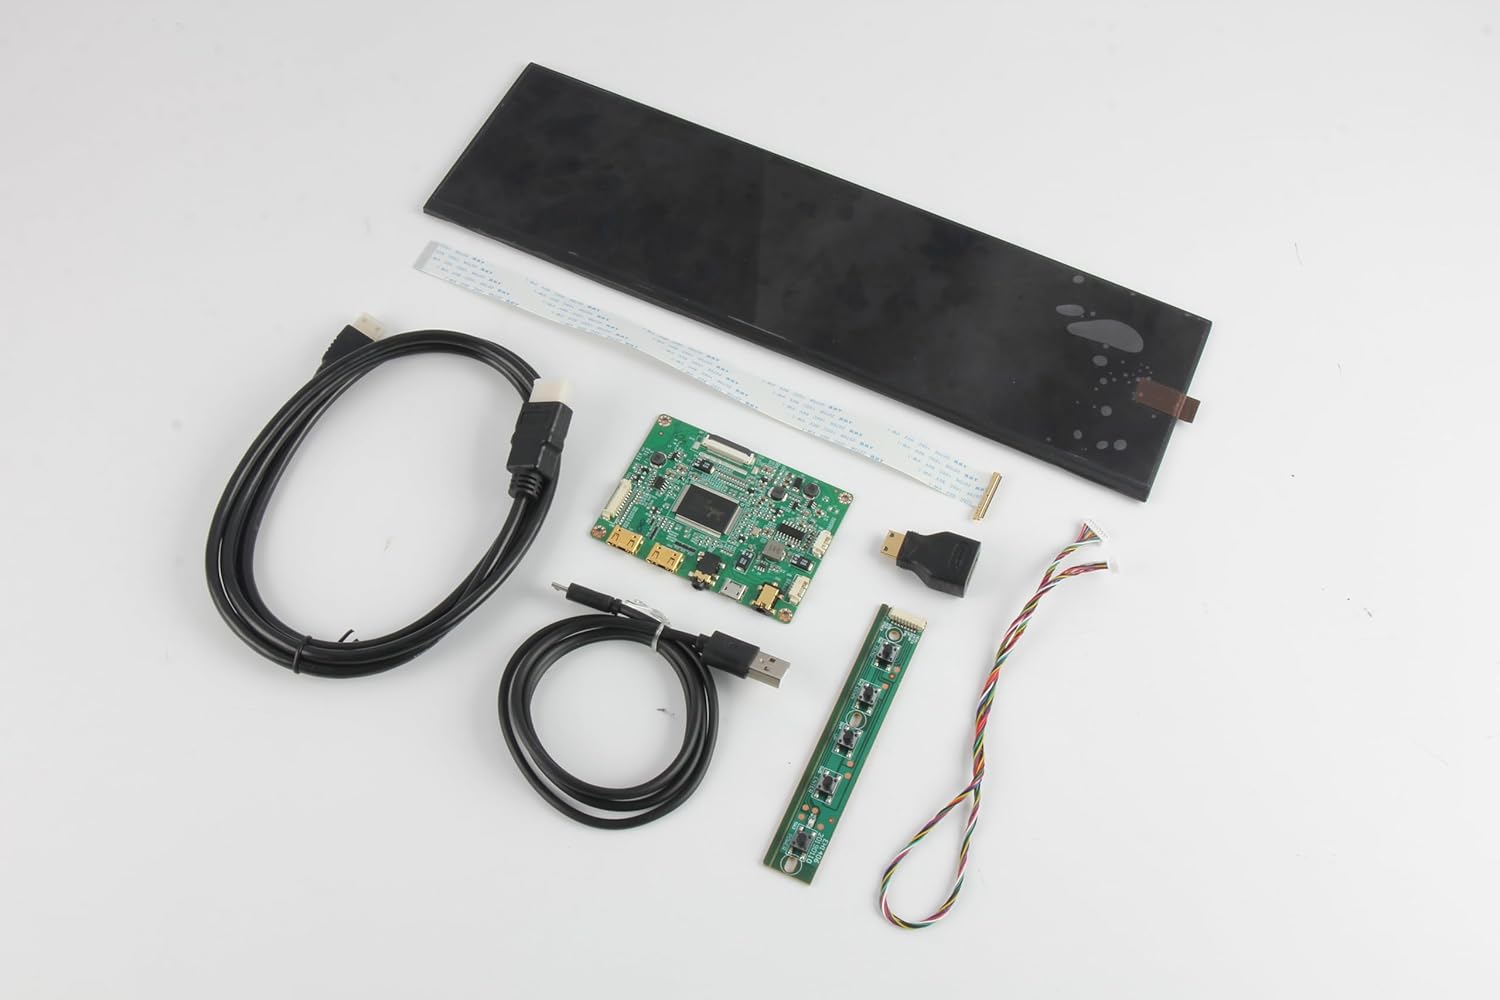
Figure 1: All components included in the package, showing the 12.6-inch LCD screen, the HDMI mini LCD controller board, the signal cable, and the control keyboard with its cable.
Product Overview
The AGCUT NV126B5M-N41 kit consists of a high-resolution 12.6-inch IPS LCD panel and a versatile HDMI mini LCD controller board, designed for various DIY PC case panel, CPU monitoring, or other embedded display applications.

Figure 2: The NV126B5M-N41 LCD screen connected to its controller board, demonstrating a typical setup with an image displayed.
LCD Screen (NV126B5M-N41)
This is a 12.6-inch IPS eDP LCD panel with a resolution of 1920x515 pixels. It features a wide viewing angle and WLED backlight.

Figure 3: Front view of the NV126B5M-N41 LCD screen.

Figure 4: Back view of the NV126B5M-N41 LCD screen, highlighting the eDP signal interface and the manufacturer's label.
LCD Controller Board (VS-RTD2556HM-V1)
The controller board is equipped with two HDMI Mini inputs and an earphone audio output. It manages the display signal and power for the LCD panel.

Figure 5: Top view of the LCD controller board, showing the main chip, eDP connector, and power input.

Figure 6: Bottom view of the LCD controller board, detailing the HDMI mini inputs, audio output, and the connector for the control keyboard.
Setup Instructions
Follow these steps to correctly assemble and connect your LCD screen and controller board:
- Connect the Signal Cable: Carefully connect one end of the provided signal cable (eDP cable) to the 40-pin eDP connector on the back of the NV126B5M-N41 LCD screen. Ensure the cable is inserted correctly and securely.
- Connect to Controller Board: Connect the other end of the signal cable to the corresponding eDP connector on the VS-RTD2556HM-V1 LCD controller board.
- Connect the Keyboard: Attach the cable from the control keyboard to the designated header on the LCD controller board. This keyboard is used for navigating the OSD (On-Screen Display) menu.
- Connect Video Source: Connect your video source (e.g., PC, mini PC, Raspberry Pi) to one of the two HDMI Mini input ports on the controller board using an appropriate HDMI cable (not included).
- Connect Power Adapter: Connect a 12V DC power adapter (not included, minimum 2A recommended) to the power input jack on the controller board.
- Power On: Once all connections are secure, apply power to the controller board. The screen should power on and display the input signal.
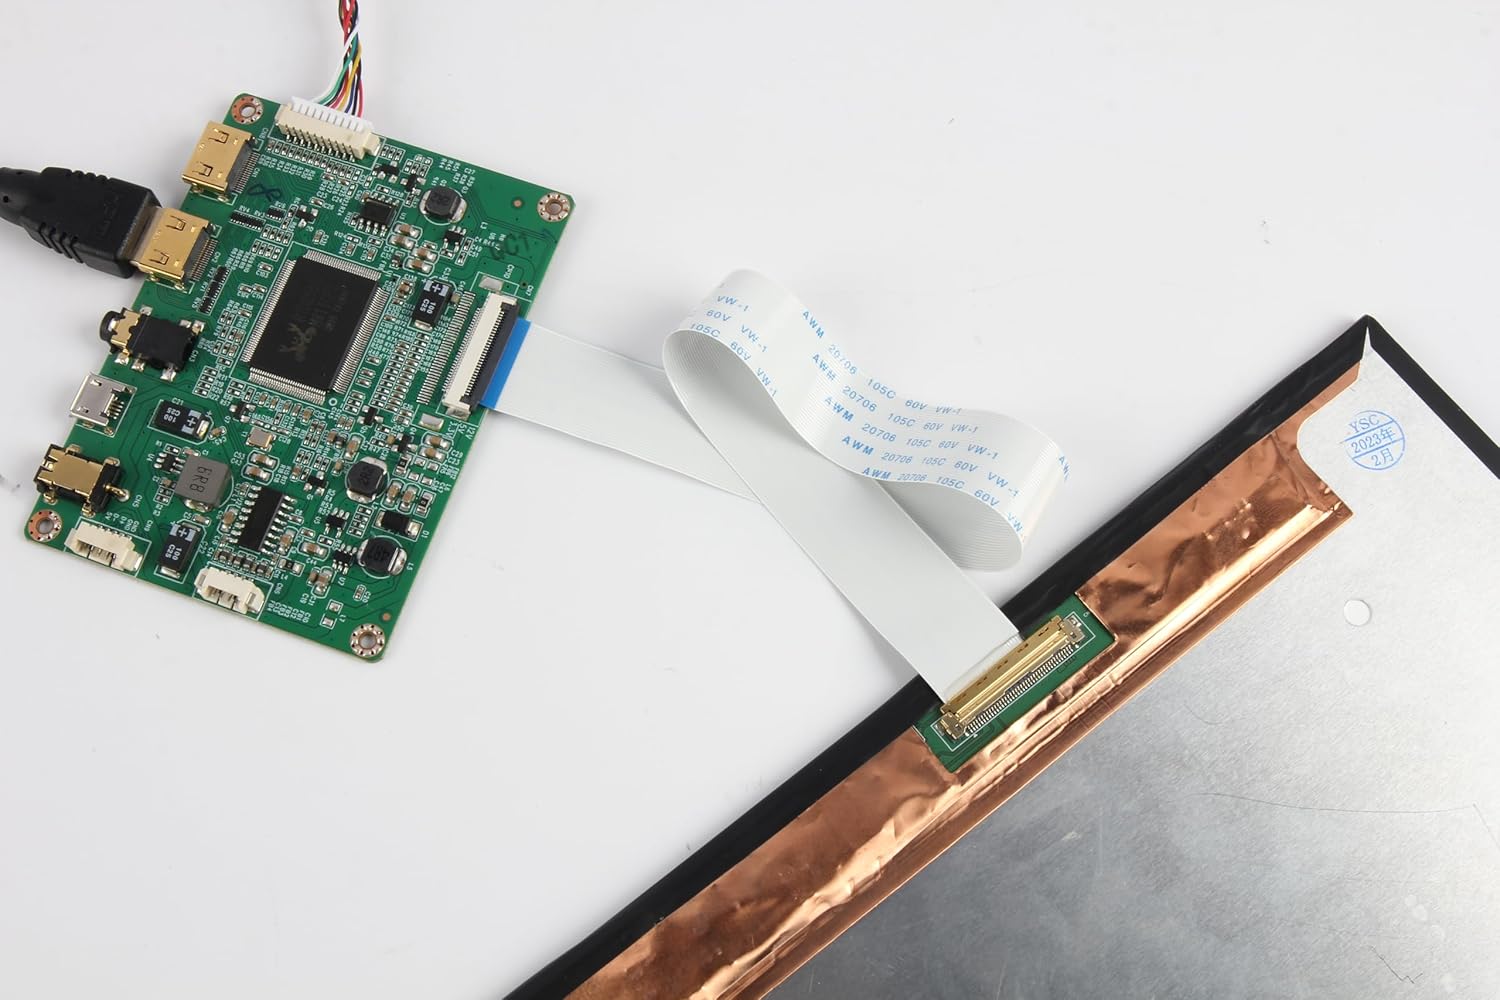
Figure 7: Connecting the eDP signal cable to the LCD panel.

Figure 8: Overview of the screen and controller board connected via the signal cable.
Operating Instructions
The LCD controller board features an On-Screen Display (OSD) menu accessible via the included keyboard. This menu allows you to adjust various display settings.
Keyboard Functions:
- Power Button: Turns the display on or off.
- Menu Button: Opens the OSD menu. Press again to exit or navigate through main menu options.
- Up/Down Buttons: Navigate through menu options or adjust values.
- Left/Right Buttons: Adjust values or select sub-menus.
- Auto Button: Automatically adjusts display settings for optimal picture (may not be available for all input types).
Basic OSD Navigation:
- Press the Menu button to open the OSD.
- Use the Up and Down buttons to select a menu category (e.g., Picture, Color, OSD Setting).
- Press the Right button to enter a sub-menu or confirm a selection.
- Use the Up and Down buttons to select an option within the sub-menu.
- Use the Left and Right buttons to adjust the value of the selected option.
- Press the Menu button repeatedly to go back to the previous menu or exit the OSD.
Specifications
LCD Screen (NV126B5M-N41)
| Feature | Description |
|---|---|
| Panel Model | NV126B5M-N41 |
| Panel Size | 12.6 inches |
| Panel Type | IPS, ADS, Normally Black, Transmissive |
| Resolution | 1920(RGB) × 515 |
| Outline Size | 315.61 × 94.02 × 5.3 mm (H×V×D) |
| Display Area | 309.31 × 82.97 mm (H×V) |
| Brightness | 250 cd/m² (Typ.) |
| Contrast Ratio | 1200:1 (Typ.) |
| Viewing Angle | 85/85/85/85 (Typ.) [Left / Right / Up / Down] |
| Signal Interface | eDP (2 Lanes), 40 pins Connector |
| Backlight | WLED |
| Input Voltage | 3.3V (Typ.) |
LCD Controller Board (VS-RTD2556HM-V1)
| Feature | Description |
|---|---|
| Model | VS-RTD2556HM-V1 |
| Input Power Adapter | 12Vdc, >2A (Recommended) |
| Standby Power Consumption | <0.3W |
| Video Input | 2x HDMI Mini |
| Audio Output | Earphone Jack |
| Board Size | 82mm x 60mm x 5mm |
Troubleshooting
| Problem | Possible Cause | Solution |
|---|---|---|
| No display / Black screen | No power to controller board; Incorrect signal cable connection; No video input signal; Incorrect input selected. | Ensure 12V power adapter is connected and functional. Check eDP signal cable is securely connected at both ends. Verify video source is active and connected to an HDMI Mini port. Use OSD to select correct input. |
| Flickering or distorted image | Loose signal cable connection; Incompatible resolution/refresh rate from source; Power supply insufficient. | Reseat the eDP signal cable. Adjust resolution/refresh rate on the video source to match screen specifications (1920x515). Ensure power adapter provides sufficient current (>2A). |
| OSD menu not appearing or unresponsive | Keyboard cable loose or disconnected; Faulty keyboard. | Check the connection of the keyboard cable to the controller board. If problem persists, the keyboard or controller board may be faulty. |
| No audio output | No audio signal from HDMI source; Earphones not connected properly; Volume too low. | Ensure your HDMI source is sending an audio signal. Check earphone connection. Adjust volume via OSD or source device. |
Maintenance
- Cleaning: Use a soft, lint-free cloth slightly dampened with water or a non-abrasive screen cleaner to wipe the screen surface. Do not spray liquid directly onto the screen or controller board.
- Storage: When not in use for extended periods, store the product in a cool, dry place away from direct sunlight and extreme temperatures.
- Handling: Avoid applying excessive pressure to the screen panel. Handle the controller board by its edges to prevent damage to components.
- Power: Always disconnect the power adapter before cleaning or performing any maintenance.
Warranty and Support
This product comes with a 90-day warranty from the date of purchase. This warranty covers manufacturing defects and material faults under normal use.
The warranty does not cover:
- Damage caused by improper installation or use.
- Damage caused by accidents, abuse, neglect, fire, water, lightning, or other acts of nature.
- Unauthorized modification or repair.
- Cosmetic damage, including but not limited to scratches, dents, and broken plastic on ports.
For technical support or warranty claims, please contact your retailer or the manufacturer, AGCUT, through the platform where you purchased the product. Please provide your purchase details and a clear description of the issue.
Ask a question about this manual
Ask about setup, troubleshooting, compatibility, parts, safety, or missing instructions. Manuals+ will review the question and use this page’s manual context to help answer it.