
Introduction
This manual provides detailed instructions for setting up, operating, and maintaining your UYIKOO CC10 WiFi Hidden Camera Alarm Clock. This device combines a functional alarm clock with a discreet 1080P HD camera, offering features like dual-band WiFi connectivity, motion detection, and invisible night vision for effective indoor surveillance.
Product Overview
Key Features

Figure 1: UYIKOO CC10 Key Features. This image visually summarizes the main functionalities of the device, including dual-band WiFi, app control, 1080P HD video, wide-angle view, motion detection, night vision, loop recording, and versatile storage options.
- Dual-Band WiFi (2.4GHz & 5GHz): Ensures stable and flexible wireless connection.
- 1080P HD Resolution: Captures clear and detailed video footage.
- 120° Wide View Angle: Provides broad coverage of the monitored area.
- Invisible IR Night Vision: Automatically activates in low light without visible indicators.
- Motion Detection & Instant Alerts: Sends notifications and snapshots to your mobile device upon detecting movement.
- Loop Recording: Continuously records by overwriting the oldest files when storage is full.
- Dual Storage Options: Supports Micro SD card (up to 256GB, not included) and cloud storage.
- Remote Access: Control and view live feed via TuyaSmart or Smartlife App from anywhere.
Product Components
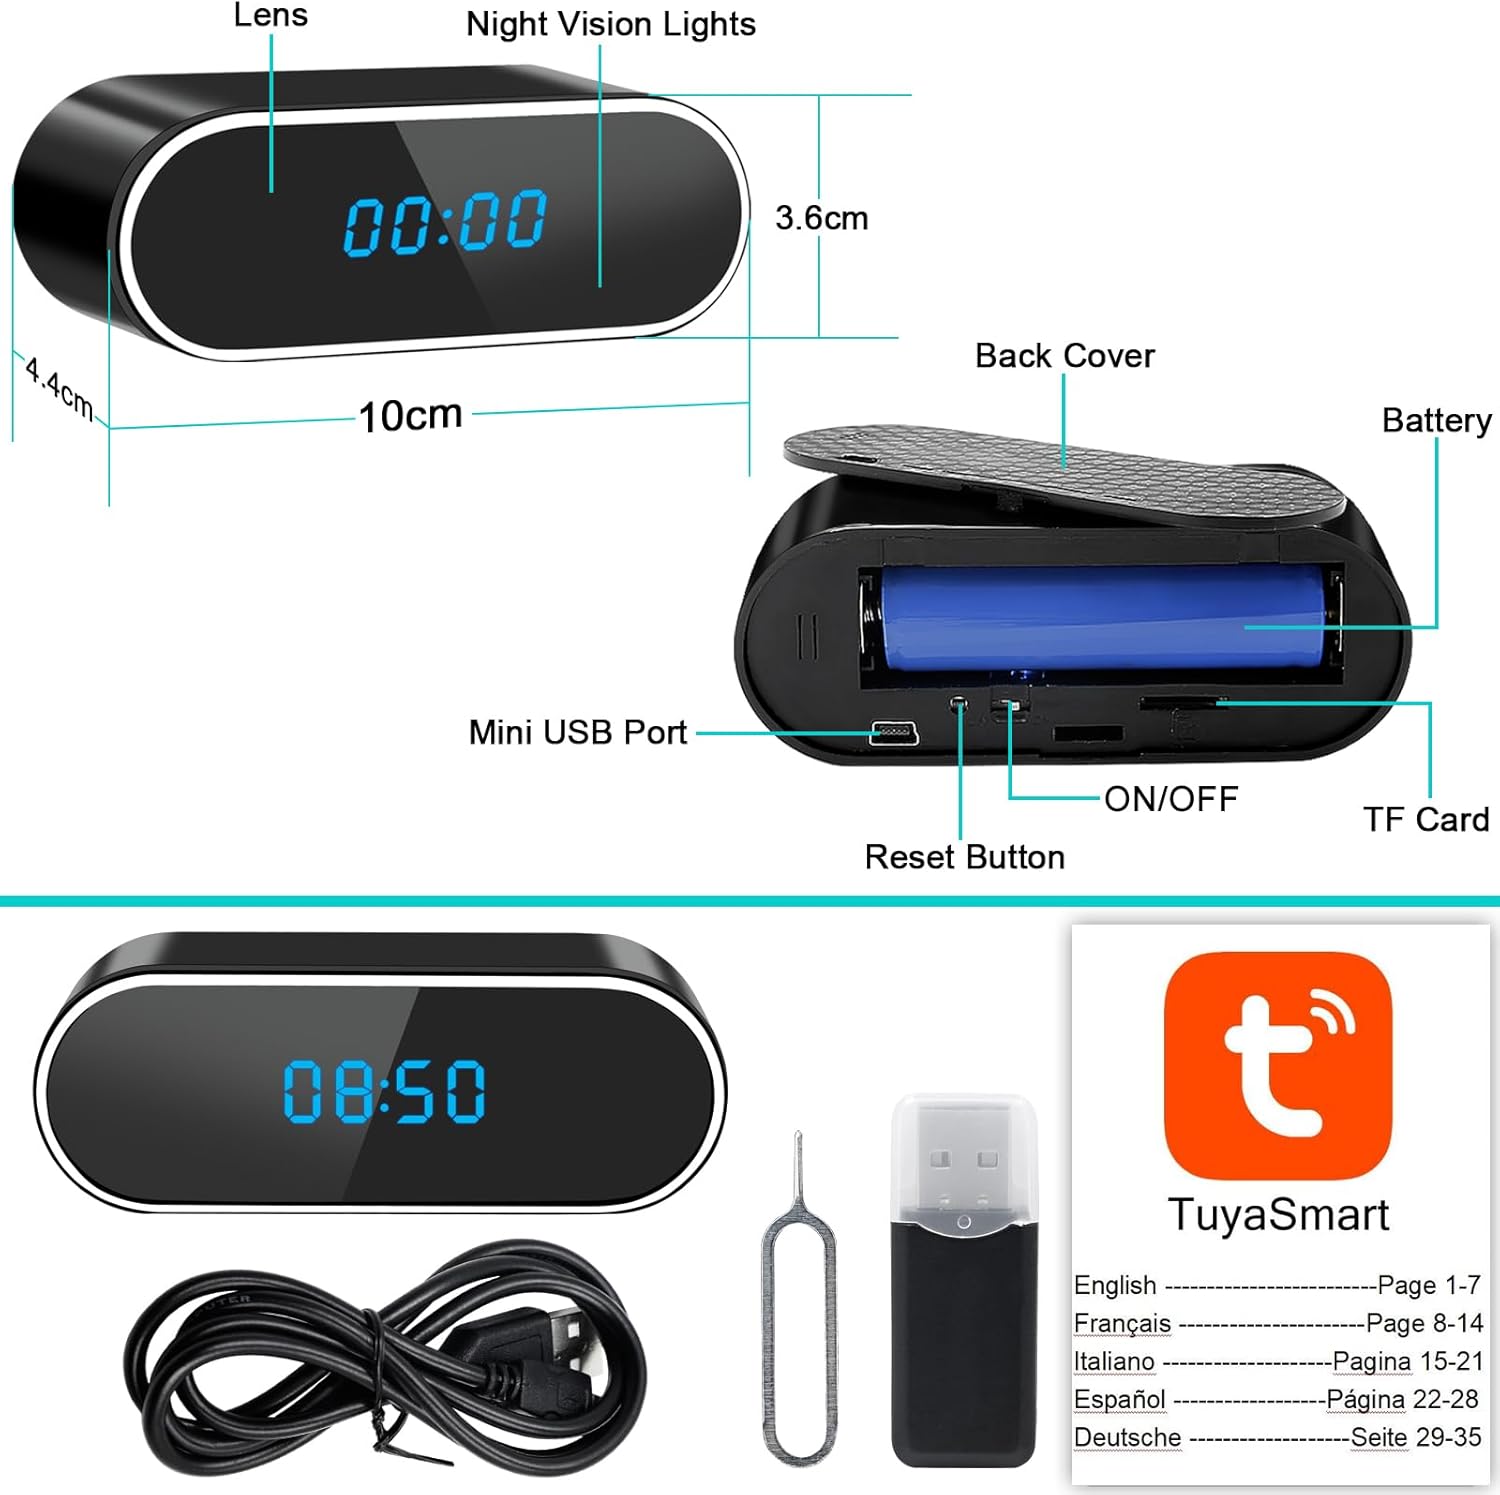
Figure 2: UYIKOO CC10 Component Diagram. This image illustrates the various parts of the device, including the camera lens, night vision lights, Mini USB charging port, ON/OFF switch, reset button, TF (Micro SD) card slot, and the battery compartment under the back cover. Dimensions are also indicated.
- Lens: The camera's optical sensor.
- Night Vision Lights: Invisible infrared LEDs for low-light conditions.
- Mini USB Port: For charging the device.
- ON/OFF Switch: Powers the device on or off.
- Reset Button: Used to reset the device to factory settings.
- TF Card Slot: For inserting a Micro SD card for local storage.
- Battery: Internal rechargeable battery.
- Back Cover: Protects the internal components.
Setup Guide
1. Initial Charging
Before first use, fully charge the device using the provided Mini USB cable and a standard 5V USB power adapter. The charging indicator will typically change color or turn off once fully charged.
2. Insert Micro SD Card (Optional)
If you plan to use local storage, gently insert a Micro SD card (up to 256GB, not included) into the TF card slot as shown in Figure 2. Ensure the card is inserted correctly until it clicks into place.
3. Power On the Device
Locate the ON/OFF switch (refer to Figure 2) and slide it to the 'ON' position. The device will power on, and the clock display should activate.
4. Download and Install the App
Download either the TuyaSmart or Smartlife application from your mobile device's app store (Google Play Store for Android or Apple App Store for iOS). Install the app and create an account if you don't already have one.
5. Connect to WiFi and Pair with App

Figure 3: Dual-Band WiFi Connectivity and App Control. This image highlights the camera's compatibility with both 2.4GHz and 5GHz WiFi networks and its remote control capabilities via the TuyaSmart app on a smartphone.
- Open the TuyaSmart or Smartlife app on your smartphone.
- Follow the in-app instructions to add a new device. Select "Security & Video Surveillance" and then "Smart Camera (Wi-Fi)".
- Ensure your phone is connected to a 2.4GHz or 5GHz WiFi network. The camera supports both.
- The app will guide you through connecting the camera to your home WiFi network. This usually involves scanning a QR code generated by the app with the camera's lens or entering your WiFi credentials.
- Once connected, the camera will appear in your app's device list, and you can access the live feed.
Operating Instructions
Live View and Recording

Figure 4: 1080P HD and 120° Wide View Angle. This image demonstrates the high-definition video quality and the broad coverage provided by the camera's 120-degree lens, as seen through the mobile application.
- Open the TuyaSmart/Smartlife app and select your camera to view the live 1080P HD video feed.
- From the live view interface, you can manually start/stop recording, take snapshots, and access recorded footage.
Motion Detection and Alerts
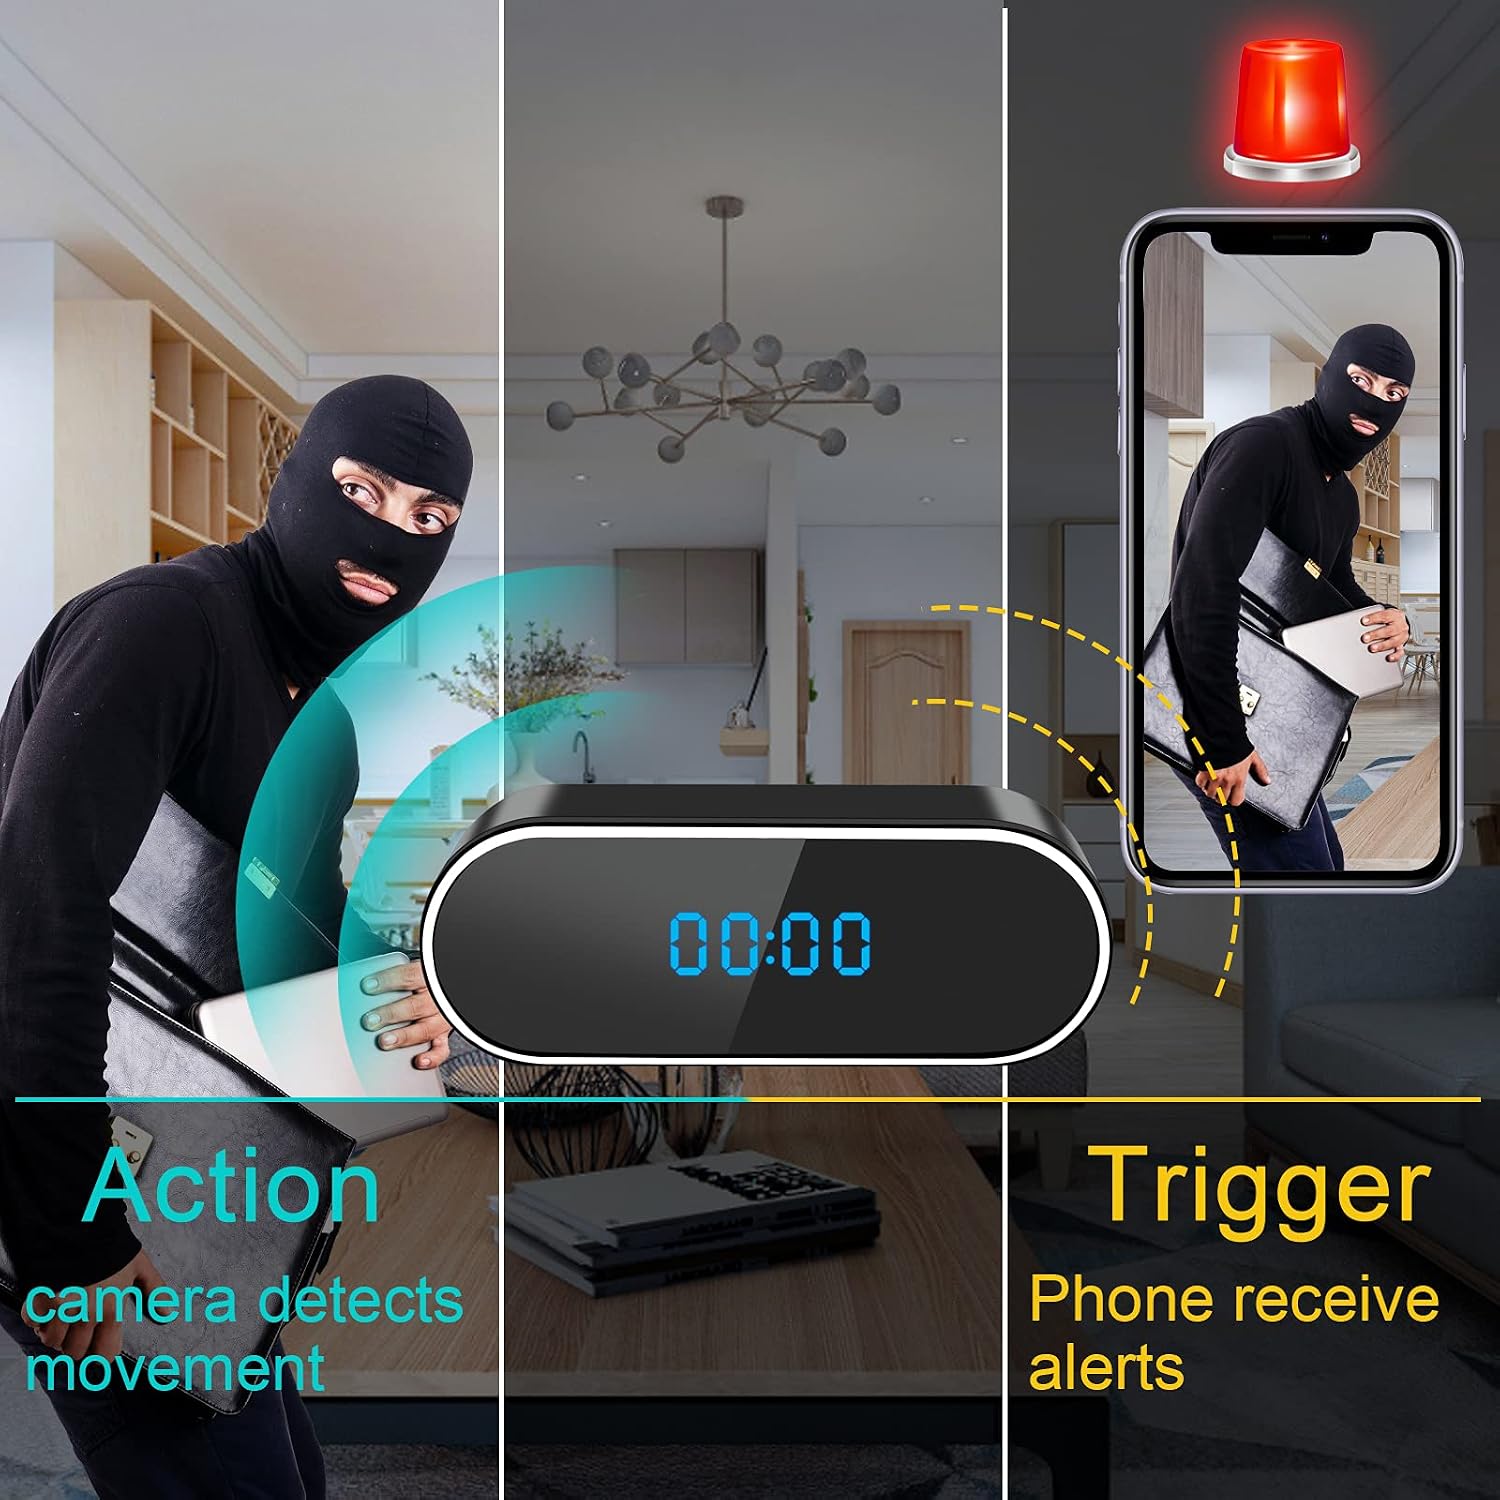
Figure 5: Motion Detection and Instant Alerts. This image visually explains how the camera detects movement and triggers immediate phone notifications, including snapshots, to the user's mobile device.
- In the app settings, navigate to "Motion Detection" or "Alarm Settings".
- Enable motion detection and adjust sensitivity levels as needed.
- Configure alert notifications to receive instant alerts and snapshots on your mobile device when motion is detected.
Invisible Night Vision

Figure 6: Enhanced Night Vision. This image illustrates the camera's ability to capture clear footage in both day and night conditions, highlighting the automatic activation of invisible infrared night vision in low light.
- The camera automatically switches to night vision mode when ambient light is low.
- The infrared lights are invisible, ensuring discreet operation without drawing attention.
Storage Management (SD Card & Cloud)

Figure 7: SD Card and Cloud Storage Options. This image highlights the flexible storage solutions offered by the camera, including support for Micro SD cards (up to 128GB, not included) and cloud service for video playback and backup.
- Micro SD Card: Videos are saved to the inserted Micro SD card. The camera supports loop recording, automatically overwriting older files when the card is full.
- Cloud Storage: The app offers optional cloud storage services (may require subscription). This provides an additional layer of data backup and accessibility.
- Access recorded footage via the "Playback" section in the app.
Sharing Device Access
You can share access to your camera with family and friends through the app, allowing multiple users to view the live feed simultaneously.
Clock Display Control
The app may offer an option to turn off the digital clock display on the device for increased discretion. Refer to the app's device settings for this feature.
Maintenance
- Cleaning: Use a soft, dry cloth to clean the camera lens and the device's exterior. Avoid abrasive cleaners or liquids.
- Battery Care: To prolong battery life, avoid extreme temperatures and fully charge the device periodically if not in continuous use.
- Firmware Updates: Check the app regularly for any available firmware updates for the camera to ensure optimal performance and security.
Troubleshooting
| Problem | Possible Cause / Solution |
|---|---|
| Device does not power on. |
|
| Cannot connect to WiFi / App pairing fails. |
|
| Poor video quality or black/white image during the day. |
|
| Motion detection alerts are not received. |
|
| SD card not recording or recognized. |
|
Specifications
| Feature | Detail |
|---|---|
| Brand | UYIKOO |
| Model Name | CC10 |
| Connectivity Technology | Wireless (Wi-Fi) |
| Special Feature | Night Vision |
| Indoor/Outdoor Use | Indoor |
| Compatible Devices | Smartphone (Android) |
| Controller Type | Android (via App) |
| Mounting Type | Table Mount |
| Video Recording Resolution | 1080p |
| Video Capture Format | AVI |
| Field of View | 120 Degrees |
| Power Source | Battery (1 Lithium-polymer, included) |
| Battery Watt-hours | 1.2 Watt-hours |
| Product Dimensions (L x W x H) | 9 x 4 x 3 cm |
| Item Weight | 240 grams |
| Max Micro SD Card Support | 256 GB (not included) |
Warranty and Support
For warranty information or technical support, please refer to the documentation included with your purchase or contact UYIKOO customer service directly. Contact details are typically available on the manufacturer's official website or through your retailer.


