
1. Introduction
This manual provides detailed instructions for the operation and maintenance of your Andoer 4K 60FPS Action Camera. Please read this manual thoroughly before using the camera to ensure proper function and to maximize your experience. This camera is designed for capturing high-quality video and photos in various environments, including underwater, with its 4K resolution, 24MP photo capability, dual screens, and built-in Wi-Fi.
2. Package Contents
Verify that all items listed below are included in your package:
- 1 x Andoer Action Camera (with battery inside)
- 1 x Waterproof Housing
- 1 x Handle Bar/Pole Mount
- 1 x Clip
- 1 x Mount 1
- 1 x Mount 2
- 1 x Mount 3
- 1 x Mount 4
- 4 x Bandages
- 2 x Adhesives
- 1 x USB Charging Cable
- 1 x Users Manual
3. Product Overview
Familiarize yourself with the camera's components and controls.

Image: The Andoer 4K 60FPS Action Camera shown both standalone and enclosed within its waterproof housing, illustrating its compact design and readiness for various mounting options.

Image: A detailed diagram highlighting the camera's buttons and ports, including the Power/Mode button, OK/Confirm key, Up/Wi-Fi key, Down/Set key, lens, and megaphone.
Camera Components:
- Power/Mode Button: Used to power the camera on/off and switch between modes.
- OK/Confirm Key: Confirms selections in menus or starts/stops recording/photo capture.
- Up/Wi-Fi Key: Navigates up in menus or activates Wi-Fi function.
- Down/Set Key: Navigates down in menus or accesses specific settings.
- Lens: 170-degree wide-angle lens for capturing expansive views.
- LCD Screens: 2.0-inch HD main screen and 1.3-inch IPS front screen for viewing and framing.
- Megaphone: Built-in microphone for audio recording.
- Micro USB Port: For charging and data transfer.
- MicroSD Card Slot: For memory card insertion.
4. Setup
4.1 Battery Installation
- Locate the battery compartment cover on the bottom of the camera.
- Slide the latch to open the cover.
- Insert the 3.7V 900mAh rechargeable battery according to the polarity indicators.
- Close the battery compartment cover securely until it latches.
4.2 Memory Card Installation
A Class 10 or higher MicroSD card (up to 128GB) is required for recording. The memory card is not included.
- Locate the MicroSD card slot on the side of the camera.
- Insert the MicroSD card with the contacts facing the front of the camera until it clicks into place.
- To remove, gently push the card until it springs out.
4.3 Charging the Battery
Connect the camera to a USB power source using the provided USB charging cable. The charging indicator will illuminate during charging and turn off when fully charged.
4.4 Using the Waterproof Housing

Image: The Andoer Action Camera encased in its waterproof housing, partially submerged in water, demonstrating its capability for underwater use up to 30 meters.
The waterproof housing allows the camera to be used up to a depth of 30 meters (98 feet).
- Ensure the camera is dry before placing it into the housing.
- Open the latch on the waterproof housing and carefully insert the camera.
- Close the housing securely, ensuring the latch is fully engaged and the rubber seal is clean and properly seated.
- Before first use, test the waterproof housing without the camera inside by submerging it in water to check for leaks.
5. Operating Instructions
5.1 Power On/Off
- To Power On: Press and hold the Power/Mode button for a few seconds.
- To Power Off: Press and hold the Power/Mode button for a few seconds until the screen turns off.
5.2 Mode Switching
Press the Power/Mode button repeatedly to cycle through different modes: Video Recording, Photo Mode, Playback Mode, and Settings Mode.
5.3 Video Recording
- Switch to Video Recording mode.
- Press the OK/Confirm key to start recording. A red indicator light will flash, and a recording icon will appear on the screen.
- Press the OK/Confirm key again to stop recording. The indicator light will stop flashing.
5.4 Photo Capture
- Switch to Photo Mode.
- Frame your shot using the LCD screen.
- Press the OK/Confirm key to take a photo.
5.5 Dual Screen Functionality
The camera features a 2.0-inch HD rear screen and a 1.3-inch IPS front screen. The front screen is useful for self-portraits or vlogging, allowing you to see yourself while recording. The camera automatically displays on the active screen based on the mode and orientation.
5.6 Wi-Fi Connection (XDV App)
The built-in Wi-Fi allows you to control the camera remotely and view content on your smartphone via the XDV app.
- Download and install the 'XDV' app on your smartphone.
- Turn on the camera.
- Press the Up/Wi-Fi key to activate Wi-Fi. The Wi-Fi icon will appear on the screen.
- On your smartphone, go to Wi-Fi settings and connect to the camera's Wi-Fi network (SSID usually starts with 'Andoer' or similar). The default password is often '1234567890' or '12345678'.
- Open the XDV app. You should now be able to see a live preview, control recording, and access settings.
5.7 Settings Menu Navigation
In Settings Mode, use the Up/Wi-Fi and Down/Set keys to navigate through menu options. Press the OK/Confirm key to select an option or enter a sub-menu. Press the Power/Mode button to exit a menu or return to the previous screen.
5.8 Anti-Shake Function
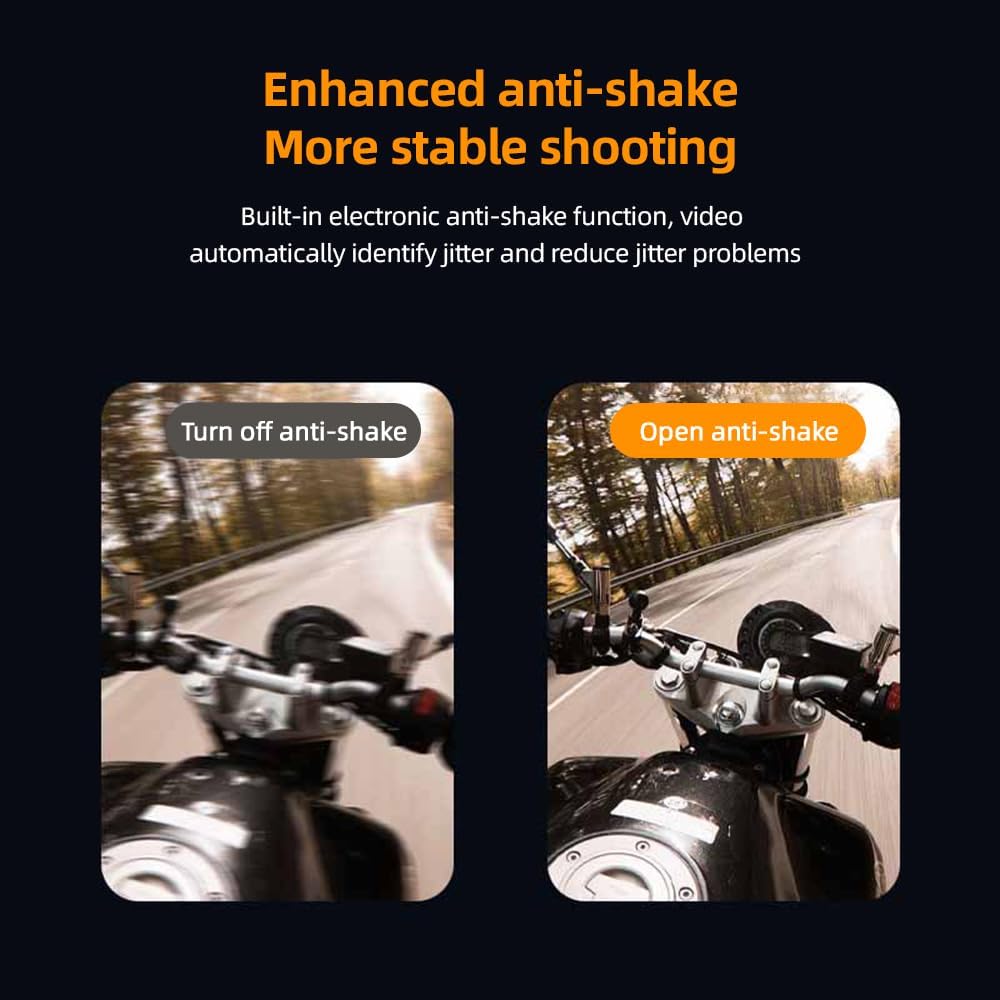
Image: A visual comparison demonstrating the effect of the anti-shake function, showing a blurred image when anti-shake is off and a clear, stable image when anti-shake is enabled during movement.
The camera features an electronic anti-shake function to reduce video jitter. This setting can be enabled or disabled in the camera's video settings menu. Enabling it is recommended for activities involving movement.
5.9 Advanced Recording Modes
- Time Lapse Video: Capture frames at set intervals (0.5s, 1s, 2s, 5s, 10s, 30s, 60s) to create a time-lapse video.
- Looping Video: Records video in segments (2min, 3min, 5min). When the memory card is full, the oldest segment is overwritten.
- Slow Motion: Records at higher frame rates (1080P 60fps, 720P 120fps) for slow-motion playback.
- Self Timer: Set a delay (3s, 5s, 10s, 20s) before taking a photo.
- Auto Shoot: Automatically takes photos at set intervals (3s, 10s, 15s, 20s, 30s).
- Burst Photo: Captures multiple photos in quick succession (3/5/10 photos per second).
6. Maintenance
6.1 Camera Care
- Keep the camera away from dust and dirt.
- Clean the lens with a soft, lint-free cloth specifically designed for optical surfaces.
- Wipe the camera body with a soft, damp cloth. Avoid harsh chemicals.
6.2 Waterproof Housing Care
- After each use in water, rinse the housing with fresh water and allow it to air dry.
- Inspect the rubber seal regularly for any debris, cracks, or damage. A damaged seal can compromise waterproofing.
- Do not use sharp objects to clean the seal.
6.3 Battery Care
- Store batteries in a cool, dry place.
- Do not expose batteries to extreme temperatures.
- Charge the battery fully before extended storage.
7. Troubleshooting
Camera Not Turning On
- Ensure the battery is fully charged.
- Check if the battery is inserted correctly.
- Try a different charged battery if available.
Memory Card Error
- Ensure the memory card is Class 10 or higher and formatted correctly (FAT32).
- Reinsert the memory card.
- Try a different memory card.
- Format the memory card using the camera's settings menu (this will erase all data).
Wi-Fi Connection Issues
- Ensure Wi-Fi is enabled on the camera.
- Restart both the camera and your smartphone.
- Verify the correct Wi-Fi password is being used.
- Ensure your smartphone is within range of the camera's Wi-Fi signal.
Poor Image/Video Quality
- Clean the camera lens.
- Check the selected resolution settings (e.g., ensure 4K is selected for highest quality).
- Ensure sufficient lighting for optimal results.
- Enable the anti-shake function for smoother video during movement.
8. Specifications
Detailed technical specifications for the Andoer 4K 60FPS Action Camera:
- LCD: 2.0 inch HD (rear) + 1.3 inch IPS (front)
- Lens: 170-degree Wide Angle
- Storage Memory: Class 10 MicroSD card, up to 128GB (not included)
- Audio Input: Built-in Mic/Speaker
- Wi-Fi: Support (APP: XDV)
- Battery: 3.7V 900mAh rechargeable battery
- Remote Control: Yes
- Waterproof Case Depth: 30 Meters (98ft)
- Video Resolution: 4K (3840x2160p) 60/30fps, 2.7K 30fps, 1080P 60/30fps, 720P 120/60/30fps
- Recording Sound: Support
- Time Lapse Video: 0.5s/1s/2s/5s/10s/30s/60s
- Looping Video: 2min, 3min, 5min
- Slow Motion: Support (1080P 60fps, 720P 120fps)
- Image Resolution: 24M/ 20M/ 16M/ 12M/ 10M
- Image File Format: JPG
- Self Timer: 3s/5s/10s/20s
- Auto Shoot: 3s/10s/15s/20s/30s
- Burst Photo: 3/5/10 photos per second
- Exposure: +3.0 to -3.0
- White Balance: Auto/Sunny/Cloudy/Incandescent Light/Fluorescent Light
- Auto Screen Saver: 10s/ 20s/ 30s/ close
- Auto Shutdown: 1mins/ 2mins/ 3mins/ close
- OSD Language: English, French, Italian, Russian, Spanish, Traditional Chinese, Korean, Japanese, Portuguese, German, Simplified Chinese, Dutch, Polish, etc.
- Camera Size: 59x41x25mm
- Camera Weight: 56g
- Package Dimensions: 10.43 x 6.38 x 2.44 inches
- Item Weight: 13.7 ounces
- Manufacturer: Andoer
- Connectivity Technology: Wi-Fi
- Special Feature: Anti Shake, Waterproof
- Lens Type: Wide Angle
- Shooting Modes: Slow Motion
9. Warranty and Support
For warranty information and technical support, please refer to the documentation provided at the time of purchase or contact your retailer. Keep your proof of purchase for warranty claims.