
UNGMUQDD ZRM-104-MS
MOES ZigBee 3.0 Smart Light Switch Relay Module User Manual
Model: ZRM-104-MS
Brand: UNGMUQDD
1. Introduction
This user manual provides comprehensive instructions for the installation, operation, and maintenance of your MOES ZigBee 3.0 Smart Light Switch Relay Module (Model: ZRM-104-MS). Please read this manual thoroughly before using the product to ensure safe and correct operation. Keep this manual for future reference.
2. Safety Information
- Always disconnect power at the circuit breaker before installation, removal, or maintenance.
- Installation should be performed by a qualified electrician or in accordance with local electrical codes.
- Do not operate the module if it is damaged or has been exposed to moisture.
- Ensure the module's specifications (voltage, current) are compatible with your electrical system.
- Keep out of reach of children.
3. Product Overview
The MOES ZigBee 3.0 Smart Light Switch Relay Module is a compact device designed to convert traditional light switches into smart switches. It integrates with your existing electrical wiring, allowing for smart control of lighting via a ZigBee 3.0 hub and compatible applications like Smart Life/Tuya, as well as voice assistants such as Alexa and Google Home. Its mini design allows for easy concealment within standard EU/UK wall switch boxes.

Figure 3.1: Front view of the MOES ZigBee 3.0 Smart Light Switch Relay Module, showing connection terminals and basic specifications.
4. Features
- ZigBee 3.0 Protocol: Ensures stable and reliable connection with Tuya ZigBee hubs.
- Compact Design: Easily fits into standard EU/UK wall switch boxes.
- Multi-Control Association: Supports multi-control in a simplified manner.
- Built-in RF Frequency: Allows for RF remote control (remote sold separately).
- Adjustable Relay Status: Configurable relay status after power outage.
- Integrated Reset Button: Simplifies device reset without complex operations.
- Compatibility: Works with both rocker and reset type traditional switches.
- 1-Way or 2-Way Circuit Support: Can be used in single or multi-location control setups.
- Voice Control: Compatible with Amazon Alexa, Google Home, and Yandex for hands-free operation.
- App Control: Remote control via Smart Life and Tuya applications (Tuya ZigBee 3.0 hub required).
5. Setup and Installation
Before proceeding, ensure power is disconnected at the circuit breaker. A Tuya ZigBee 3.0 hub is required for smart functionality.
5.1 Wiring Instructions
The module supports both 1-gang and 2-gang configurations. Refer to the diagrams below for proper wiring.
Figure 5.1: Wiring diagram for a single-gang setup. Connect Live (L) and Neutral (N) to the module's input. Connect the switch to S1 and the light to L1/OUT.
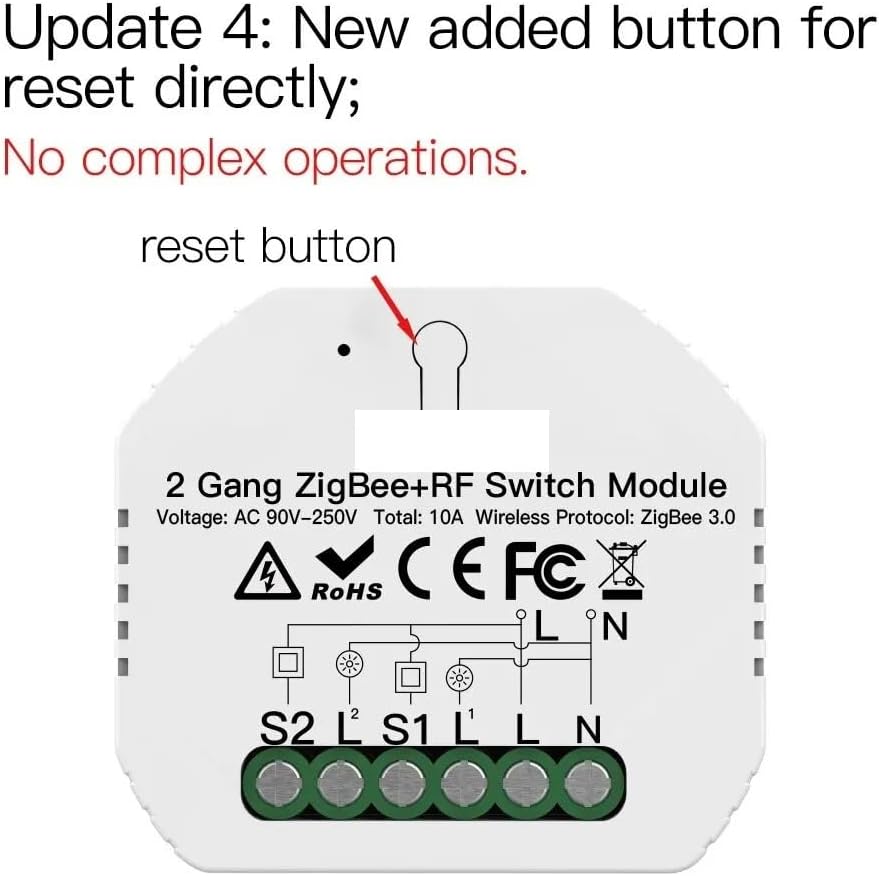
Figure 5.2: Wiring diagram for a two-gang setup. Note the S1 and S2 terminals for connecting two separate switches, and L1 and L2 for corresponding light outputs. The reset button is also indicated.
- Disconnect Power: Turn off the main power supply at your circuit breaker.
- Identify Wires: Locate the Live (L), Neutral (N), and Load (L1/OUT) wires from your existing switch box.
- Connect Input Power: Connect the Live wire to the 'L' terminal and the Neutral wire to the 'N' terminal on the module.
- Connect Load: Connect the wire going to your light fixture to the 'L1' (or 'OUT') terminal on the module.
- Connect Switch: Connect the traditional wall switch to the 'S1' terminal (and 'S2' for 2-gang modules).
- Secure Module: Carefully place the module inside the wall switch box, ensuring no wires are pinched.
- Restore Power: Turn the power back on at the circuit breaker.
5.2 Pairing with ZigBee Hub
- Ensure your Tuya ZigBee 3.0 hub is powered on and connected to your network.
- Open the Smart Life or Tuya App on your smartphone.
- Enter the ZigBee hub interface in the app and select 'Add sub-device' or 'Search for device'.
- On the relay module, press and hold the reset button (refer to Figure 5.2) for approximately 5-10 seconds until the indicator light flashes rapidly, indicating pairing mode.
- Follow the on-screen instructions in the app to complete the pairing process.
- Once successfully paired, the indicator light on the module will stop flashing and remain solid, or turn off.
6. Operating the Module
6.1 Traditional Switch Control
After installation, your traditional wall switch will continue to function normally, controlling the connected light fixture. The smart module works in conjunction with the physical switch without interference.
6.2 App Control
Once paired with your ZigBee hub, you can control the connected light from the Smart Life or Tuya App:
- Open the app and select the module from your device list.
- Tap the on/off icon to toggle the light.
- For dimmer modules (if applicable), use the slider to adjust brightness (0%-100%).
- Set schedules, timers, and create smart scenes within the app.
6.3 Voice Control
Integrate the Smart Life/Tuya App with your voice assistant (Alexa, Google Home, Yandex) to enable voice commands:
- Ensure your voice assistant device is set up and linked to your Smart Life/Tuya account.
- Use commands such as:
- "Alexa, turn on [device name]"
- "Hey Google, turn off [device name]"
- "Yandex, set [device name] to 50%" (for dimmer modules)
6.4 Relay Status Setting
You can configure the module's state after a power outage (e.g., on, off, or last state) through the Smart Life/Tuya App settings for the device.
7. Maintenance
The MOES ZigBee 3.0 Smart Light Switch Relay Module requires minimal maintenance.
- Keep the module dry and away from excessive heat or cold.
- Do not attempt to disassemble or repair the module yourself. This will void the warranty and may pose a safety risk.
- Clean the exterior of the module (if accessible) with a soft, dry cloth. Do not use harsh chemicals or abrasive cleaners.
8. Troubleshooting
| Problem | Possible Cause | Solution |
|---|---|---|
| Module not responding to app/voice commands. | No power; ZigBee hub offline; Module not paired; Weak ZigBee signal. | Check power to module and light; Ensure ZigBee hub is online and connected; Re-pair the module; Move hub closer or use a ZigBee repeater. |
| Light not turning on/off via traditional switch. | Incorrect wiring; Faulty module/switch. | Verify wiring according to diagrams (Section 5.1); Test the traditional switch independently; If issue persists, contact support. |
| Module fails to pair with ZigBee hub. | Module not in pairing mode; Hub too far; Interference. | Ensure module indicator is flashing rapidly; Bring module closer to hub during pairing; Reduce potential wireless interference. |
| Module frequently disconnects. | Weak ZigBee signal; Network congestion. | Ensure hub is centrally located; Consider adding ZigBee repeaters; Check for other devices causing interference. |
9. Specifications
- Model: ZRM-104-MS
- Brand: UNGMUQDD
- Wireless Protocol: ZigBee 3.0
- Voltage: AC 90V-250V
- Total Current: 10A
- Dimensions: 1.18 x 0.79 x 0.39 inches (Package Dimensions)
- Item Weight: 3.49 ounces
- Compatibility: Tuya ZigBee Hub, Smart Life/Tuya App, Amazon Alexa, Google Home, Yandex
- Operating Temperature: (Not specified, typically -10°C to 40°C for similar devices)
10. Warranty and Support
For warranty information and customer support, please refer to the documentation provided with your purchase or contact the seller/manufacturer directly. Keep your proof of purchase for warranty claims.
For technical assistance or further inquiries, please visit the UNGMUQDD official website or contact their customer service department.
Ask a question about this manual
Ask about setup, troubleshooting, compatibility, parts, safety, or missing instructions. Manuals+ will review the question and use this page’s manual context to help answer it.