
UNGMUQDD ZM-105B-MS
MOES ZigBee 3.0 Smart Light Switch Relay Module
Model: ZM-105B-MS
1. Introduction
This manual provides comprehensive instructions for the installation, operation, and maintenance of your MOES ZigBee 3.0 Smart Light Switch Relay Module (ZM-105B-MS). This module is designed to convert traditional light switches into smart switches, enabling remote control via the Smart Life/Tuya App, voice control through Alexa, Google Home, and Yandex, and integration into a ZigBee 3.0 smart home ecosystem. Please read this manual carefully before installation and use to ensure safe and correct operation.
2. Safety Information
- Electrical Hazard: Installation must be performed by a qualified electrician or person with electrical knowledge.
- Power Disconnection: Ensure power is disconnected at the circuit breaker before installation, maintenance, or removal.
- Voltage Compatibility: Verify that the module's voltage rating (90-250V AC) matches your electrical system.
- Load Capacity: Do not exceed the maximum load capacity of the module (e.g., 2*100W for dimmer, 10A for switch). Overloading can cause damage or fire.
- Indoor Use Only: This device is intended for indoor use in dry locations only.
- Children Safety: Keep out of reach of children.
- Proper Wiring: Follow the wiring diagrams precisely. Incorrect wiring can lead to malfunction or safety hazards.
3. Product Overview
3.1. Features
- ZigBee 3.0 Protocol for stable and reliable connection.
- Compact design for easy integration into EU/UK wall switch boxes.
- Compatible with traditional rocker and reset switches.
- Supports 1-way or 2-way circuit control.
- Remote control via Smart Life/Tuya App (ZigBee hub required).
- Voice control compatible with Alexa, Google Home, and Yandex.
- Adjustable relay status after power failure.
- Built-in reset button for easy device reset.
3.2. Module Components
The module is a compact device designed to fit behind your existing wall switch. It features terminals for connecting live, neutral, and switch wires, along with a reset button.
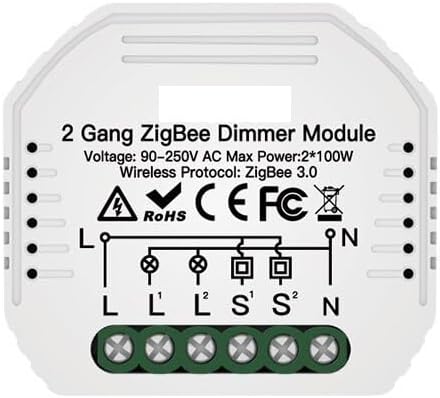
Image 1: Front view of the MOES ZigBee Dimmer Module showing wiring terminals (L, L1, L2, S1, S2, N) and electrical specifications (Voltage: 90-250V AC, Max Power: 2*100W, Wireless Protocol: ZigBee 3.0).
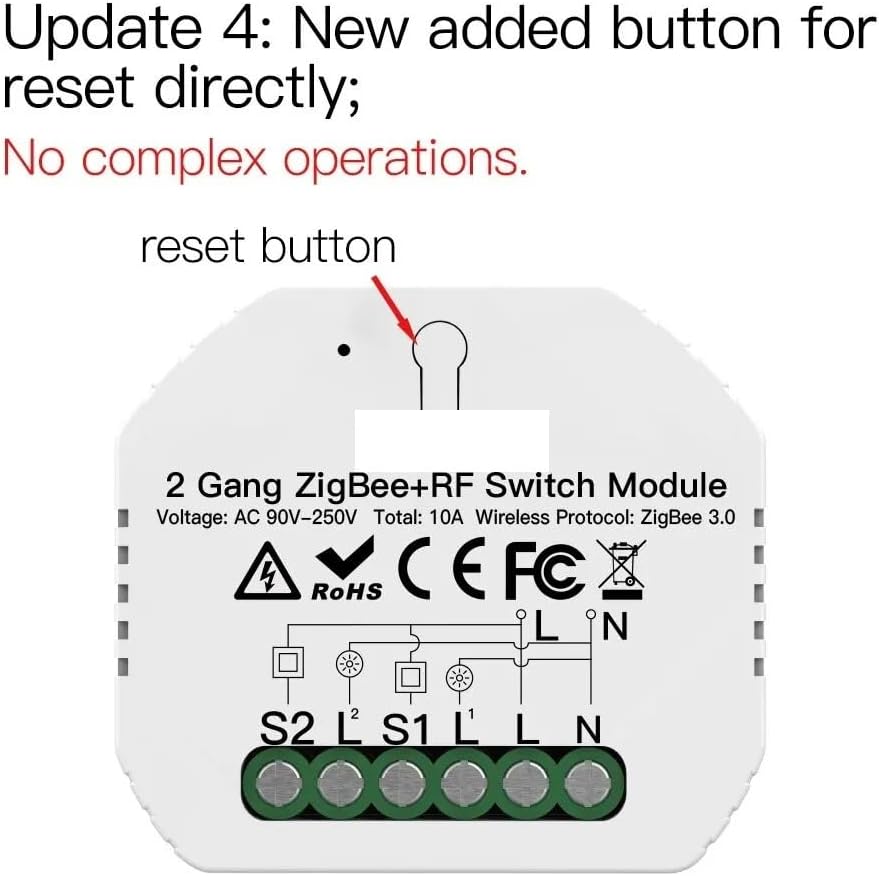
Image 2: Top view of the MOES ZigBee Module highlighting the newly added reset button for direct device reset, simplifying operations.
4. Specifications
| Model | ZM-105B-MS |
| Wireless Protocol | ZigBee 3.0 |
| Input Voltage | AC 90-250V |
| Max Load (Dimmer) | 2*100W (for resistive load) |
| Max Load (Switch) | 10A (for ZRM-104B-MS/ZRM-104-MS variants, this ZM-105B-MS is a dimmer) |
| Dimensions | Approx. 1.18 x 0.79 x 0.39 inches (30 x 20 x 10 mm) |
| Operating Temperature | -10°C to 40°C |
| Weight | Approx. 3.49 ounces (99 grams) |
5. Installation and Setup
5.1. Wiring Diagram (ZM-105B-MS Dimmer Module)
Refer to Image 1 for the wiring diagram. Ensure all connections are secure and insulated.
- Disconnect Power: Before starting, turn off the main power supply at your circuit breaker to avoid electric shock.
- Identify Wires: Identify the Live (L), Neutral (N), Load (L1, L2), and Switch (S1, S2) wires in your wall box.
- Connect Neutral: Connect the Neutral wire from your electrical system to the 'N' terminal on the module.
- Connect Live: Connect the Live wire from your electrical system to the 'L' terminal on the module.
- Connect Load: Connect the load wires (to your light fixture) to the 'L1' and 'L2' terminals on the module.
- Connect Switches: Connect your traditional wall switch wires to the 'S1' and 'S2' terminals. If using a single gang switch, use S1. For 2-way control, connect one of the 2-way switch wires to S1 or S2.
- Secure Module: Carefully place the module into the wall switch box, ensuring no wires are pinched.
- Restore Power: Turn the power back on at the circuit breaker.
5.2. Pairing with ZigBee Hub (Tuya/Smart Life App)
A ZigBee hub (e.g., Tuya ZigBee hub) is required for smart control.
- App Download: Download the "Smart Life" or "Tuya Smart" app from your mobile app store.
- Add Hub: Open the app and add your ZigBee hub if you haven't already.
- Enter Pairing Mode:
- Method 1 (via connected switch): Quickly press the connected traditional wall switch 5 times. The connected light should blink, indicating pairing mode.
- Method 2 (via reset button): Press and hold the reset button on the module (refer to Image 2) for approximately 5-10 seconds until the connected light blinks.
- Add Device in App: In the Smart Life/Tuya app, select your ZigBee hub, then choose "Add sub-device" or "Search for new devices." The app will scan for the module.
- Confirm Device: Once detected, confirm the device in the app and assign it a name and room.
6. Operating the Module
6.1. Manual Control
You can continue to use your traditional wall switch to turn the lights on/off or dim them (if using a dimmer switch compatible with the module).
6.2. App Control (Smart Life/Tuya)
- Open the Smart Life/Tuya app.
- Select the added light switch module.
- You can now turn the lights on/off, set timers, create schedules, and adjust brightness (for dimmer modules) from anywhere with an internet connection.
- Utilize the multi-control association feature within the app to link multiple smart switches or modules for synchronized control.
6.3. Voice Control
Once paired with the app, you can link your Smart Life/Tuya account to voice assistants like Amazon Alexa, Google Home, or Yandex.
- For Alexa: Enable the "Smart Life" or "Tuya Smart" skill in the Alexa app. Discover devices. Then use commands like "Alexa, turn on [light name]" or "Alexa, dim [light name] to 50%."
- For Google Home: Link "Smart Life" or "Tuya Smart" under "Works with Google Home." Use commands like "Hey Google, turn off [light name]" or "Hey Google, set [light name] to warm white."
- For Yandex: Follow similar steps to link your account and control devices.
6.4. Relay Status Setting
You can configure the module's state after a power outage (e.g., always on, always off, or last state) within the Smart Life/Tuya app settings for the device.
7. Maintenance
- Cleaning: Ensure power is off before cleaning. Use a dry, soft cloth to wipe the module if necessary. Do not use liquid cleaners.
- Regular Checks: Periodically check wiring connections for tightness and signs of wear.
- Firmware Updates: Keep your Smart Life/Tuya app and ZigBee hub firmware updated for optimal performance and security.
8. Troubleshooting
| Problem | Possible Cause | Solution |
|---|---|---|
| Module not responding / Light not turning on/off. | No power, incorrect wiring, module malfunction. | Check circuit breaker. Verify wiring according to diagram. If problem persists, module may be faulty. |
| Cannot pair module with ZigBee hub. | Module not in pairing mode, hub too far, interference, incorrect hub. | Ensure module is in pairing mode (blinking light). Move hub closer. Reduce interference. Confirm you are using a ZigBee 3.0 compatible hub. |
| App control not working. | No internet connection, app not linked to hub, module offline. | Check internet connection. Ensure Smart Life/Tuya app is correctly linked to your ZigBee hub. Verify module is online in the app. |
| Voice control not working. | Voice assistant not linked, incorrect commands, device name mismatch. | Ensure Smart Life/Tuya skill is enabled and linked in your voice assistant app. Use correct device names. Try re-discovering devices. |
| Light flickers or dims incorrectly (dimmer module). | Incompatible bulb type (not dimmable), exceeding max load, faulty bulb. | Ensure you are using dimmable LED or incandescent bulbs. Check total wattage does not exceed 2*100W. Try a different bulb. |
9. Warranty and Support
For warranty information and technical support, please refer to the product packaging or contact the retailer/manufacturer directly. Keep your purchase receipt as proof of purchase.
Ask a question about this manual
Ask about setup, troubleshooting, compatibility, parts, safety, or missing instructions. Manuals+ will review the question and use this page’s manual context to help answer it.