
1. Introduction
This manual provides detailed instructions for the installation, operation, and maintenance of your MSI MAG PANO 100R PZ White PC Case. Please read this manual thoroughly before beginning assembly to ensure proper setup and safe usage.

Image: The MSI MAG PANO 100R PZ White PC case showcasing its panoramic tempered glass design, pre-installed ARGB fans, and a fully assembled system with illuminated components.
2. Safety Information
- Always disconnect the power supply from the wall outlet before installing or removing any components.
- Handle tempered glass panels with care. They are fragile and can break if dropped or subjected to impact.
- Wear an anti-static wrist strap to prevent electrostatic discharge (ESD) damage to sensitive components.
- Keep small parts and screws away from children.
- Ensure proper ventilation around the PC case to prevent overheating.
3. Package Contents
Verify that all items are present in the package. If any items are missing or damaged, contact your retailer.
- MSI MAG PANO 100R PZ White PC Case
- Accessory Box (screws, cable ties, etc.)
- User Manual (this document)
- Pre-installed 120mm ARGB Fans (3x side, 1x rear)
- Vertical GPU Holder
4. Setup and Installation
Follow these steps to assemble your computer system within the MSI MAG PANO 100R PZ White case.
4.1 Removing Side Panels
Carefully remove the tempered glass front and side panels to access the interior of the case. These panels are typically secured with thumbscrews or a latch mechanism.

Image: A diagram illustrating the process of removing the transparent side panels and structural components for internal access.
4.2 Motherboard Installation
The MAG PANO 100R PZ White supports ATX, Micro-ATX, and Mini-ITX motherboards, including Back-Connect motherboards.
- Install the necessary standoffs for your motherboard form factor.
- Place the motherboard into the case, aligning it with the standoffs and the I/O shield opening.
- Secure the motherboard with screws.

Image: An internal view of the PC case highlighting the designated areas for Mini-ITX, Micro-ATX, and ATX motherboards, along with the GPU installation zone.
4.3 Graphics Card (GPU) Installation
The case supports both horizontal and vertical GPU mounting.
Horizontal Mounting:
Remove the necessary PCIe slot covers from the rear of the case. Insert your graphics card into the PCIe slot on your motherboard and secure it with screws.
Vertical Mounting:
The case includes a vertical GPU holder. To use this feature, you will need a separate PCIe riser cable (not included). Install the riser cable into your motherboard's PCIe slot, then mount your GPU onto the vertical holder and connect it to the riser cable. Secure the holder to the case.

Image: A technical diagram illustrating the installation of a graphics card using the vertical mounting bracket within the PC case.
4.4 Storage Drive Installation
The case provides multiple mounting points for 2.5" SSDs and 3.5" HDDs.
- Locate the drive trays or mounting brackets behind the motherboard tray or near the PSU shroud.
- Secure your 2.5" or 3.5" drives to these trays/brackets using the provided screws.
- Slide the trays back into their designated slots.
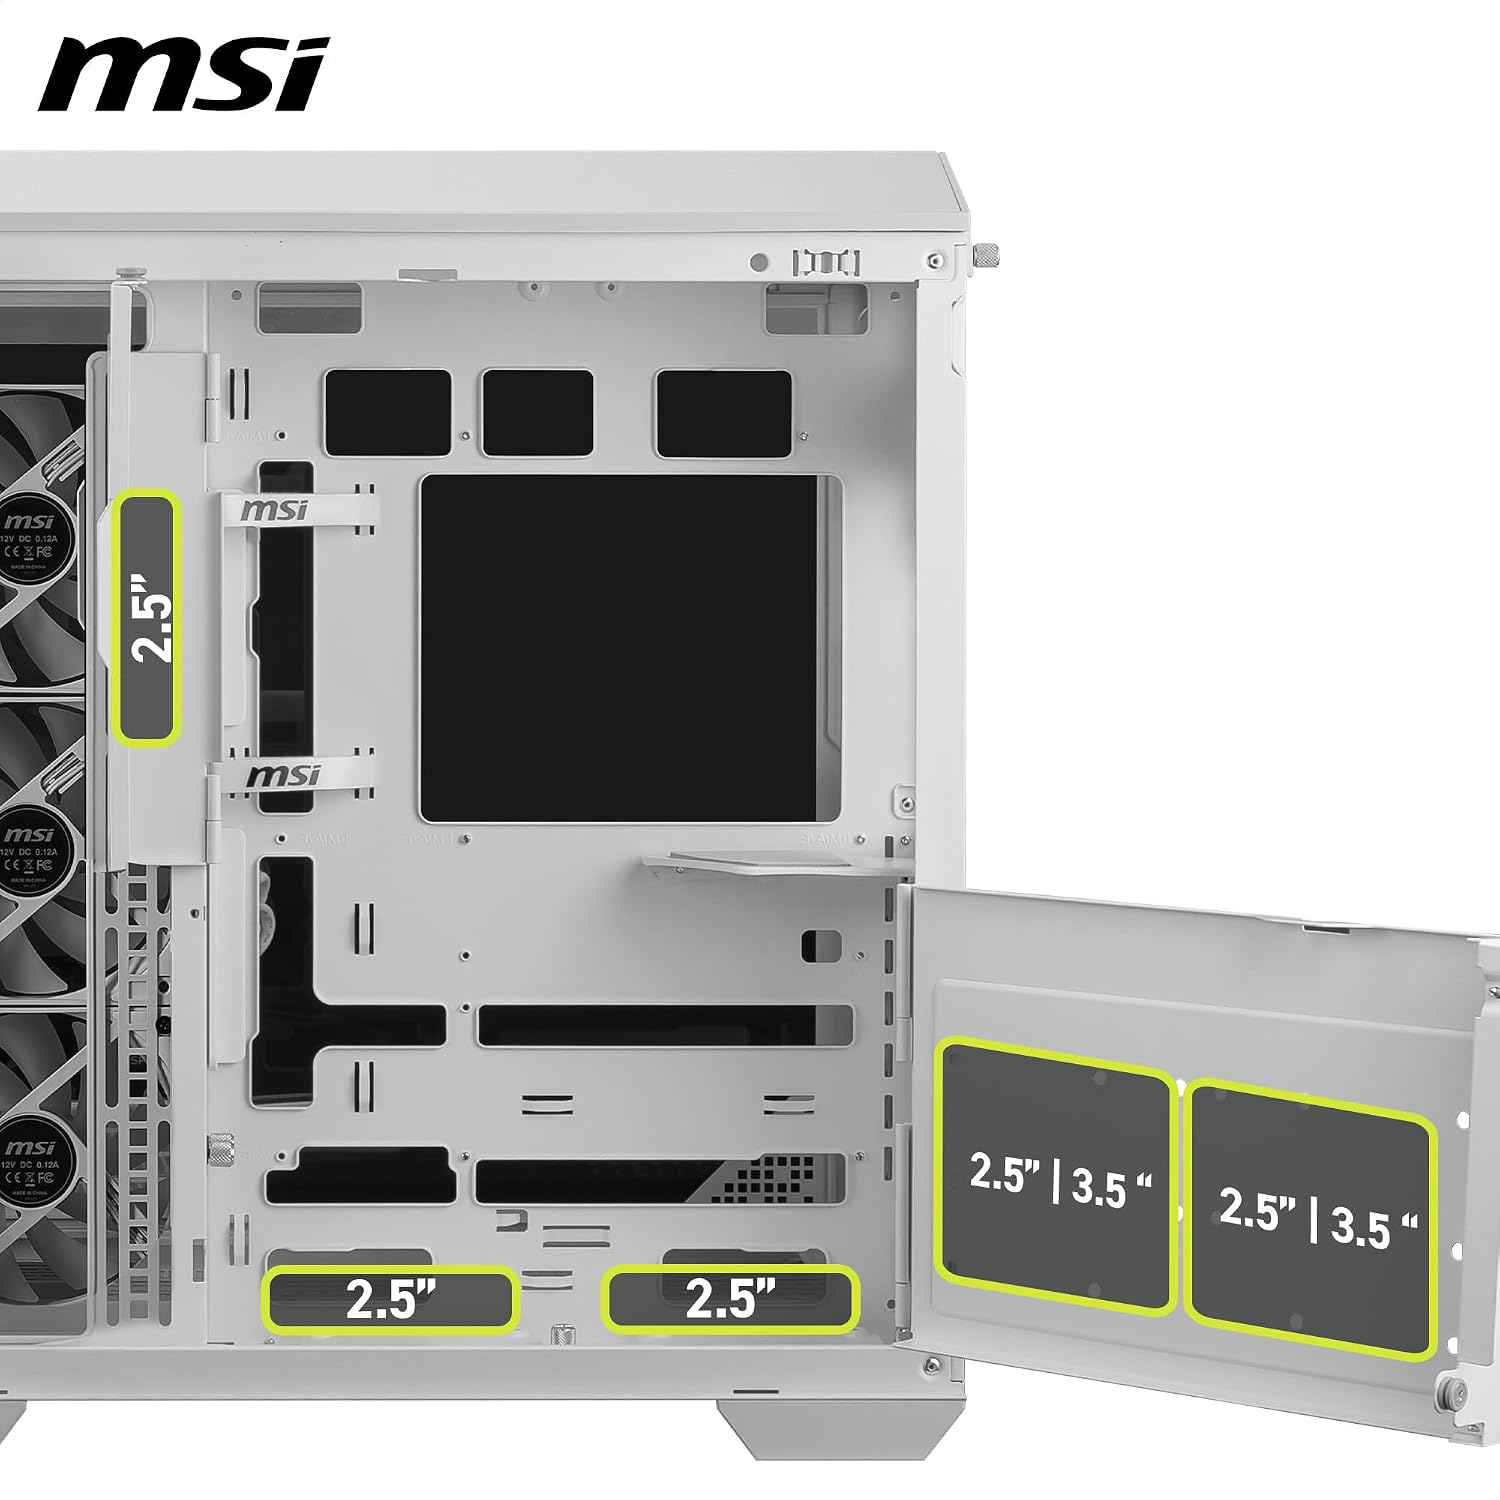
Image: The rear interior of the PC case, showing the mounting locations for 2.5-inch and 3.5-inch storage drives behind the motherboard tray.
4.5 Power Supply Unit (PSU) Installation
The PSU mounts at the bottom rear of the case.
- Slide the PSU into its designated compartment from the rear of the case.
- Secure the PSU with screws from the exterior rear panel.
- Connect the necessary power cables to your motherboard and components.
Note:
The case supports PSUs up to 200mm in length. For PSUs at the maximum length, the cable management cover above it may need to be removed to allow the side panel to close properly.

Image: A technical diagram showing the power supply unit (PSU) mounting area, indicating compatibility with ATX and Mini-ITX standards.
4.6 Cable Management
The MAG PANO 100R PZ White offers excellent cable management options behind the motherboard tray. Utilize the cable routing cutouts and included cable ties to organize your cables for improved airflow and aesthetics.

Image: An illustration demonstrating effective cable management within the PC case, highlighting routing channels and tie-down points.
5. Operating Instructions
5.1 Front I/O Panel
The front I/O panel provides convenient access to various ports and controls.
- USB 20Gbps Type-C: For high-speed data transfer.
- 2 x USB 5Gbps Type-A: Standard USB ports for peripherals.
- Mic-in / Audio-out (Combo Jack): A single port for both microphone input and audio output. Use a headset with a single 4-pole jack or an adapter for separate mic/audio connections.
- LED Switch Button: Controls the lighting effects of the pre-installed ARGB fans.
- Power Button: To power on/off your system.

Image: A close-up view of the front I/O panel, clearly labeling the USB 20Gbps Type-C, USB 5Gbps Type-A ports, Mic/Audio combo jack, LED switch button, and power button.

Image: A technical diagram highlighting the various interface and connection points on the I/O panel.
5.2 Fan Control (ARGB)
The case comes with four pre-installed 120mm ARGB fans. These fans are connected to a basic hub.
- LED Control: Use the dedicated LED Switch Button on the front I/O panel to cycle through various ARGB lighting effects.
- Fan Speed: The pre-installed fans are not PWM (Pulse Width Modulation) controlled, meaning their speed is fixed. For adjustable fan speeds, you may need to replace them with PWM-compatible fans and connect them to your motherboard's fan headers.
6. Maintenance
6.1 Dust Filter Cleaning
Regular cleaning of dust filters is essential to maintain optimal airflow and prevent dust buildup inside your PC.
- Top Dust Filter: This filter is tool-free and can be easily removed from the top panel.
- Side and Bottom Dust Filters: These are magnetic filters, allowing for easy removal and reattachment.
- To clean, gently remove the filters and tap out any loose dust. For heavier buildup, rinse with water and ensure they are completely dry before re-installing.

Image: The MSI MAG PANO 100R PZ White PC case with its various dust filters, including the top, side, and bottom magnetic filters, shown detached for cleaning.

Image: A close-up view of a removable dust filter, designed to prevent particulate matter from entering the PC case.
7. Troubleshooting
- System not powering on:
- Ensure all power cables are securely connected to the motherboard, GPU, and PSU.
- Verify the PSU switch is in the "ON" position.
- Check front panel header connections to the motherboard (Power SW, Reset SW).
- Fans not spinning or RGB not working:
- Confirm fan power cables are connected to the fan hub and the hub is powered.
- Ensure ARGB cables are connected to the hub and the hub is connected to the motherboard's ARGB header (if applicable) or controlled via the case's LED button.
- Side panel not closing:
- Check for any cables or components obstructing the panel.
- If using a 200mm PSU, ensure the cable management cover above it is removed if it interferes with the panel.
- Poor airflow/high temperatures:
- Clean all dust filters.
- Ensure fans are oriented correctly for optimal intake and exhaust.
- Verify no cables are obstructing airflow paths.
8. Specifications
| Feature | Detail |
|---|---|
| Model Name | MAG PANO 100R PZ White |
| Case Type | Mid-Tower |
| Motherboard Support | ATX, Micro-ATX, Mini-ITX (including Back-Connect) |
| Dimensions (D x W x H) | 51.9D x 29W x 48.2H cm |
| Weight | 11.3 kg |
| Material | Metal, Tempered Glass |
| Pre-installed Fans | 4x 120mm ARGB (3x side, 1x rear) |
| Expansion Slots | 7 |
| Drive Bays | 2x 2.5", 2x 2.5"/3.5" (total 4) |
| Front I/O Ports | 1x USB 20Gbps Type-C, 2x USB 5Gbps Type-A, 1x Mic-in/Audio-out (Combo), Power Button, LED Switch Button |
| PSU Compatibility | ATX, up to 200mm length |
| Cooling Method | Air |
| Special Features | 270° Panoramic Tempered Glass, Vertical GPU Support, Tool-free Dust Filters, Back-Connect Motherboard Compatibility |

Image: The MSI MAG PANO 100R PZ White PC case displaying its overall dimensions: 518.7 mm (depth), 290 mm (width), and 482 mm (height).

Image: A technical diagram detailing the internal layout, fan mounting options (120mm, 140mm, 160mm), and overall dimensions of the PC case.
9. Warranty and Support
For warranty information and technical support, please refer to the official MSI website or contact your local retailer.
MSI Official Website: www.msi.com
For product-specific information, you can visit the product page: MSI MAG PANO 100R PZ Specification


