
Introduction
Welcome to the user manual for your AEROCOOL Designer G v1 Mid Tower PC Case. This guide provides comprehensive instructions for the proper setup, operation, maintenance, and troubleshooting of your new PC case. Please read this manual carefully before beginning installation to ensure optimal performance and longevity of your system components. For further assistance, please refer to the support section.
Product Overview
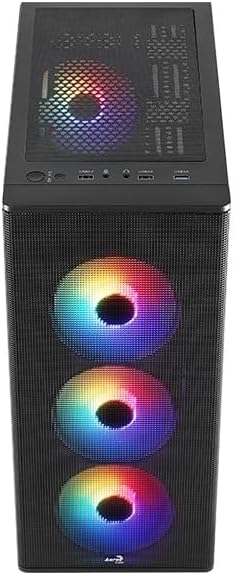
The Designer G V1 case is a minimalist tower medium designed for PC enthusiasts. It supports ATX, Micro ATX, and Mini-ITX motherboards, making it suitable for a variety of system builds. The case is equipped with advanced cooling options, including four pre-installed RGB fans and support for 360mm liquid cooling, ensuring efficient heat management for high-performance components. With ample space for GPUs and CPUs, flexible storage options, and convenient I/O ports, the Designer G v1 offers a perfect blend of features, ease of assembly, and modern aesthetics.
Key Features:
- Supports ATX, Micro ATX, and Mini-ITX motherboards.
- Equipped with four 120mm FRGB Fans for efficient cooling and aesthetic appeal.
- Supports up to 360mm liquid cooling radiators.
- Designed for high GPU and CPU clearance.
- Flexible storage options.
- Conveniently located I/O ports for easy access.

Setup and Installation
Follow these steps to properly set up and install components into your AEROCOOL Designer G v1 PC Case:
- Unboxing: Carefully remove the PC case from its packaging. Inspect for any shipping damage. Retain the packaging for future transport or warranty claims.
- Side Panel Removal: Locate the thumbscrews on the rear of the case securing the side panels. Unscrew them and gently slide the tempered glass side panel (if applicable) and the solid metal side panel off. Place them on a soft, non-abrasive surface to prevent scratches.
- Motherboard Installation: Install the necessary standoffs for your motherboard form factor (ATX, Micro ATX, or Mini-ITX). Carefully align your motherboard with the standoffs and the I/O shield opening, then secure it with screws.
- Power Supply Unit (PSU) Installation: Install your PSU into its designated compartment, typically at the bottom rear of the case. Secure it with screws from the rear.
- Storage Drive Installation: Install your 2.5" SSDs and 3.5" HDDs into the provided drive bays. Refer to the case's internal layout for specific mounting points and methods (e.g., tool-less trays or screw mounts).
- Graphics Card (GPU) and Expansion Card Installation: Remove the necessary PCIe slot covers. Insert your graphics card and any other expansion cards into their respective motherboard slots and secure them with screws or retention clips.
- Cable Management: Utilize the cable routing cutouts and tie-down points behind the motherboard tray to manage cables neatly. This improves airflow and aesthetics.
- Front Panel Connections: Connect the front panel I/O cables (USB, audio, power/reset switches, LED indicators) to the corresponding headers on your motherboard. Refer to your motherboard manual for pinout diagrams.
- Fan and RGB Connections: Connect the pre-installed FRGB fans to your motherboard's fan headers or a dedicated fan controller/RGB hub if included. Ensure proper power delivery for fan operation and RGB lighting.
- Final Inspection: Before closing the case, double-check all connections and ensure no cables are obstructing fans or airflow.
- Side Panel Reinstallation: Carefully slide the side panels back into place and secure them with the thumbscrews.


Operation
The AEROCOOL Designer G v1 PC Case is designed to house and protect your computer components while providing optimal airflow. Once your system is fully assembled and powered on, the pre-installed FRGB fans will begin to operate, providing cooling and illumination.
- Airflow: The case features a mesh front panel and multiple fan mounts to ensure efficient airflow. Ensure that intake and exhaust fans are properly oriented for optimal cooling performance.
- RGB Lighting: The pre-installed FRGB fans offer vibrant lighting effects. Depending on your motherboard's capabilities or an optional RGB controller, you may be able to customize the lighting patterns and colors. Refer to your motherboard or RGB controller manual for specific instructions.
- Front I/O Ports: Utilize the conveniently located front I/O ports for connecting peripherals such as USB devices, headphones, and microphones.
Maintenance
Regular maintenance helps ensure the longevity and optimal performance of your PC case and the components within it.
- Dust Cleaning: Dust accumulation can impede airflow and lead to overheating. Regularly clean the dust filters (if present) and the interior of the case using compressed air or a soft brush. It is recommended to do this every 3-6 months, or more frequently in dusty environments.
- Fan Inspection: Periodically check the fans for any signs of wear, unusual noise, or reduced rotation speed. Ensure fan blades are free from obstructions.
- Cable Management Check: Occasionally verify that cables remain neatly routed and do not interfere with fan operation or airflow.
- Exterior Cleaning: Wipe the exterior surfaces of the case with a soft, damp cloth. Avoid using harsh chemicals or abrasive materials that could damage the finish.
Troubleshooting
This section addresses common issues you might encounter with your PC case.
- Fans Not Spinning/No RGB:
- Ensure all fan power cables are securely connected to the motherboard or fan controller.
- Verify RGB cables are correctly connected to the appropriate RGB headers on the motherboard or controller.
- Check motherboard BIOS/UEFI settings for fan control and RGB settings.
- Poor Airflow/High Temperatures:
- Clean any dust filters and internal components.
- Ensure fans are oriented correctly (intake at front/bottom, exhaust at rear/top).
- Improve cable management to reduce airflow obstruction.
- Front Panel I/O Not Working:
- Verify that all front panel cables (USB, audio, power/reset) are correctly connected to the motherboard headers. Refer to your motherboard manual.
- Vibration/Noise:
- Ensure all screws securing components (motherboard, PSU, drives, fans) are tightened.
- Check if any cables are touching fan blades.
- If a specific fan is noisy, consider replacing it.
Specifications
Detailed specifications for the AEROCOOL Designer G v1 Mid Tower PC Case:
| Feature | Detail |
|---|---|
| Brand | Aerocool |
| Model Number | ACCM-ES0504311 |
| Product Dimensions | 39.9 x 19.5 x 44.85 cm |
| Item Weight | 4.88 Kilograms |
| Color | Black |
| Motherboard Support | ATX, Micro ATX, Mini-ITX |
| Pre-installed Fans | 4 x 120mm FRGB Fans |
| Liquid Cooling Support | Up to 360mm radiator |


Warranty and Support
Aerocool products are manufactured to the highest quality standards. For information regarding warranty coverage, technical support, or service inquiries, please visit the official Aerocool website or contact their customer support directly. Please have your product model number (ACCM-ES0504311) and proof of purchase ready when contacting support.
Official Aerocool Website: www.aerocool.io
