
Driini 00198168831380
Driini Modern Large Digital Wall Clock User Manual
Model: 00198168831380
Introduction
This manual provides comprehensive instructions for the setup, operation, and maintenance of your Driini Modern Large Digital Wall Clock. This clock features a large LED display, showing time, day of the week, temperature, and humidity. It is designed for both wall mounting and desk placement, offering versatile integration into any space.

Image: The Driini Modern Large Digital Wall Clock, showcasing its bamboo wood frame and large LED display with time, day, temperature, and humidity.
Please read these instructions carefully before using the product to ensure proper function and longevity.
Package Contents
Verify that all items listed below are present in your package:

Image: The Driini Modern Large Digital Wall Clock shown with its included accessories, including the wooden base, USB power brick, USB power cord, mounting screws, drywall anchors, and cable organizers.
- Driini Modern Bamboo Wall Clock: The main clock unit with LED display.
- Wooden Base: For desk or table placement.
- USB Power Brick: Wall adapter for power supply.
- USB Power Cord: Connects the clock to the power brick.
- Mounting Screws (2x): For wall installation.
- Drywall Anchors (2x): For secure wall installation.
- Cable Organizers (5x): For managing the power cord.
Setup Instructions
Important: The clock requires continuous power and must be plugged into a wall outlet to operate. It is not battery-operated.
1. Power Connection
- Connect the USB power cord to the clock's power input port.
- Plug the other end of the USB power cord into the provided USB power brick.
- Insert the USB power brick into a standard wall outlet. The clock display will illuminate.

Image: The clock displayed on a surface and mounted on a wall, illustrating its dual-purpose design. A close-up shows the USB power cable and wall adapter, emphasizing the need for continuous power.
2. Placement Options
Your Driini clock offers two versatile placement options:
Desk or Surface Mount
- Assemble the wooden base by connecting the two base blocks with the central wooden bar.
- Carefully insert the bottom edge of the clock into the grooves of the assembled wooden base. Ensure the clock is stable and upright.
- Place the clock on a flat, stable surface such as a desk, shelf, or mantel.

Image: The Driini clock positioned on a shelf using its wooden base, demonstrating its desk or surface mount capability.
Wall Mount
- Select a suitable location on a wall, ensuring it is near a power outlet.
- Mark the desired position for the mounting screws. The clock has a keyhole slot on the back for hanging.
- Drill pilot holes at the marked positions. If mounting into drywall, insert the provided drywall anchors.
- Insert the mounting screws into the anchors or directly into studs, leaving a small portion of the screw head exposed.
- Align the keyhole slot on the back of the clock with the screw head and slide the clock down to secure it.
- Use the included cable organizers to neatly route the power cord along the wall to the power outlet.

Image: A diagram illustrating the precise dimensions of the Driini clock, including its length, height, and width, which are crucial for accurate wall mounting and placement.
Operation
The Driini Digital Wall Clock is designed for intuitive operation. Control buttons are typically located on the back or side of the clock for adjustments.
1. Setting Time and Date
Upon initial power-up, the clock may require time and date setting. Refer to the specific button labels on the back of your clock (e.g., SET, UP, DOWN) for precise instructions. Generally:
- Press the SET button to enter time setting mode.
- Use the UP or DOWN buttons to adjust the hour, then press SET to confirm and move to minutes.
- Repeat for minutes, and any other settings like year, month, or day if available.
- Press SET again to exit setting mode.
2. Toggling 12/24-Hour Format
To switch between 12-hour (with AM/PM indicator) and 24-hour time formats, locate the dedicated button (often labeled "12/24H" or integrated with the SET button) and press it. The display will update accordingly.
3. Toggling Temperature Units (°F/°C)
The clock displays temperature in either Fahrenheit (°F) or Celsius (°C). To change the unit, press the designated temperature unit button (often labeled "°F/°C" or similar). The display will switch between the two units.
4. Brightness Adjustment
The clock features an intelligent light sensor that automatically adjusts display brightness based on ambient room lighting. You can also manually adjust or override this setting:
- Locate the brightness control button (often labeled "BRIGHT" or a sun icon).
- Press the button repeatedly to cycle through different brightness levels or to activate/deactivate the auto-dimming feature.

Image: A series of images demonstrating the Driini clock's automatic brightness adjustment feature, showing the display at different light intensities from bright to dim, adapting to ambient room light.
Key Features
Your Driini Modern Large Digital Wall Clock is equipped with several features to enhance its utility:
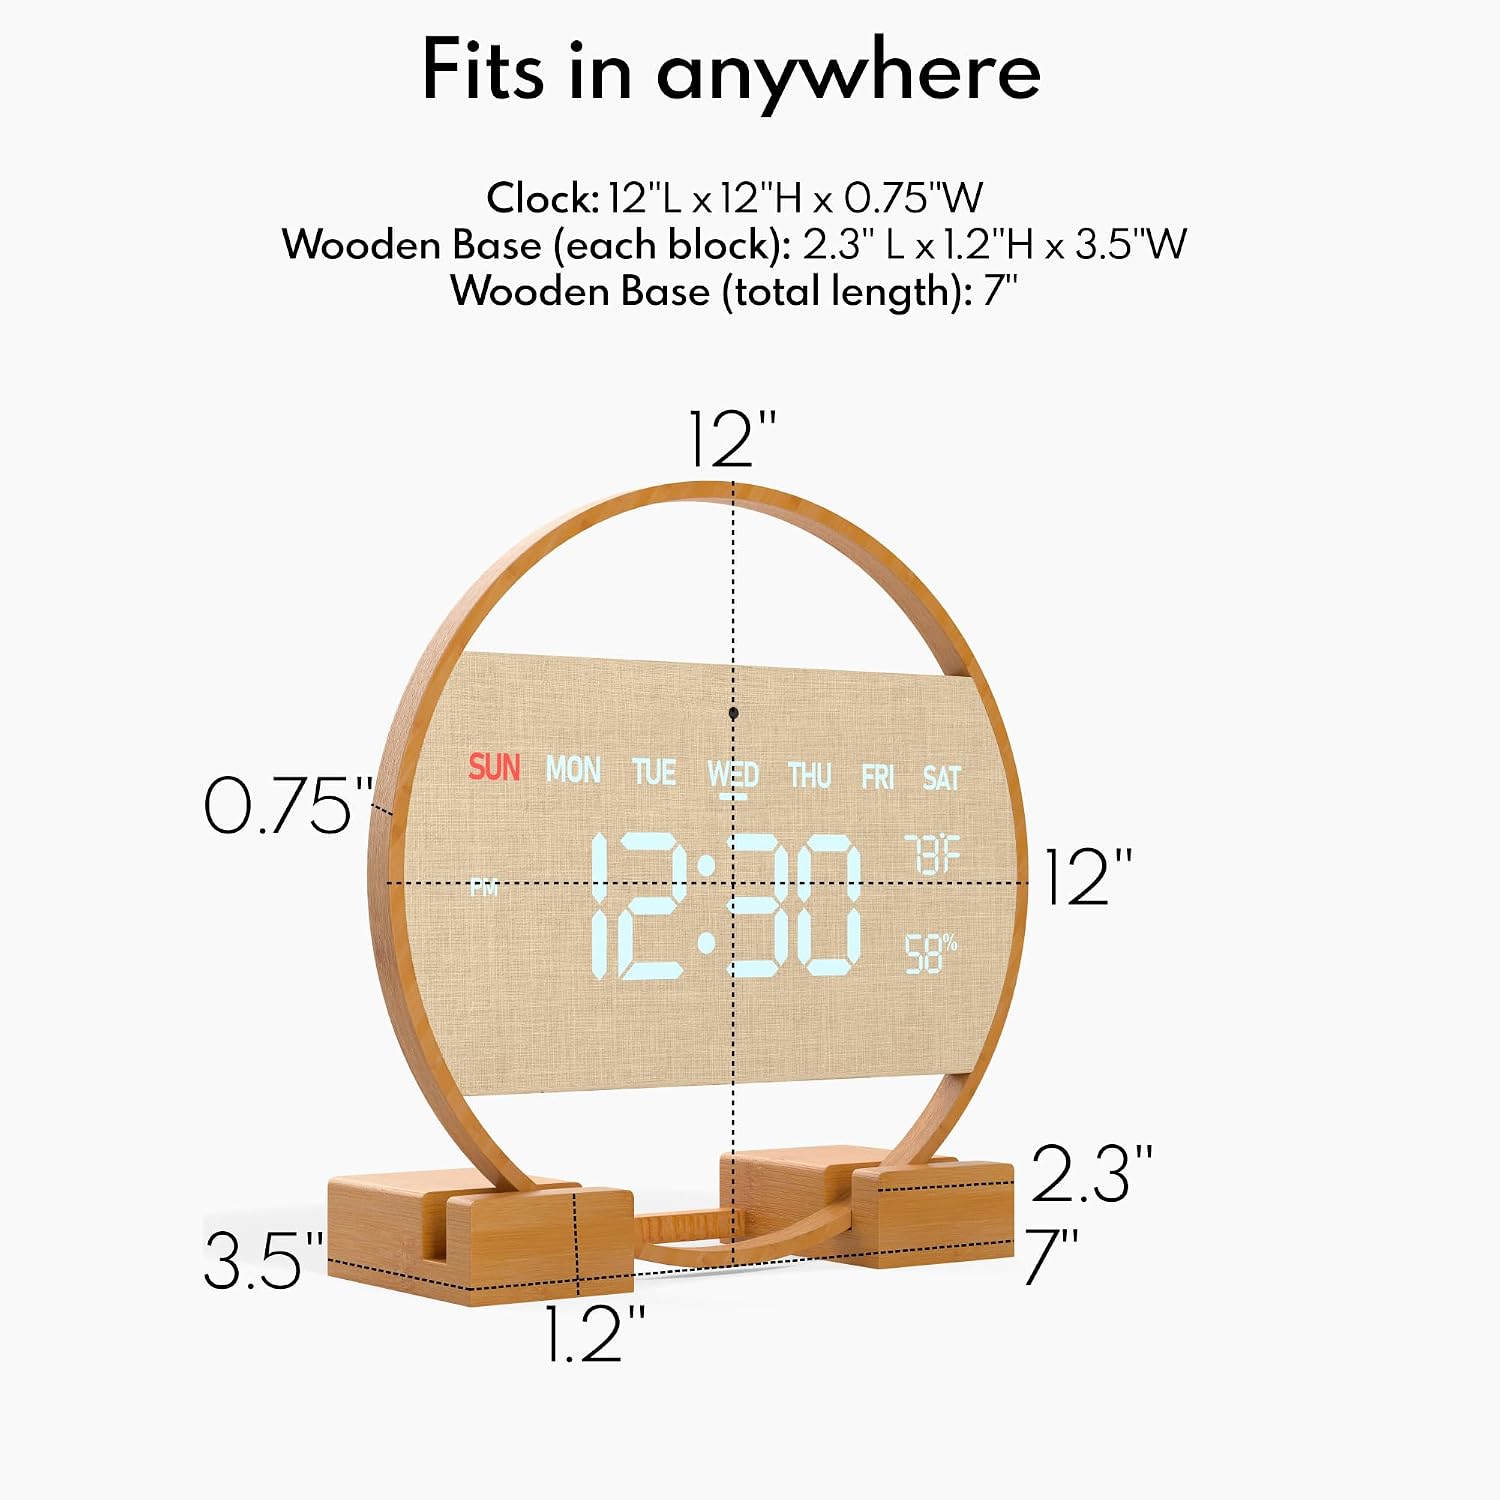
Image: A detailed view of the Driini clock's display, with labels pointing to and describing each function: Day of the Week Indicator, AM/PM Indicator, Time of Day, Temperature Indicator, Humidity Indicator, Light Sensor, and Temperature and Humidity Sensor.
- Large LED Display: Provides clear visibility of time, day, temperature, and humidity from a distance.
- Day of the Week Indicator: Displays the current day (SUN, MON, TUE, WED, THU, FRI, SAT).
- Temperature Display: Shows the ambient room temperature, switchable between Fahrenheit (°F) and Celsius (°C).
- Humidity Display: Indicates the relative humidity level in the room.
- Intelligent Light Sensor: Automatically adjusts the display brightness to suit the surrounding light conditions, ensuring optimal readability without being overly bright or dim.
- 12/24-Hour Format: Easily switch between standard 12-hour time with AM/PM indicators and 24-hour military time.
Maintenance
To ensure the longevity and optimal performance of your Driini Digital Wall Clock, follow these simple maintenance guidelines:
- Cleaning: Gently wipe the clock's surface and display with a soft, dry, lint-free cloth. Avoid using abrasive cleaners, solvents, or chemical sprays, as these can damage the finish or display.
- Placement: Avoid placing the clock in direct sunlight or near heat sources, which can affect temperature readings and potentially damage the unit. Keep it away from areas with excessive moisture.
- Power: Ensure the power cord is not kinked or pinched. Disconnect power during electrical storms or if the clock will be unused for an extended period.
Troubleshooting
If you encounter any issues with your Driini Digital Wall Clock, please refer to the following common problems and solutions:
| Problem | Possible Cause | Solution |
|---|---|---|
| Clock display is off. | No power supply. | Ensure the USB power cord is securely connected to the clock and the USB power brick, and that the power brick is plugged into a functional wall outlet. |
| Display is too dim or too bright. | Automatic brightness adjustment or manual setting. | Check the ambient light conditions. If the auto-dimming feature is active, it will adjust. Manually adjust brightness using the dedicated button on the clock. |
| Time is incorrect. | Time not set or power interruption. | Follow the "Setting Time and Date" instructions in the Operation section to reset the time. |
| Temperature/Humidity readings seem inaccurate or not updating. | Stable environment or external factors. | In stable indoor environments, temperature and humidity may not change frequently. Ensure the clock is not in direct sunlight, near vents, or in areas with extreme temperature fluctuations. Allow time for readings to stabilize after initial setup. |
Specifications
| Feature | Detail |
|---|---|
| Brand | Driini |
| Model Number | 00198168831380 |
| Color | Bamboo Wood |
| Display Type | Digital LED |
| Style | Contemporary |
| Special Features | Adjustable Brightness, Auto Dimmable, Calendar Display (Day of Week), Large Display, Temperature Display, Humidity Display |
| Product Dimensions | 12"L x 12"H x 0.75"W (Clock unit) |
| Power Source | Corded Electric (USB) |
| Indoor/Outdoor Usage | Indoor |
| Material | Bamboo |
| Mounting Type | Wall Mount, Desk Mount |
| Item Weight | 1.2 Pounds |
| Are Batteries Included | No (Not battery operated) |
Warranty and Support
The Driini Modern Large Digital Wall Clock comes with an Extended Warranty. For specific details regarding the warranty period and coverage, please refer to the warranty card included with your product or visit the official Driini website.
For technical support, troubleshooting assistance, or any inquiries regarding your product, please contact Driini customer service. Contact information can typically be found on the product packaging or the official Driini website.
You can visit the Driini Store on Amazon for more information.
Product Videos
Note: The provided product data does not include specific video URLs or metadata (like creator type or filename) required for embedding. Therefore, no videos can be embedded in this manual. Please refer to the product page for any available video content.
Ask a question about this manual
Ask about setup, troubleshooting, compatibility, parts, safety, or missing instructions. Manuals+ will review the question and use this page’s manual context to help answer it.