
Introduction
This manual provides detailed instructions for the setup, operation, maintenance, and troubleshooting of your Gamrombo 2 Pack Wired Controller. Please read this manual thoroughly before use to ensure optimal performance and longevity of your device.
Product Features
- Multi-Platform Compatibility: Supports Xbox One, Xbox Series S, Xbox Series X, Xbox One S, Xbox One X, Xbox Elite Controller Series, Xbox Core Controller, Steam, and PC Windows 10 and above.
- Wired Connection: 10ft (3m) USB cable for stable and quick connection.
- Enhanced Gaming Experience: Sensitive joysticks, enhanced direction keys, built-in dual motors for vibration feedback, and 6-axis sensor for motion control.
- Audio Features: Integrated 3.5mm audio jack with volume adjustment and mute button.
- Ergonomic Design: Comfortable grip with anti-slip texture, well-placed buttons and triggers for extended gaming sessions.
- Programmable Functions: Customizable buttons for macro settings.
- Turbo Function: For rapid button presses in action games.

Image: Illustration of the controller's dual-motor shock feature.

Image: Demonstration of the 6-axis motion sensor for enhanced dynamic feeling.
Package Contents
- 2 x Gamrombo Wired Controllers (White+Green)
- 1 x Instruction Manual
Setup
Connecting to Xbox Console
1. Locate an available USB port on the front of your Xbox One, Xbox Series S, or Xbox Series X console.
2. Plug the USB cable of the Gamrombo Wired Controller into the USB port.
3. The controller light will illuminate steadily, indicating a successful connection. The controller is now ready for use.
Connecting to PC (Windows 10/11)
1. Plug the USB cable of the Gamrombo Wired Controller into an available USB port on your Windows 10 or 11 PC.
2. The system will automatically detect and install the necessary drivers. This may take a few moments.
3. Once drivers are installed, the controller light will illuminate steadily, and the controller will be ready for use with compatible PC games.

Image: Two Gamrombo wired controllers, one white and one green, highlighting multi-platform compatibility.
Operating Instructions
Basic Controls
- Joysticks: Control movement and camera.
- D-Pad: Directional input for menus and specific game actions.
- A/B/X/Y Buttons: Primary action buttons.
- LB/RB Buttons: Shoulder buttons.
- LT/RT Triggers: Analog triggers for precise input.
- View Button: Access in-game maps or menus.
- Menu Button: Access game options or system menus.
- Home Button: Return to console dashboard or PC desktop.
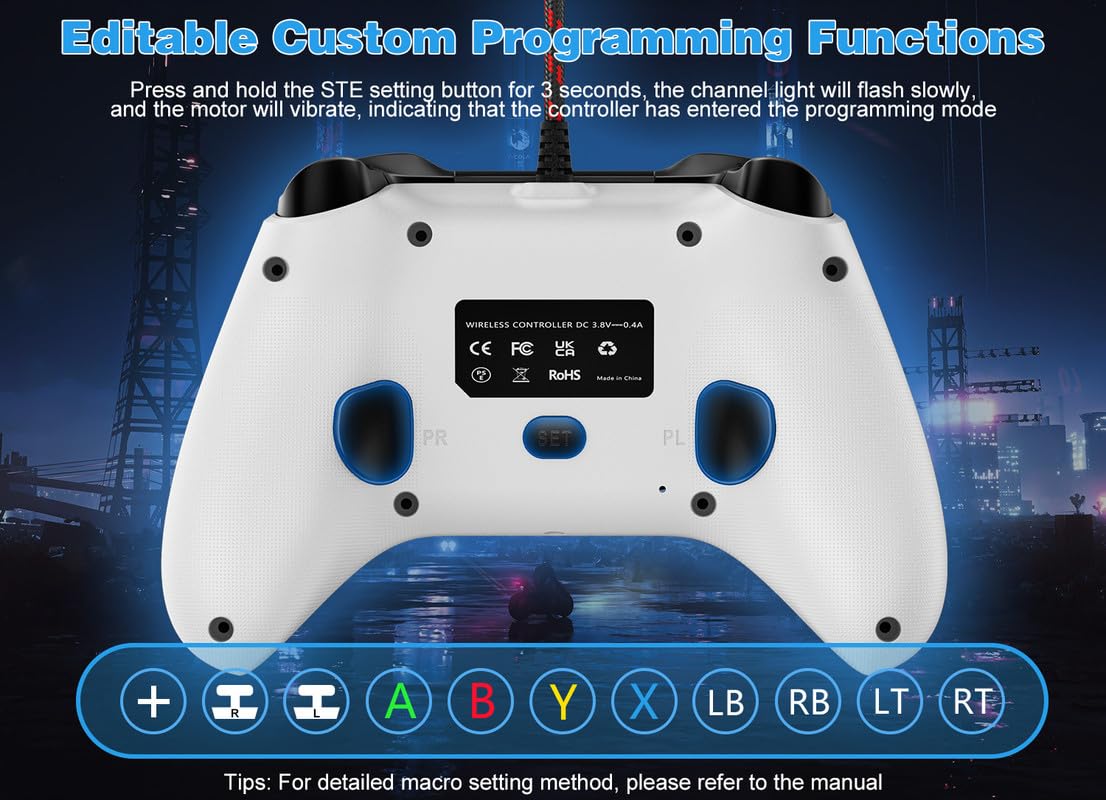
Image: Detailed button layout of the Gamrombo wired controller.
Audio Jack and Volume Control
The controller features a 3.5mm audio jack. Plug in any compatible headset for in-game audio and voice chat.
- Volume Adjustment: Use the dedicated volume rocker (left/right push) to adjust headset volume.
- Mute Function: Press and hold the middle of the volume rocker to mute/unmute your microphone.
Turbo Function
The Turbo function allows for rapid, continuous pressing of a button. This can be useful in games requiring quick, repeated inputs.
- To activate Turbo: Press and hold the desired action button (e.g., A, B, X, Y, LB, RB, LT, RT), then press the Turbo button. The button will now rapidly repeat its input.
- To deactivate Turbo: Repeat the process (press and hold the action button, then press the Turbo button again).

Image: Illustration of the Turbo function.
Custom Programming Functions (Macro)
The controller supports custom programming for certain buttons, allowing you to assign complex sequences or single actions to a single press.
- To enter programming mode: Press and hold the "SET" button for 3 seconds. The channel light will flash slowly, and the motor will vibrate, indicating entry into programming mode.
- For detailed macro setting methods, please refer to the specific instructions provided in the included manual or online resources.

Image: Rear view of the controller highlighting programmable buttons.
Maintenance
- Cleaning: Use a soft, dry cloth to clean the controller. Do not use harsh chemicals or abrasive materials.
- Storage: Store the controller in a cool, dry place away from direct sunlight and extreme temperatures.
- Cable Care: Avoid sharp bends or kinks in the USB cable to prevent damage. Do not pull the cable to disconnect the controller.
Troubleshooting
Controller Not Connecting/Recognized
- Check USB Connection: Ensure the USB cable is securely plugged into both the controller and the console/PC. Try a different USB port.
- Restart Device: Restart your Xbox console or PC.
- Driver Installation (PC): For PC, ensure Windows 10/11 has successfully installed the necessary drivers. You can check Device Manager.
- Controller Firmware Upgrade: If you experience connection issues with your Xbox console, a firmware upgrade may be required. This upgrade can only be performed on a PC.

Image: Instructions for controller firmware upgrade if connection issues occur.
Firmware Upgrade Process (for Xbox compatibility issues)
If your controller is not recognized by your Xbox console, a firmware update is necessary. This process must be done on a Windows PC.
- Download Upgrade Program: Visit the provided URL (or search for "Gamrombo controller firmware upgrade") to download the upgrade program. The URL mentioned in the product image is we.tl/t-wd84LeAwOG.
- Extract Files: Extract the downloaded ZIP file to a convenient location on your PC.
- Run Program: Open the extracted folder and run the upgrade program (e.g., "MP325 Update V2.00.exe").
- Connect Controller: While holding the "Up" button on the D-pad of the controller, connect the controller's USB cable to your PC.
- Initiate Upgrade: Once the program detects the controller, it should automatically begin the upgrade process. Follow any on-screen prompts.
- Completion: The upgrade typically takes 2-3 minutes. Once complete, disconnect the controller.
Video: Step-by-step guide on how to upgrade the Xbox Wired Controller firmware. This video demonstrates downloading the upgrade program, extracting files, running the program, connecting the controller while holding the 'Up' button, and the automatic upgrade process.
Note: The upgrade process is specifically for resolving Xbox compatibility issues. The controller will remain compatible with Xbox devices after the upgrade, and the upgrade can only be done on a PC.
Buttons/Joysticks Not Responding
- Check Connection: Ensure the controller is properly connected.
- Test in Another Game/Application: Verify if the issue is specific to one game or widespread.
- Restart Controller: Disconnect and reconnect the controller.
Specifications
| Feature | Specification |
|---|---|
| Model Number | Xbox |
| Connectivity | Wired USB (10ft / 3m cable) |
| Compatibility | Xbox One, Xbox Series S/X, Windows 10/11 PC, Steam |
| Audio Jack | 3.5mm (with volume and mute control) |
| Vibration Feedback | Dual Motors |
| Motion Control | 6-Axis Sensor |
| Programmable Buttons | Yes (Macro Function) |
| Turbo Function | Yes |
| Item Weight | 1.3 pounds |
| Package Dimensions | 6.69 x 5.63 x 4.88 inches |
| Manufacturer | Gamrombo |
| Country of Origin | China |
Warranty and Support
Gamrombo stands behind the quality of its products. If you encounter any issues or have questions regarding your wired Xbox controller, please contact the seller directly for assistance.
For product support, please reach out to Xinyuan-US, the seller, via Amazon's messaging system or their provided contact information.
Please retain your proof of purchase for any warranty claims.


