1. Introduction
This manual provides comprehensive instructions for the installation, operation, and maintenance of your TTXSCAM-E02 HD 720P Universal Backup Camera. This camera is designed to enhance driving safety by providing clear visual assistance for reversing, parking, and maneuvering in various vehicle types including cars, pickups, SUVs, RVs, and vans. Please read this manual thoroughly before installation and use to ensure proper function and safety.
2. Safety Information
Always prioritize safety during installation and operation. Failure to follow these guidelines may result in injury or damage to the product or vehicle.
- Ensure the vehicle's ignition is off and the battery is disconnected before beginning any electrical installation.
- Consult a professional if you are unsure about any part of the installation process.
- Route all cables securely to prevent interference with vehicle controls or moving parts.
- Do not obstruct the driver's view or deployable airbags with the camera or wiring.
- The camera is an aid and does not replace the driver's responsibility to check surroundings manually.
- Ensure your monitor supports AHD 1080P 25HZ/PAL video signal for optimal performance.
3. Package Contents
Verify that all components are present in the package:
- TTXSCAM-E02 Backup Camera
- Mounting Brackets (for both butterfly and flush mounting)
- Power Cable (5FT)
- Video Cable (26FT)
- Hex Wrench (for angle adjustment)
4. Product Features
- HD 720P Video Output: Utilizes Analog High Definition (AHD) technology to deliver high-quality video at 1080P (1920 x 1080 pixels) resolution, providing superior clarity for enhanced safety during backing up.
- Versatile View Options: Can be configured for rear view (mirror image) or front view (non-mirror image) by cutting the white cable.
- Signal Compatibility: Supports AHD video signal by default. Can be switched to CVBS video signal by cutting the orange cable if your monitor does not support AHD 1080P 25HZ (PAL) video settings.
- Adjustable Guidelines: The parking guideline can be disabled by cutting the green cable.
- IP68 Waterproof Rating: Designed to be durable and weather-resistant, offering excellent protection against dust and water, ensuring reliable operation in adverse conditions.
- Dual Installation Options: Comes with two brackets for either bracket mounting or flush mounting, allowing flexibility to suit specific vehicle needs.
- Wide Adaptability: Suitable for a broad range of vehicles including SUVs, trucks, campers, minivans, and sedans.

Figure 4.1: The TTXSCAM-E02 HD 720P Universal Backup Camera, showcasing its compact design and integrated cable.
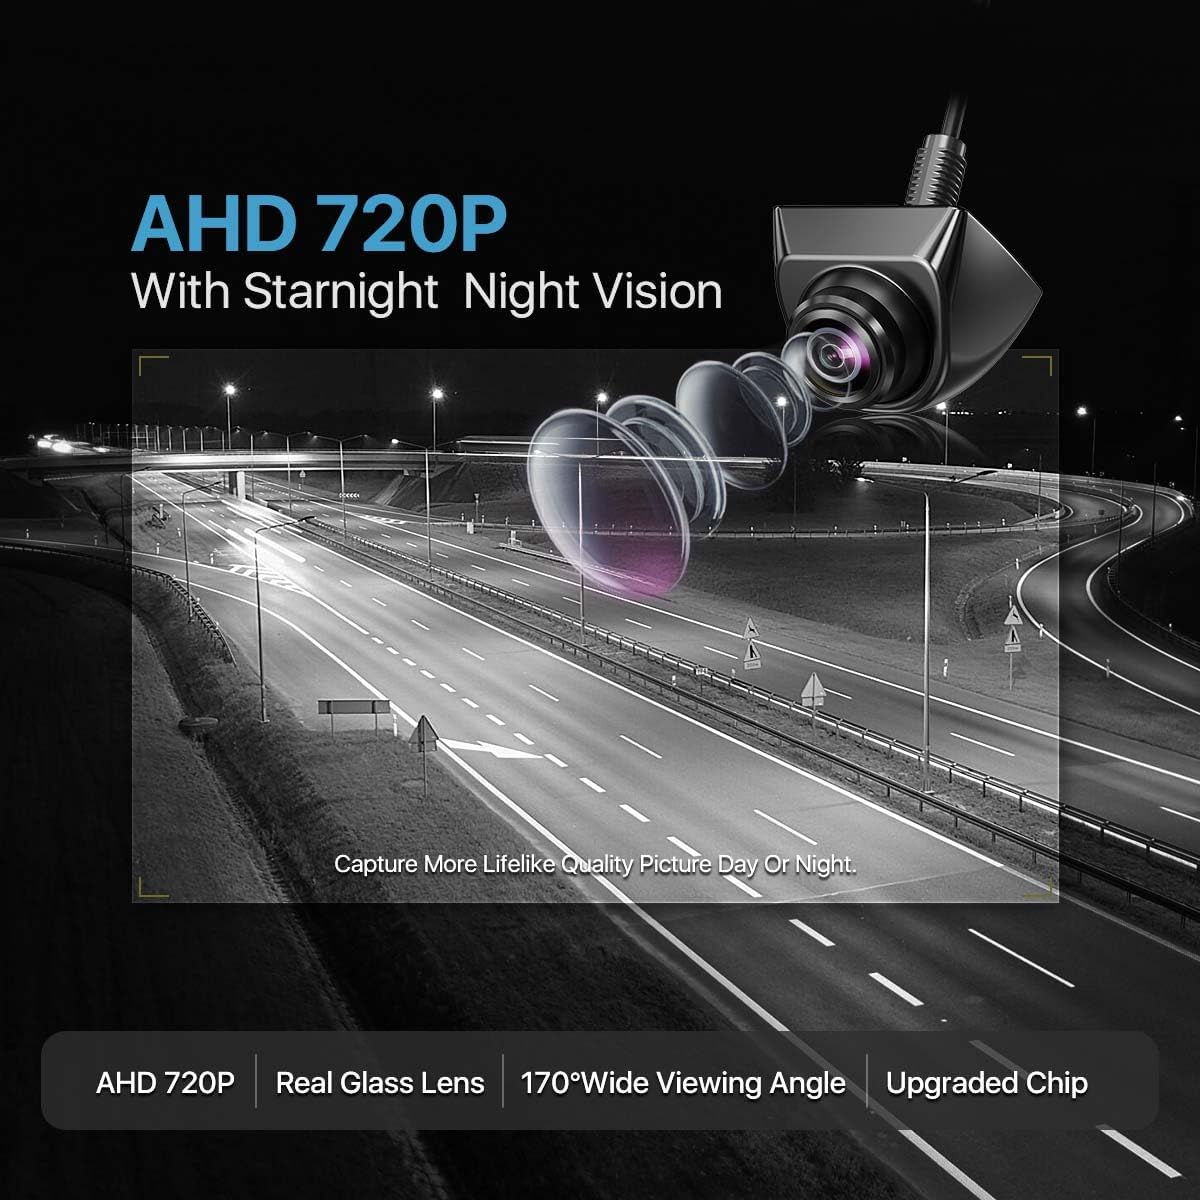
Figure 4.2: Illustration of the camera's AHD 720P resolution and starlight night vision capabilities, providing clear images day or night.

Figure 4.3: Close-up view of the camera demonstrating its IP68 waterproof rating, indicating its resilience to water and dust.

Figure 4.4: Depiction of the camera's wide field of view aiding in parking safety by showing obstacles behind the vehicle.

Figure 4.5: An illustration showing the camera's compatibility with a wide range of vehicles, including SUVs, trucks, campers, minivans, and sedans.
5. Setup and Installation
Careful installation is crucial for optimal performance. Follow these steps for proper setup.
5.1 Camera Placement and Mounting
The TTXSCAM-E02 camera offers flexible placement options for front, rear, or side views, and can be installed using either bracket mounting or flush mounting.

Figure 5.1: Examples of camera installation positions: front view (e.g., on grille), rear view (e.g., above license plate), and side view (e.g., near side mirror).

Figure 5.2: Illustration of the two primary mounting methods: horizontal mounting (e.g., under a lip) and vertical mounting (e.g., flush into a surface).
5.2 Camera Angle Adjustment
The camera body is designed for 360-degree rotation, and the lens can be adjusted 45 degrees left/right and 45 degrees up/down using the provided hex wrench. This allows for precise aiming to achieve the desired field of view.
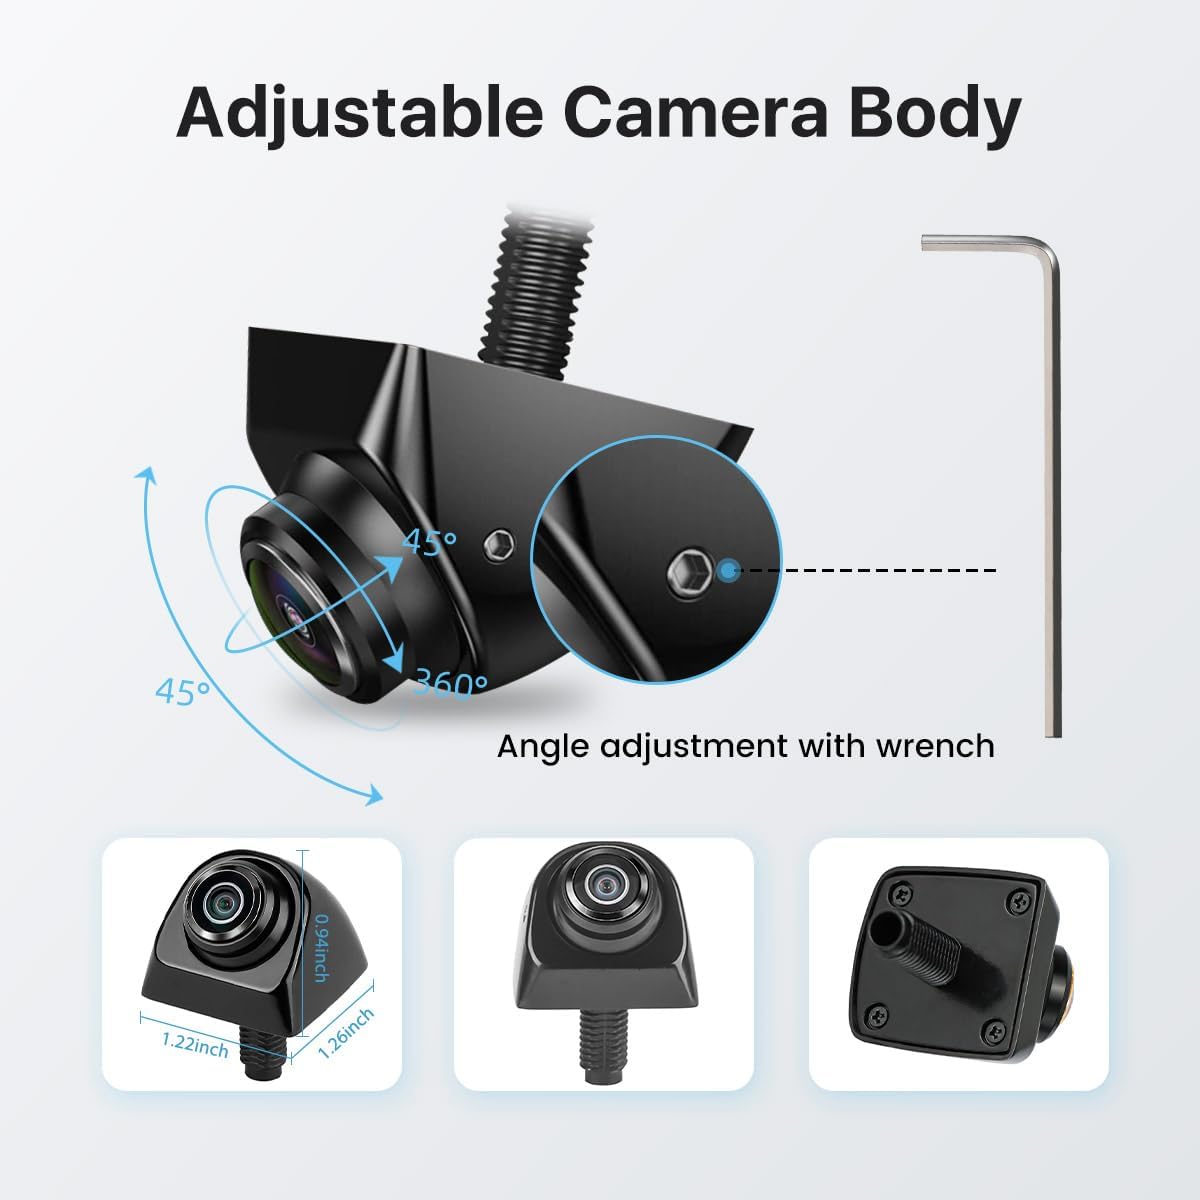
Figure 5.3: Diagram showing the camera's adjustable body (360 degrees) and lens (45 degrees in two axes) for optimal viewing angle, with an inset showing the hex wrench for adjustment.
5.3 Wiring Diagram
The camera connects to your vehicle's power system and display unit. There are two primary wiring configurations depending on whether your head unit has a dedicated trigger wire.

Figure 5.4: Detailed wiring diagrams. Wire Program 1 shows connection with a head unit's trigger wire (A connects to B, C connects to reversing/brake/turning light positive or ACC). Wire Program 2 shows connection to a monitor without a trigger wire, where the camera's power is supplied directly from the vehicle's reversing light positive, brake light positive, turning light positive, or ACC.
- Wire Program 1 (with Head Unit Trigger Wire): Connect the camera's trigger wire (B) to the head unit's trigger wire (A). Connect the camera's power (Red wire) to the reversing light positive, brake light positive, turning light positive, or ACC. Connect the camera's ground (Black wire) to GND.
- Wire Program 2 (without Head Unit Trigger Wire): If your monitor does not have a trigger wire, connect the camera's power (Red wire) directly to the reversing light positive, brake light positive, turning light positive, or ACC. Connect the camera's ground (Black wire) to GND.
- Important: Always test the backup camera before routing the video cable permanently. Start the vehicle and engage reverse gear to test the camera's functionality.
5.4 Signal and Feature Configuration (Switcher Cables)
The camera features three switcher loop cables (white, orange, green) that allow you to customize its functionality. After cutting any cable, remember to reconnect the power supply to apply the change. You can also reconnect the cut cable if you wish to revert the setting.
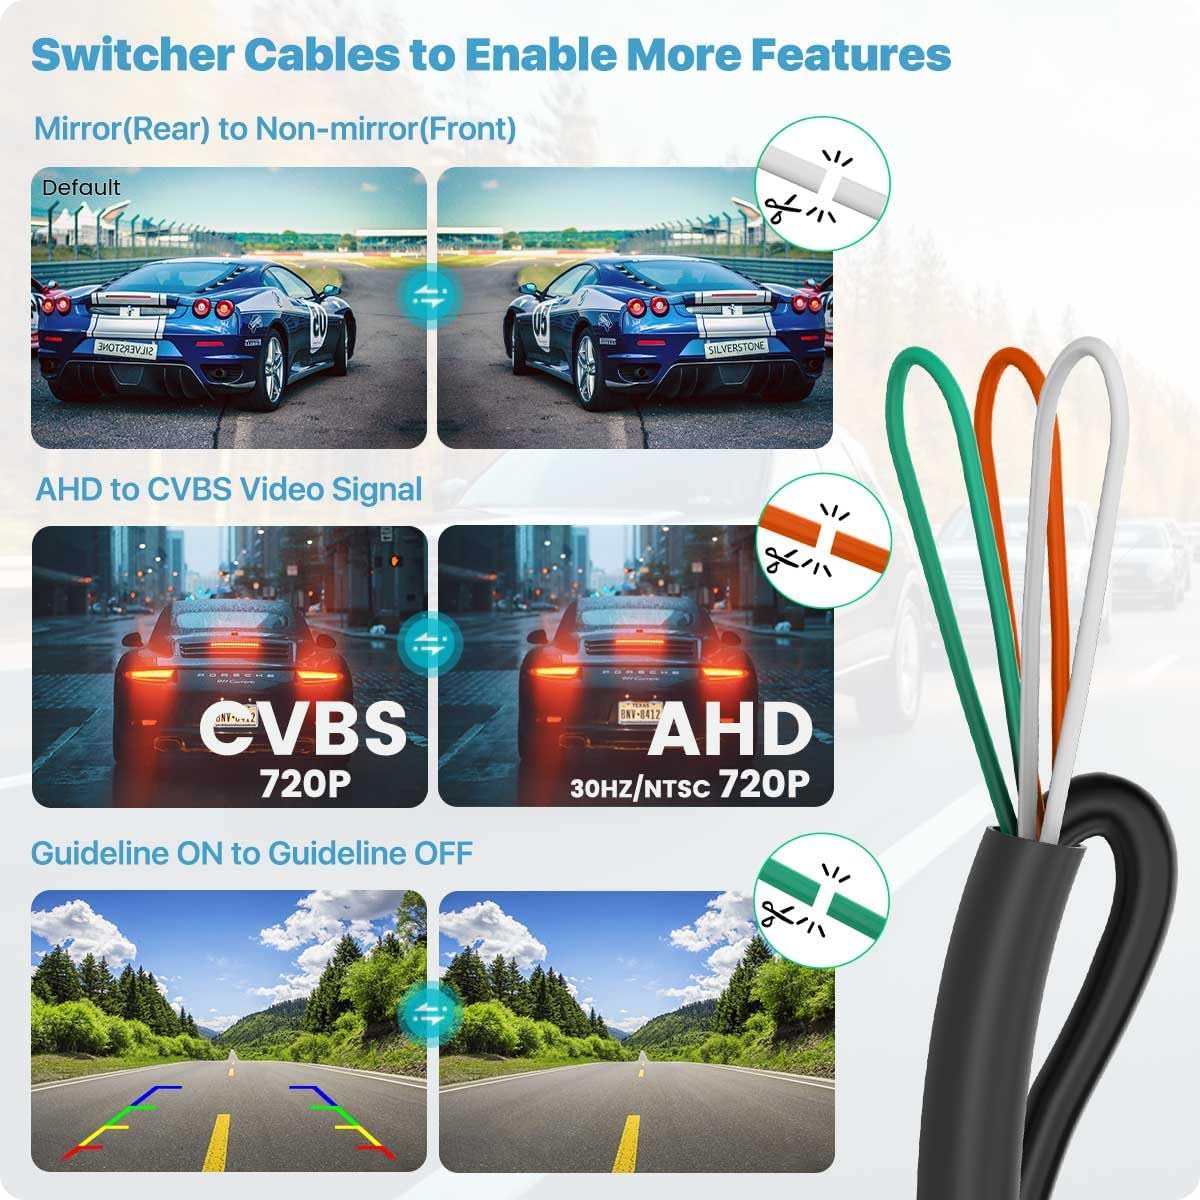
Figure 5.5: Diagram illustrating the function of the three switcher cables: white for mirror/non-mirror image, orange for AHD/CVBS video signal, and green for enabling/disabling guidelines.
- White Cable: Cut this cable to switch from mirror image (rear view default) to non-mirror image (front view).
- Orange Cable: Cut this cable to switch from AHD video signal to CVBS video signal. This is necessary if your monitor does not support AHD 1080P 25HZ (PAL) video settings. The camera is designed to produce CVBS video signal by default.
- Green Cable: Cut this cable to disable the parking guideline.
5.5 Compatibility Note
This camera has an RCA video output plug. It must work with monitors that support RCA video input. It is not compatible with dash cams, mirror cams, or GPS units that do not support RCA video input.

Figure 5.6: An important note indicating that the camera uses an RCA video output and is not suitable for direct connection to dash cams, GPS units, or mirror cams that lack RCA input.
6. Operating Instructions
Once properly installed and configured, the TTXSCAM-E02 camera operates automatically.
- Rear View Operation: When connected to the vehicle's reversing light circuit, the camera will automatically activate and display the rear view on your connected monitor when the vehicle is shifted into reverse gear.
- Front/Side View Operation: If configured for front or side view and connected to an ACC (Accessory) power source or a dedicated switch, the camera can be activated manually or automatically depending on your vehicle's setup.
- Viewing Guidelines: If the green switcher cable is intact, parking guidelines will appear on the screen to assist with parking maneuvers.
7. Maintenance
To ensure the longevity and optimal performance of your TTXSCAM-E02 camera, follow these simple maintenance guidelines:
- Cleaning: Regularly clean the camera lens with a soft, damp cloth to remove dirt, dust, or water spots that may obscure the view. Avoid abrasive cleaners or solvents.
- Inspection: Periodically check the camera's mounting and cable connections to ensure they are secure and free from damage.
- Waterproof Integrity: While the camera is IP68 rated, avoid directing high-pressure water jets directly at the camera for extended periods, especially during car washes.
8. Troubleshooting
If you encounter issues with your TTXSCAM-E02 camera, refer to the following common problems and solutions:
| Problem | Possible Cause | Solution |
|---|---|---|
| No image on monitor | Loose cable connection; Incorrect power supply; Monitor not set to correct input; Camera not receiving power. | Check all video and power cable connections. Ensure the camera is receiving 12V DC power. Verify your monitor is on the correct video input channel. |
| Image is distorted or flickering | Interference; Loose connection; Incompatible video signal. | Ensure cables are not routed near high-voltage wires. Check connections. If your monitor does not support AHD 1080P 25HZ (PAL), cut the orange switcher cable to switch to CVBS signal. |
| No parking guidelines | Green switcher cable cut. | If you desire guidelines, ensure the green switcher cable is intact. If it was cut, you may need to reconnect it. |
| Image is reversed (mirror image when front-mounted) | White switcher cable intact (default for rear view). | Cut the white switcher cable to switch to non-mirror image for front view applications. |
| Poor image quality at night | Dirty lens; Insufficient ambient light. | Clean the camera lens. Ensure vehicle reverse lights are functioning correctly to provide illumination. |
| Monitor does not support AHD 720P | Monitor incompatibility. | Cut the orange switcher cable to change the video signal to CVBS. For Android head units, check settings: Go to Car settings >> Factory settings >> Reverse (Picture) settings >> Select AHD-720P 30HZ (or AHD-720P-NTSC). Note: Not all Android head units can be set to receive AHD video signal, especially older models. |

Figure 8.1: Instructions on how to check and configure AHD 720P compatibility on an Android head unit through its settings menu.
9. Specifications
| Feature | Specification |
|---|---|
| Model Number | TTXSCAM-E02 |
| Video Capture Resolution | HD 720P (1080P output) |
| Video Capture Format | AHD (default), CVBS (selectable) |
| Compatible Devices | Monitors supporting AHD 1080P 25HZ/FPS PAL video format and RCA connector |
| Installation Type | Butterfly Mount or Flush Mount |
| Waterproof Rating | IP68 |
| Voltage | 12 Volts (DC) |
| Optical Sensor Technology | CCD, CMOS |
| Lens Type | Wide Angle or Fisheye |
| Connector Type | 4-Pin Mini DIN, DC (RCA video output) |
| Product Dimensions | 0.98"L x 0.8"W x 0.72"H |
| Item Weight | 0.8 ounces |
| Color | Black |
| Manufacturer | TTXSCAM |
| Country of Origin | China |
10. Warranty and Support
For warranty information and technical support, please refer to the documentation included with your purchase or contact TTXSCAM customer service directly. Keep your purchase receipt as proof of purchase for any warranty claims.
For further assistance, you may visit the official TTXSCAM store on Amazon: TTXSCAM Store


