
Srutueo S8601A
Srutueo S8601A 3-in-1 CO2 Meter Air Quality Monitor User Manual
Model: S8601A
1. Introduction
The Srutueo S8601A is a portable 3-in-1 air quality monitor designed to measure Carbon Dioxide (CO2) concentration, temperature, and humidity. This device utilizes NDIR (Non-Dispersive Infrared) technology for accurate CO2 detection. It is suitable for monitoring indoor air quality in various environments such as homes, offices, schools, and public places. This manual provides essential information for the safe and effective operation of your device.
2. Safety Information
- Read all instructions carefully before using the device.
- Do not expose the device to extreme temperatures, humidity, or direct sunlight.
- Avoid dropping or subjecting the device to strong impacts.
- Do not attempt to disassemble or modify the device. This will void the warranty and may cause damage.
- Keep the device away from water and other liquids.
- Use only specified batteries (AAA) for operation. Ensure correct polarity when inserting batteries.
- Dispose of used batteries according to local regulations.
3. Product Overview
The Srutueo S8601A features a clear digital display and intuitive buttons for easy operation. It provides real-time readings of CO2 levels, temperature, and relative humidity.
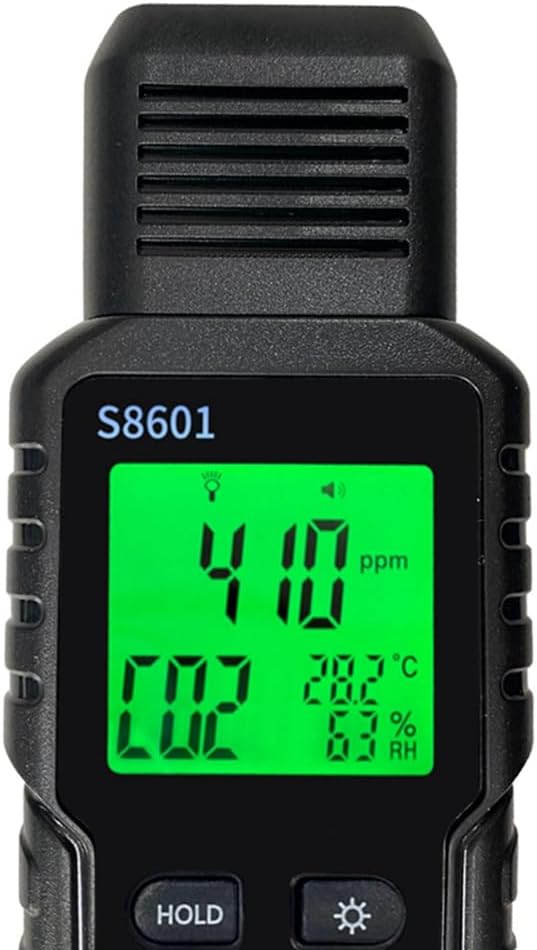
Figure 3.1: Front view of the Srutueo S8601A CO2 meter, displaying CO2 concentration (410 ppm), temperature (28.2°C), and relative humidity (63% RH).

Figure 3.2: Key features of the Srutueo S8601A, including NDIR CO2 sensor, temperature unit conversion, measurement hold function, red, yellow, and green backlight, and automatic shutdown.
3.1 Device Components
- CO2 Sensor: Located at the top of the device.
- LCD Display: Shows CO2 concentration, temperature, and humidity.
- HOLD Button: Freezes the current readings on the display.
- Backlight Button: Adjusts display brightness or changes backlight color (if applicable).
- Power Button: Turns the device on/off.
- °C/°F Button: Toggles between Celsius and Fahrenheit temperature units.
- Sound Button: Toggles alarm sound on/off.
- Battery Compartment: Located on the back for AAA batteries.
4. Setup
4.1 Battery Installation
- Locate the battery compartment cover on the back of the device.
- Slide the cover downwards to open the compartment.
- Insert 3 AAA batteries, ensuring correct polarity (+ and - terminals).
- Close the battery compartment cover by sliding it upwards until it clicks into place.

Figure 4.1: Battery compartment open, showing the correct placement for three AAA batteries.

Figure 4.2: Back view of the device with the battery compartment securely closed.
5. Operating Instructions
5.1 Power On/Off
- To power on, press and hold the Power Button (red button) for approximately 2 seconds. The device will perform a self-test and then display current readings.
- To power off, press and hold the Power Button again for approximately 2 seconds.
5.2 Taking Measurements
Once powered on, the device will automatically begin measuring CO2 concentration, temperature, and humidity. Allow a few minutes for the readings to stabilize, especially after initial power-on or moving to a new environment.
5.3 Interpreting CO2 Readings and Backlight Indicators
The device uses a color-coded backlight system to provide a quick visual indication of CO2 levels:

Figure 5.1: Examples of the three-color screen indicating different CO2 concentration ranges.
- Green Backlight: Indicates good air quality, typically below 1000 ppm CO2.
- Yellow Backlight: Indicates moderate air quality, typically between 1000-2000 ppm CO2. Ventilation is recommended.
- Red Backlight: Indicates poor air quality, typically above 2000 ppm CO2. Immediate ventilation is strongly recommended.
Note: Specific thresholds for color changes may vary slightly. Refer to local air quality guidelines for detailed recommendations.
5.4 HOLD Function
- Press the HOLD Button to freeze the current readings on the display. This is useful for recording specific measurements.
- Press the HOLD Button again to resume real-time measurements.
5.5 Temperature Unit Conversion
- Press the °C/°F Button to switch the temperature display between Celsius (°C) and Fahrenheit (°F).
5.6 Backlight Adjustment
- Press the Backlight Button (sun icon) to adjust the brightness of the display backlight. Repeated presses may cycle through different brightness levels or turn the backlight off/on.
5.7 Sound Alarm
- Press the Sound Button (speaker icon) to toggle the audible alarm on or off. The alarm will sound when CO2 levels exceed a preset threshold (if applicable).
6. Maintenance
6.1 Cleaning
- Wipe the device with a soft, dry cloth.
- Do not use abrasive cleaners, solvents, or corrosive chemicals.
- Ensure no liquid enters the sensor openings or buttons.
6.2 Storage
- When not in use for extended periods, remove the batteries to prevent leakage.
- Store the device in a cool, dry place, away from direct sunlight and extreme temperatures.
7. Troubleshooting
| Problem | Possible Cause | Solution |
|---|---|---|
| Device does not power on. | Low or dead batteries; incorrect battery polarity. | Replace batteries with new AAA batteries. Check battery polarity. |
| Inaccurate CO2 readings. | Device not calibrated; sensor obstructed; sudden environmental change. | Ensure the device has been in a fresh air environment for 10-15 minutes for auto-calibration. Ensure sensor vents are clear. |
| Display is dim or blank. | Low batteries; backlight off or set to lowest brightness. | Replace batteries. Press the Backlight Button to adjust brightness. |
| Temperature/Humidity readings seem off. | Device not stabilized; sensor obstructed. | Allow device to stabilize in the environment for 15-30 minutes. Ensure sensor vents are clear. |
8. Specifications
| Parameter | Value |
|---|---|
| CO2 Measurement Range | 400 - 5000 ppm |
| CO2 Detection Method | NDIR (Non-Dispersive Infrared) |
| Temperature Measurement Range | 0°C to 50°C (32°F to 122°F) |
| Humidity Measurement Range | 0% to 99% RH |
| Display | Digital LCD with color backlight |
| Power Supply | 3 x AAA Batteries |
| Automatic Shutdown | Yes |
| Weight | 3.9154 Ounce (approx. 111g) |
9. Warranty and Support
Srutueo products are manufactured to high quality standards. For warranty information or technical support, please refer to the documentation included with your purchase or contact your retailer. Keep your purchase receipt as proof of purchase.
For further assistance, please visit the official Srutueo website or contact customer service through your point of purchase.
Ask a question about this manual
Ask about setup, troubleshooting, compatibility, parts, safety, or missing instructions. Manuals+ will review the question and use this page’s manual context to help answer it.