
KoolMore KM-RIC-1DGD
KoolMore KM-RIC-1DGD Commercial Convertible Refrigerator/Freezer User Manual
Model: KM-RIC-1DGD
Introduction
This user manual provides essential information for the safe and efficient operation, maintenance, and troubleshooting of your KoolMore KM-RIC-1DGD Commercial One Glass Door Convertible Reach-in Refrigerator/Freezer. Please read this manual thoroughly before installation and operation to ensure proper use and to prevent damage to the unit or injury to yourself.
Safety Information
Always follow basic safety precautions when using this appliance to reduce the risk of fire, electric shock, or injury. Keep this manual for future reference.
- Ensure the unit is properly grounded.
- Do not store explosive substances such as aerosol cans with a flammable propellant in this appliance.
- Keep ventilation openings clear of obstruction.
- Do not use mechanical devices or other means to accelerate the defrosting process, other than those recommended by the manufacturer.
- Do not damage the refrigerant circuit.
- Only qualified service personnel should perform repairs.
- Unplug the unit before cleaning or performing any maintenance.
Setup
Unpacking
Carefully remove all packaging materials, including tape and protective film. Inspect the unit for any shipping damage. Report any damage to your carrier immediately.
Placement
Place the unit on a strong, level surface capable of supporting its weight when fully loaded. Ensure adequate air circulation around the unit. Maintain a minimum of 4 inches of clearance from walls or other obstructions on all sides and the top for proper ventilation.

Image: Front view of the KoolMore KM-RIC-1DGD unit with key dimensions (82.87" H, 26.99" W, 32.17" D) indicated, showing its tall, slender design.
Caster Installation
The unit comes with four casters, two of which have brakes. Attach the casters to the bottom of the unit. Ensure the casters with brakes are installed on the front side for stability when the unit is in its desired location.

Image: A close-up view of one of the durable caster wheels, highlighting the integrated brake mechanism for securing the unit in place.
Shelf Installation
The unit includes 3 adjustable shelves. Install the shelf clips at the desired height on the interior pilasters. Place the shelves securely on the clips, ensuring they are level and stable before loading any items.

Image: The interior of the KoolMore unit, with the glass door open, revealing multiple adjustable wire shelves and various containers and boxes stored inside.
Operating Instructions
Initial Startup
After installation, allow the unit to stand upright for at least 2 hours before plugging it in. Plug the unit into a dedicated grounded electrical outlet. Allow the unit to run empty for 24 hours to reach its set temperature before loading with products.
Digital Temperature Control and Convertible Functionality
The unit features a digital temperature display and controls for precise temperature management. It can be converted between refrigerator and freezer modes.
- Temperature Adjustment: Use the up and down arrows on the digital display to set the desired temperature.
- Mode Conversion: To switch between refrigerator and freezer modes, locate the "HEATERS SWITCH" on the control panel.
- Set the switch to "ON" for freezer mode (typically -7 to -3°F).
- Set the switch to "OFF" for refrigerator mode (typically 34-38°F).
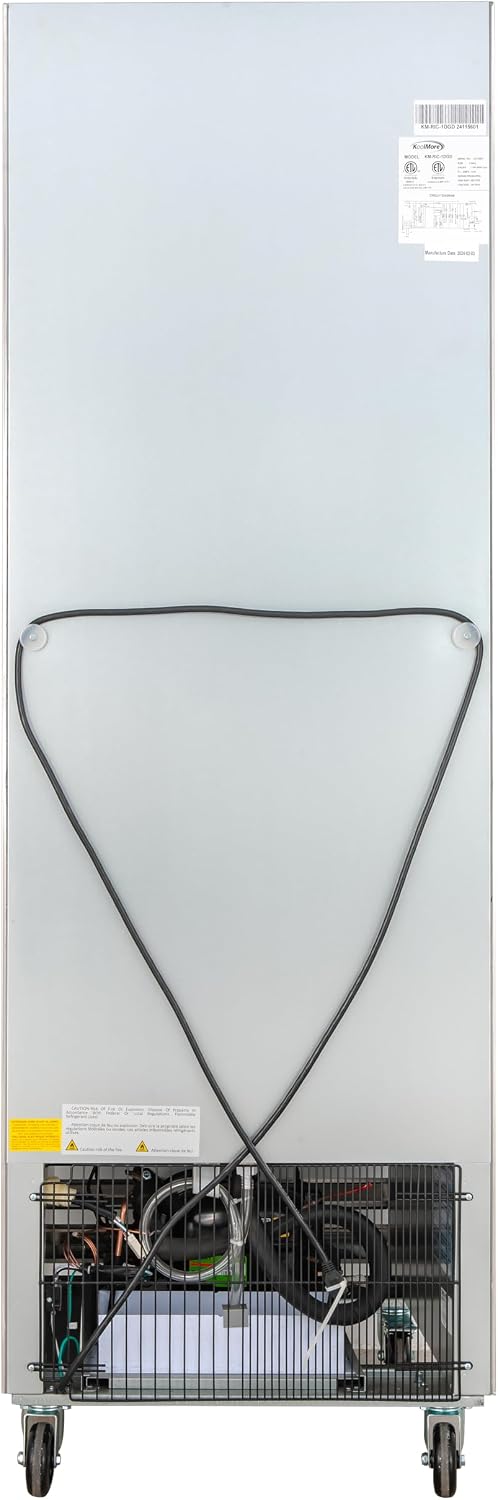
Image: A close-up of the digital control panel, showing the Dixell display with temperature readings and buttons for setting, R/F (refrigerator/freezer) mode, and up/down arrows. Two toggle switches are also visible, one labeled "HEATERS SWITCH" with instructions for freezer and refrigerator modes.
Loading the Unit
Distribute products evenly on the shelves to ensure proper air circulation. Do not block the internal air vents. The glass door provides clear visibility of contents, allowing for quick inventory checks.

Image: A full front view of the KoolMore KM-RIC-1DGD commercial convertible refrigerator/freezer, showcasing its stainless steel exterior and clear glass door filled with various food items and containers.
Door Operation and Security
The unit features a self-closing glass door for energy efficiency and convenience. It also includes a key lock for securing contents.

Image: A close-up view of the key lock mechanism located on the upper part of the unit's door, with keys inserted, indicating security features.

Image: A close-up of the ergonomic, stainless steel door handle, designed for easy grip and durability.

Image: A detailed view of the bright, energy-efficient LED lighting strip running vertically along the interior frame of the glass door, illuminating the contents.
Maintenance
Regular maintenance ensures optimal performance and longevity of your unit. Always unplug the unit before cleaning or maintenance.
Cleaning
- Interior: Clean the interior regularly with a mild soap and water solution. Rinse thoroughly and dry completely to prevent odors and mildew.
- Exterior: Wipe down the stainless steel exterior with a soft cloth and a non-abrasive cleaner designed for stainless steel.
- Glass Door: Use a glass cleaner for the door. The anti-condensation heating strips help keep the glass clear.
- Door Gaskets: Inspect and clean door gaskets regularly to ensure a tight seal. A damaged or dirty gasket can lead to temperature fluctuations and increased energy consumption.
Defrosting
This unit features manual defrost. When ice buildup on the evaporator coils reaches approximately 1/4 inch thickness, manual defrosting is required.
- Unplug the unit.
- Remove all food items and store them in another refrigerated area.
- Leave the door open to allow ice to melt naturally. You can place towels at the bottom to absorb water.
- Once defrosted, clean and dry the interior before plugging the unit back in and returning food items.
Condenser Coil Cleaning
The condenser coils are located at the bottom rear of the unit. Clean them every 3-6 months to ensure efficient operation. Use a stiff brush or vacuum cleaner to remove dust and debris from the coils. Blocked coils can lead to reduced cooling efficiency and increased energy consumption.

Image: The rear view of the KoolMore unit, clearly showing the power cord routing and the lower section where the compressor and condenser coils are housed, indicating the area for maintenance.
Troubleshooting
Before calling for service, check the following common issues and solutions:
| Problem | Possible Cause | Solution |
|---|---|---|
| Unit not cooling | Power supply issue, thermostat set too high, condenser coils dirty, excessive door openings. | Check power connection and circuit breaker. Adjust thermostat. Clean condenser coils. Minimize door openings. |
| Excessive noise | Unit not level, loose parts, fan obstruction. | Level the unit using the adjustable feet/casters. Check for and tighten any loose components. Ensure fan blades are clear. |
| Temperature fluctuates | Door gasket not sealing, frequent door openings, unit overloaded. | Inspect and clean/replace door gasket. Reduce frequency of door openings. Do not overload the unit. |
| Water on floor | Drain pan overflowing, clogged drain line. | Empty drain pan if accessible. Clear any obstructions in the drain line. |
If the problem persists after checking these solutions, please contact qualified service personnel.
Specifications
| Feature | Detail |
|---|---|
| Brand | KoolMore |
| Model Number | KM-RIC-1DGD |
| Capacity | 23 Cubic Feet |
| Dimensions (D x W x H) | 32.17" x 26.99" x 82.87" |
| Item Weight | 288 pounds |
| Color | Stainless-Steel |
| Installation Type | Freestanding |
| Form Factor | Convertible (Refrigerator/Freezer) |
| Defrost System | Manual |
| Voltage | 115 Volts |
| Number of Doors | 1 (Glass Door) |
| Shelves | 3, Adjustable |
| Special Features | Anti Condensation Door, Convertible |
| Certification | ETL Listed |
Warranty and Support
This KoolMore product is covered by a manufacturer's warranty. For specific warranty details, please refer to the warranty card included with your purchase or visit the official KoolMore website. For technical support, parts, or service inquiries, please contact KoolMore customer service through their official channels.
You can find more information and contact details on the KoolMore Store on Amazon.
Related documentsKM-RIC-1DGD


Ask a question about this manual
Ask about setup, troubleshooting, compatibility, parts, safety, or missing instructions. Manuals+ will review the question and use this page’s manual context to help answer it.