
1. Introduction
Thank you for choosing the pxton 666S Walkie Talkie. This manual provides essential information for the safe and efficient operation of your two-way radio. Please read this manual thoroughly before use to ensure optimal performance and to prevent damage to the device.

Image 1.1: pxton 666S Walkie Talkies in use, highlighting key features.
2. Product Overview
2.1 Included Components
- pxton 666S Walkie Talkie Unit(s)
- 1500mAh Lithium-ion Battery
- Charging Base
- Power Adapter
- Belt Clip
- Antenna
- Headphones (earpiece with microphone)
- User Manual
2.2 Key Features
- VOX (Voice Operated Exchange): Hands-free communication.
- Noise Reduction: Improves audio clarity in noisy environments.
- TOT (Time-Out Timer): Prevents accidental long transmissions.
- Built-in Flashlight: For illumination in low-light conditions.
- Monitoring Function: Allows listening to weak signals.
- Scan Function: Scans active channels.
- Long Range: Up to 3 miles in open areas, 1.2 miles in suburban, 0.6 miles in urban.
- 1500mAh Li-ion Battery: Provides extended standby and talk time.
- Water Resistant: Offers protection against splashes.
- 16 Channels: For diverse communication needs.
2.3 Parts of the Walkie Talkie
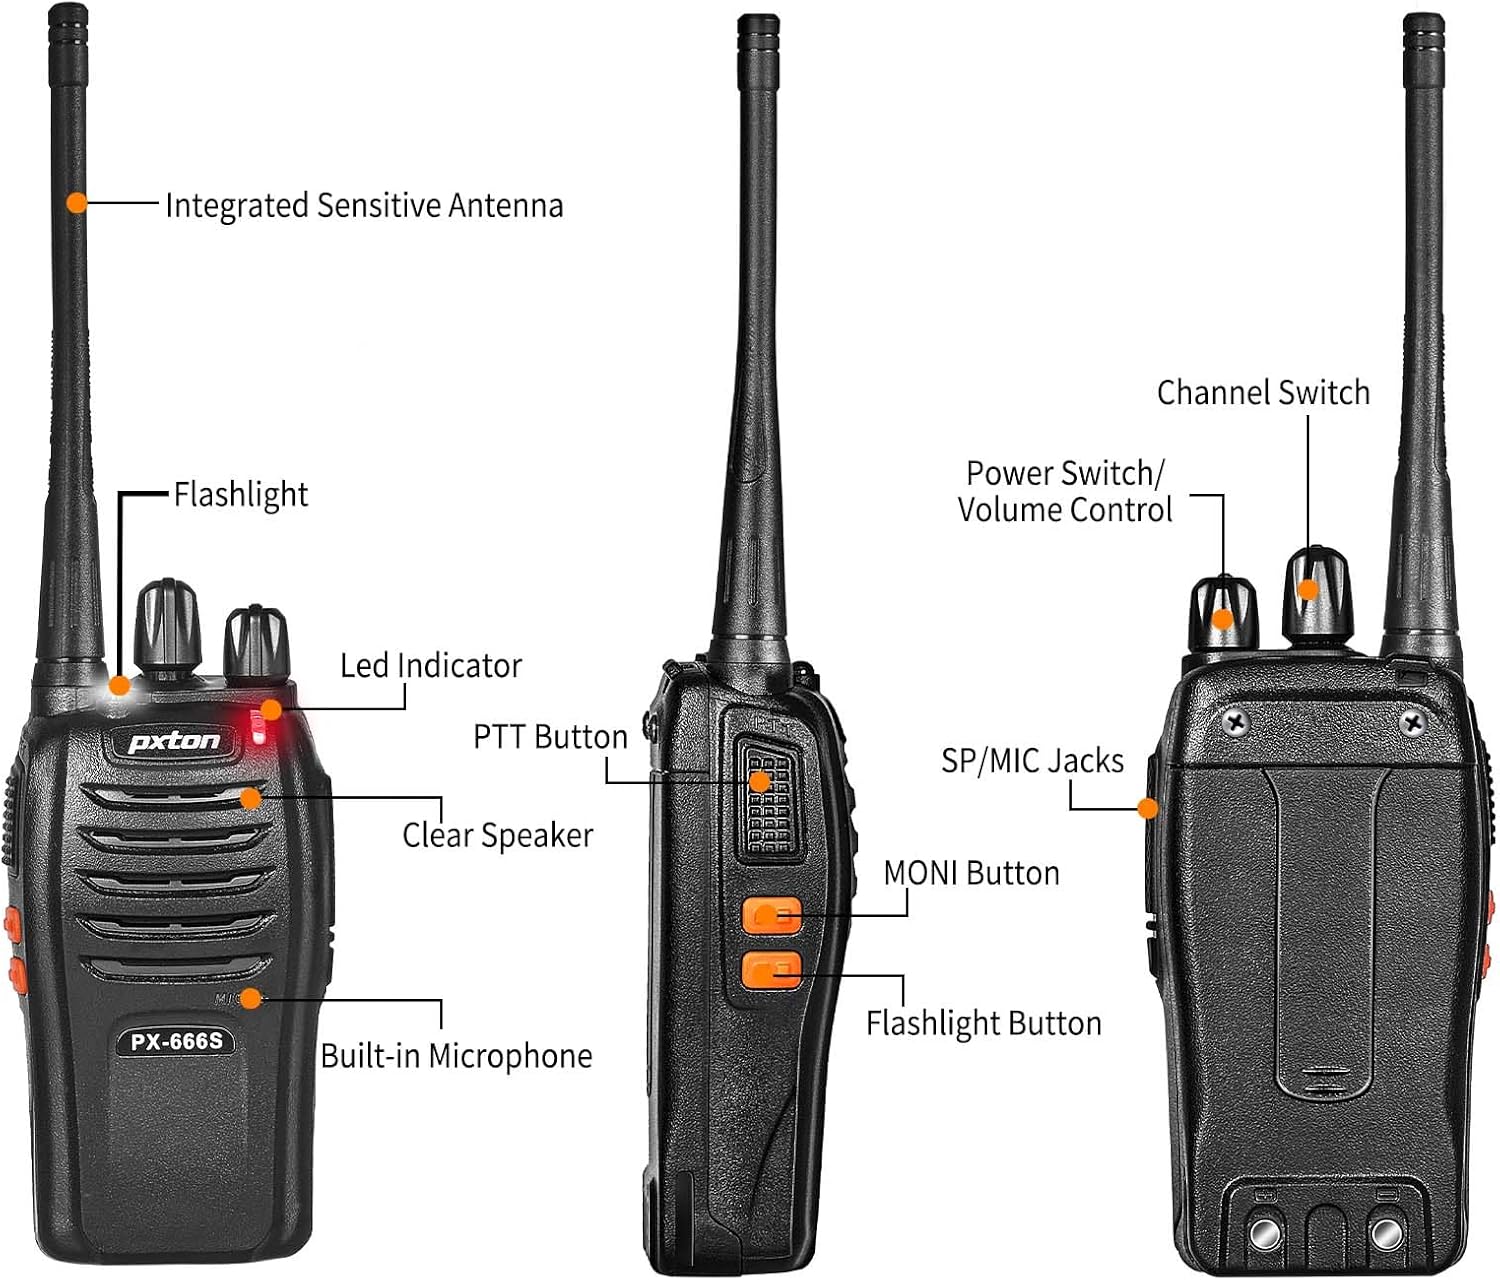
Image 2.1: Front and side view of the pxton 666S with labeled components.

Image 2.2: Angled view of the pxton 666S with labeled components.
3. Setup
3.1 Battery Installation and Charging
- Ensure the walkie talkie is powered off.
- Align the 1500mAh Li-ion battery with the battery compartment on the back of the radio.
- Gently push the battery into place until it clicks securely.
- To charge, place the walkie talkie into the charging base. Ensure the charging contacts align.
- Connect the power adapter to the charging base and plug it into a wall outlet.
- The LED indicator on the radio will typically show red during charging and turn green when fully charged.
- Charging time is approximately 3-4 hours for a full charge.

Image 3.1: Battery installation and specifications.

Image 3.2: Walkie talkie in charging base.
3.2 Attaching Accessories
- Antenna: Screw the antenna clockwise into the connector on top of the radio until it is firm. Do not overtighten.
- Belt Clip: Attach the belt clip to the designated slots on the back of the radio using the provided screws.
- Headphones: Insert the headphone jack into the SP/MIC jacks on the side of the radio. Ensure it is fully inserted for proper connection.
4. Operating Instructions
4.1 Power On/Off and Volume Control
- Power On: Rotate the Power Switch/Volume Control knob (top left knob) clockwise until you hear a click. The radio will emit a tone, and the LED indicator will flash.
- Power Off: Rotate the Power Switch/Volume Control knob counter-clockwise until you hear a click.
- Volume Adjustment: After powering on, continue rotating the Power Switch/Volume Control knob clockwise to increase volume or counter-clockwise to decrease volume.
4.2 Channel Selection
- Rotate the Channel Switch knob (top right knob) to select your desired channel (1-16).
- Ensure all radios in your group are set to the same channel for communication.
4.3 Transmitting and Receiving
- To Transmit: Press and hold the PTT (Push-To-Talk) button on the side of the radio. Speak clearly into the microphone (located below the speaker grille). Release the PTT button to stop transmitting.
- To Receive: When the PTT button is not pressed, the radio is in receive mode. You will hear incoming transmissions through the speaker or connected headphones.
4.4 VOX Function
The VOX function allows for hands-free operation. When activated, the radio will automatically transmit when it detects your voice, without needing to press the PTT button. Refer to your radio's programming software for VOX activation and sensitivity adjustment (programming cable sold separately).
4.5 Flashlight Operation
Press the dedicated Flashlight Button (often located below the PTT button) to turn the built-in LED flashlight on or off.
4.6 Monitoring and Scan Functions
- MONI Button: Press and hold the MONI (Monitor) button to temporarily disable squelch and listen to all activity on the current channel, including weak signals.
- Scan Function: The scan function allows the radio to automatically sweep through programmed channels to detect active transmissions. Activation and channel programming for scan typically require programming software.
4.7 Communication Range
The actual communication range varies significantly based on terrain and obstructions:
- Open Areas (e.g., flat terrain, mountain peaks): Up to 3 miles.
- Suburban/Countryside: Approximately 1.2 miles.
- City Limits (with buildings and obstructions): Approximately 0.6 miles.

Image 4.1: Communication distance in various environments.
5. Maintenance
- Cleaning: Use a soft, damp cloth to clean the radio's exterior. Do not use harsh chemicals or solvents.
- Battery Care: Avoid fully discharging the battery frequently. Charge the battery regularly, even if not in use, to maintain its lifespan. Do not expose batteries to extreme temperatures.
- Storage: Store the walkie talkie in a cool, dry place when not in use. Remove the battery if storing for extended periods.
- Antenna: Do not bend or modify the antenna, as this can affect performance.
6. Troubleshooting
| Problem | Possible Cause | Solution |
|---|---|---|
| Radio does not power on. | Battery is low or not installed correctly. | Charge the battery fully. Reinstall the battery securely. |
| Cannot transmit or receive. | Incorrect channel selected. Out of range. Battery low. | Ensure all radios are on the same channel. Move closer to other radios. Charge battery. |
| Poor audio quality or static. | Weak signal. Obstructions. Volume too low/high. | Move to an open area. Adjust volume. Use MONI button to check for weak signals. |
| Battery life is shorter than expected. | Frequent transmissions. Old battery. Extreme temperatures. | Reduce transmission time. Replace old battery. Operate in moderate temperatures. |
7. Specifications
| Feature | Detail |
|---|---|
| Brand | pxton |
| Model Number | 666S |
| Number of Channels | 16 |
| Frequency Range | UHF |
| Talking Range (Max) | 3 Miles (open areas) |
| Battery Capacity | 1500mAh Lithium-ion |
| Battery Average Life | Up to 120 hours standby, 12 hours continuous talk |
| Voltage | 3.7 Volts (DC) |
| Water Resistance Level | Water Resistant |
| Special Features | Long Range, Noise Reduction, VOX, Flashlight, Monitoring, Scan |
| Compatible Devices | PX-888S, PX-777S, PX-888S Pro (with same programming tools/cables) |

Image 7.1: Size comparison of pxton 666S walkie talkie.
8. Warranty and Support
pxton offers a 30-day no-questions-asked replacement and refund policy for your peace of mind. Additionally, we provide lifelong after-sales service to ensure your satisfaction.
If you encounter any issues or have questions regarding your pxton 666S walkie talkie, please do not hesitate to reach out to pxton customer support. We are committed to assisting you and resolving any concerns you may have.
For support, please refer to the contact information provided with your purchase or visit the official pxton website.


