
1. Safety Information
Please read and understand all safety information before operating this laser level. Failure to follow these instructions may result in laser radiation exposure, electric shock, fire, and/or serious injury.
- Laser Radiation: This product is a Class 2 laser product (IEC/EN60825-1/2014), with a maximum output power of <1mW at 505-520nm. Do not stare directly into the laser beam. Avoid direct eye exposure.
- Do not disassemble the laser level. Repairs should only be performed by authorized service personnel.
- Do not operate the laser level in explosive atmospheres, such as in the presence of flammable liquids, gases, or dust.
- Keep the laser level out of reach of children.
- Use only the specified battery and charging cable.
2. Package Contents
Verify that all items are present upon opening the package:
- 1 x Huepar Pro 3D Laser Level (Model: ZK03DG-S)
- 1 x Rechargeable Li-ion Battery (8000mAh)
- 1 x Remote Control
- 1 x Magnetic Bracket
- 1 x Type-C Charging Cord
- 1 x Green Laser Target Plate
- 1 x User Manual
- 1 x Hard Carrying Case
- 1 x Lifting Base

Figure 2.1: Package Contents
3. Product Overview
The Huepar Pro ZK03DG-S is a 3x360° green laser level designed for various leveling and alignment tasks, particularly tiling. It features high accuracy, a long-lasting rechargeable battery, and multiple operating modes.
Key Features:
- 3D Laser Configuration: Projects one 360° horizontal tiling laser line and two 360° vertical laser planes. The floor horizontal line is specifically designed for tiling installations.
- Lifting Base: Allows the 360° floor laser to be raised from the surface, adjustable between 0.83" and 3.2" in height.
- High Accuracy: Provides an accuracy of ±1/13 inch at 33 feet (±2mm at 10m).
- Extended Working Range: Operates up to 100 feet (100 LUX). When used with a Huepar laser receiver (not included), pulse mode extends the range to 200 feet.
- Bright Green Laser: Utilizes a green laser unit for enhanced stability and visibility compared to red lasers.
- Rechargeable Battery: An 8000mAh Li-ion battery provides approximately 10 hours of continuous operation with all three 360° laser beams active. It features a Type-C charging port and a Micro-USB output port for charging other devices.
- Self-leveling and Manual Modes: Equipped with a smart pendulum for automatic self-leveling within ±3°. A locking mechanism enables manual mode for projecting lines at any angle.
- Line Selection: Individual laser lines can be selected using the 'H' (horizontal) and 'V' (vertical) buttons on the keypad.
- Remote Control: Allows activation/deactivation of pulse mode and switching of laser lines from a distance of up to 32.8 feet.
- Versatile Mounting: Includes a strong magnetic bracket for attachment to metal surfaces, offering 180° rotation. Both the bracket and the laser tool feature 1/4"-20 and 5/8"-11 threaded mounts for compatibility with tripods or pole mounts.

Figure 3.1: Ultra Bright Green Diode for High Accuracy

Figure 3.2: 3x360° Laser Lines for Multiple Applications
4. Setup
4.1. Battery Installation and Charging
- Locate the battery compartment on the laser level.
- Insert the 8000mAh Li-ion battery, ensuring correct polarity.
- To charge, connect the Type-C charging cord to the battery's Type-C port and a suitable USB power adapter (not included). The battery indicators will show charging status.
- The battery can also be charged separately from the laser level.
- The battery features a Micro-USB output port to charge other small electronic devices.
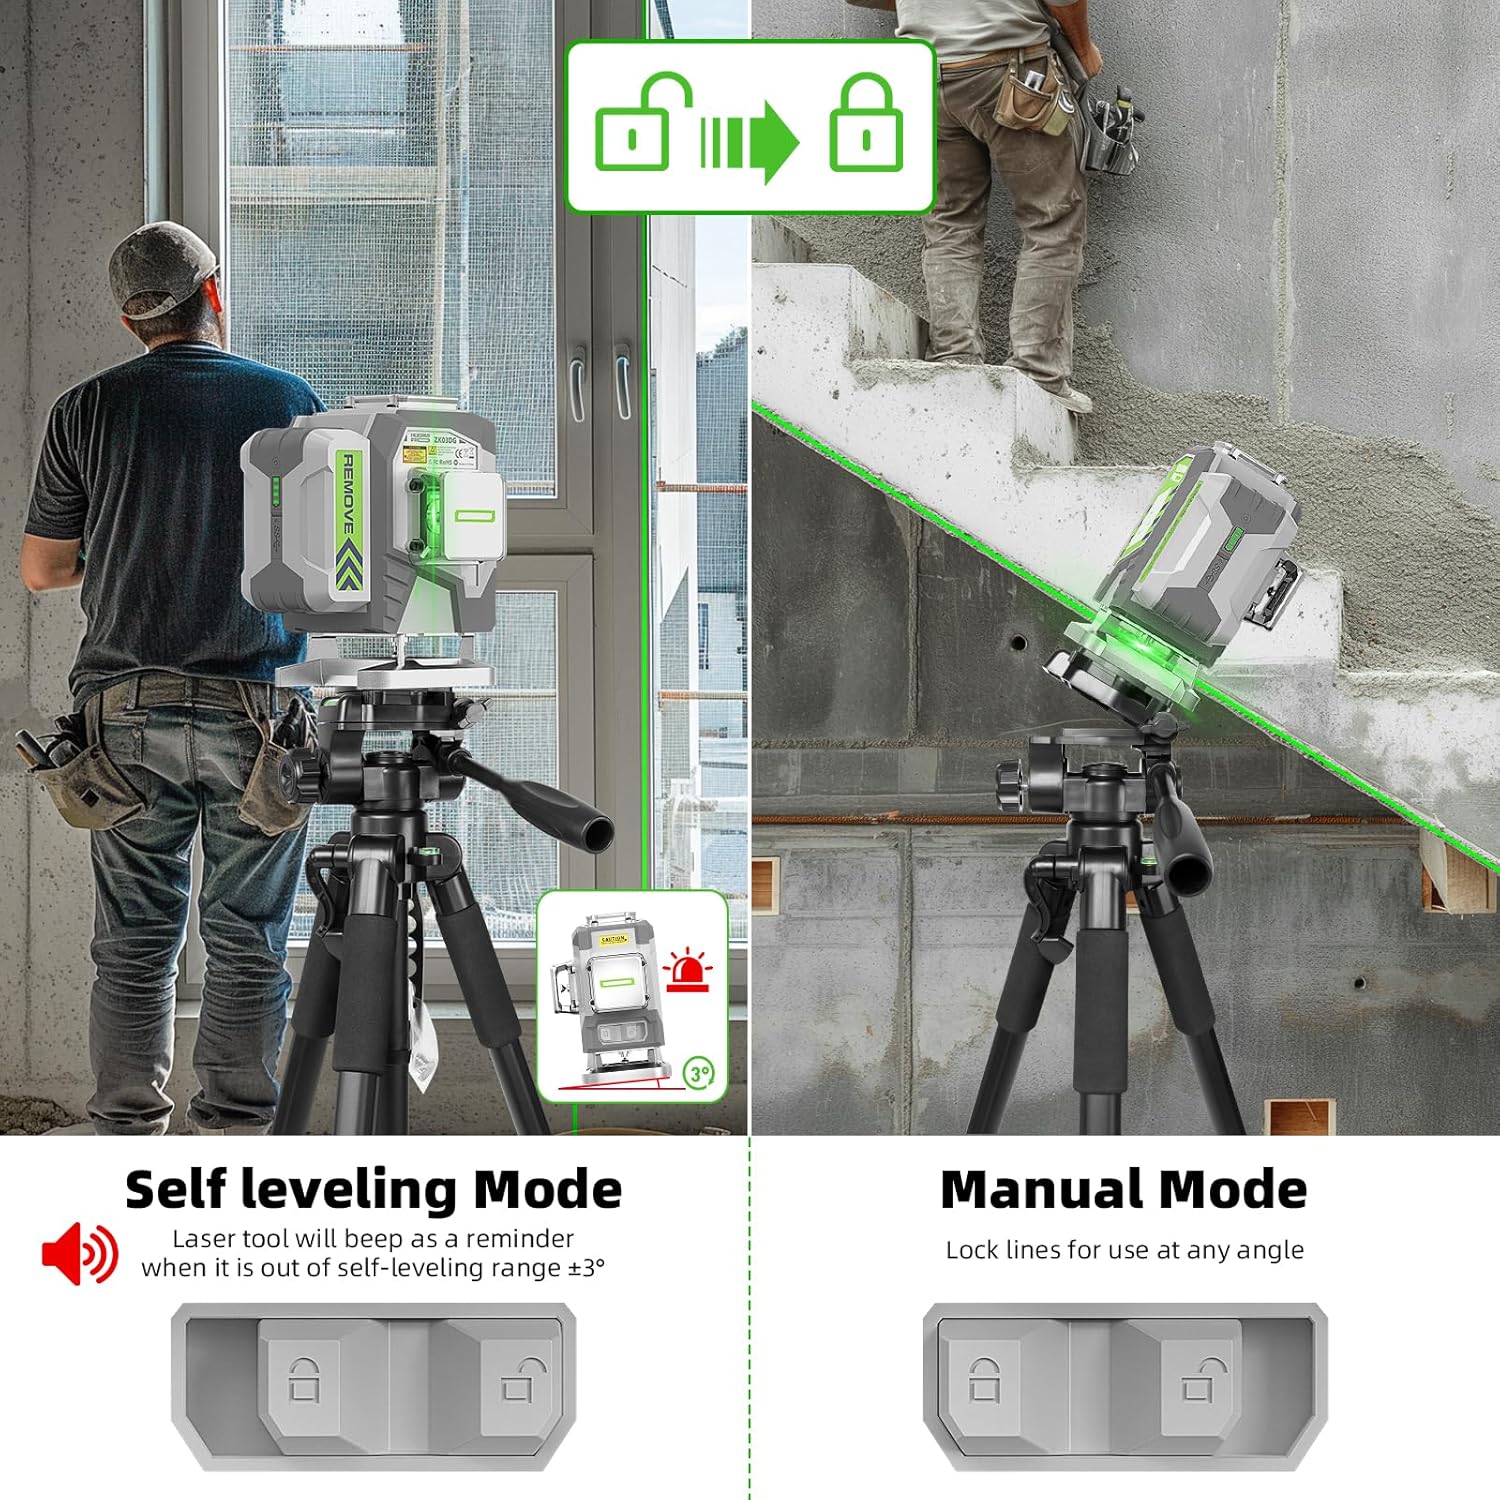
Figure 4.1: Battery Features and Charging
4.2. Mounting the Laser Level
The Huepar Pro ZK03DG-S offers several mounting options:
- Lifting Base: Place the laser level on the included lifting base for precise height adjustment of the floor laser line. Adjust the knob on the base to raise or lower the laser.
- Magnetic Bracket: Attach the laser level to the magnetic bracket. The strong magnets allow secure attachment to metal surfaces. The bracket also rotates 180° for flexible positioning.
- Tripod/Pole Mount: Both the laser level and the magnetic bracket have 1/4"-20 and 5/8"-11 threaded mounts for attachment to standard tripods or pole mounts (not included).

Figure 4.2: Various Fixing Methods
5. Operating Instructions
5.1. Power On/Off
To power on the device, slide the pendulum lock switch to the unlocked position. To power off, slide the pendulum lock switch to the locked position.
5.2. Self-Leveling Mode
When the pendulum lock switch is in the unlocked position, the laser level will automatically self-level within 3 seconds. If the device is outside its self-leveling range of ±3°, the laser lines will flash rapidly and a beeping sound will be emitted to indicate an out-of-level condition. Adjust the position of the laser level until it is within the self-leveling range.
5.3. Manual Mode
To use the laser level in manual mode, slide the pendulum lock switch to the locked position. In this mode, the laser lines can be projected at any desired angle without self-leveling. The laser lines will not flash or beep when tilted.

Figure 5.1: Self-leveling vs. Manual Mode
5.4. Switching Laser Lines
The 3x360° laser lines can be selected individually using the 'H' and 'V' buttons on the keypad or via the remote control.
- Press the 'H' button to cycle through horizontal line combinations.
- Press the 'V' button to cycle through vertical line combinations.
- The remote control allows you to switch lines and activate/deactivate pulse mode from a distance.
5.5. Pulse Mode
Activate pulse mode when working in strong light conditions or outdoors, especially when using a Huepar laser receiver (not included). Pulse mode extends the working range up to 200 feet.
- Press the pulse mode button on the laser level or the remote control to activate/deactivate.
- When pulse mode is active, the laser lines will appear slightly dimmer to the naked eye but will be detectable by a compatible laser receiver.

Figure 5.2: Pulse Mode Operation
Video 5.1: Demonstration of HueparPro Laser Level features, including line switching and remote control functionality.
6. Maintenance
- Cleaning: Regularly clean the laser level with a soft, damp cloth. Do not use harsh chemicals or abrasive cleaners. Ensure the laser windows are clean for optimal performance.
- Storage: When not in use, store the laser level in its hard carrying case in a dry, dust-free environment. Ensure the pendulum lock is engaged to protect the internal mechanism during transport and storage.
- Battery Care: Charge the battery fully before long-term storage and recharge every 3-6 months to maintain battery health.
- Calibration: If you suspect the laser level is out of calibration, refer to the troubleshooting section or contact customer support. Do not attempt to self-calibrate without proper instructions.
7. Troubleshooting
| Problem | Possible Cause | Solution |
|---|---|---|
| Laser lines are flashing and beeping in self-leveling mode. | The laser level is outside its self-leveling range (±3°). | Place the laser level on a more level surface until the flashing and beeping stop. |
| Laser lines are dim or not visible outdoors. | Bright ambient light or pulse mode is not activated. | Activate pulse mode and use a Huepar laser receiver (not included) for outdoor or bright conditions. Ensure laser windows are clean. |
| Laser level does not turn on. | Battery is low or not installed correctly; pendulum lock is engaged. | Charge the battery or ensure it is properly installed. Slide the pendulum lock switch to the unlocked position. |
| Remote control is not working. | Remote battery is dead; out of range; obstruction. | Replace remote battery. Ensure you are within 32.8 feet of the laser level and there are no obstructions. |
| Inaccurate laser lines. | Device is not self-leveling correctly; needs calibration. | Ensure the device is on a stable surface and within its self-leveling range. If issues persist, contact Huepar Pro customer support for calibration guidance. |
8. Specifications
| Feature | Detail |
|---|---|
| Brand | Huepar Pro |
| Model Number | ZK03DG-S |
| Laser Class | Class 2 (IEC/EN60825-1/2014), <1mW |
| Laser Color | Green Beam |
| Accuracy | ±1/13 inch at 33Ft (±2mm at 10m) |
| Self-leveling Range | ±3° |
| Working Range | Up to 100Ft (100 LUX), 200Ft with receiver (not included) |
| Battery Type | 8000mAh Li-ion Rechargeable Battery |
| Working Time | Approx. 10 hours (with all beams on) |
| Charging Port | Type-C |
| Output Port | Micro-USB (for charging other devices) |
| Remote Control Range | Up to 32.8Ft |
| Mounting Thread | 1/4"-20 and 5/8"-11 |
| Material | Metal, Rubber |
| Operation Mode | Self-leveling/Manual Mode |
| Included Components | 3D Laser Level, Rechargeable Battery, Remote Control, Magnetic Bracket, Type-C cord, Green Laser Target Plate, User Manual, Hard Carry Case, Lifting Base |
9. Warranty & Support
Huepar Pro offers comprehensive warranty and technical support for this product:
- 5-Year Warranty: All Huepar Pro laser tools are covered by a 5-year warranty. The rechargeable battery has a 2-year warranty. This warranty covers non-user damage.
- Year 1: Full set replacement for any non-user damage, ensuring no repairs or waiting time.
- Years 2-5: Free refurbished or equivalent replacement if the product is non-repairable due to non-user damage.
- Lifetime Technical Support: Access to setup and troubleshooting assistance for the lifetime of the product.
- 24/7 Support: Huepar Pro provides 24-hour response and 48-hour solution commitment for customer inquiries.
- Global Repair Service: Available for product repairs.
Contact Information:
- Email: cs@hueparpro.com
- WhatsApp: +16267029700


