
1. Introduction
The LEAUDIO XDUOO MH-02 is a versatile USB Digital-to-Analog Converter (DAC) and Tube Headphone Amplifier. It combines the warmth of tube pre-amplification with the power of a Class A transistor buffer, designed to enhance your audio experience. This manual provides detailed instructions for setup, operation, and maintenance of your MH-02 unit.
2. Safety Instructions
- Ensure the power supply voltage matches the requirements specified for the device (DC 12V/2A).
- Do not expose the unit to water, moisture, or extreme temperatures.
- Avoid placing the unit in direct sunlight or near heat sources.
- Ensure adequate ventilation around the unit to prevent overheating.
- Do not attempt to open or repair the unit yourself. Refer all servicing to qualified personnel.
- Keep out of reach of children.
3. Package Contents
Please check the package for the following items:
- XDUOO MH-02 Unit
- Power Adapter (DC 12V) (Typically included, please verify packaging)
- USB Cable (Typically included, please verify packaging)
4. Product Overview
4.1 Front Panel
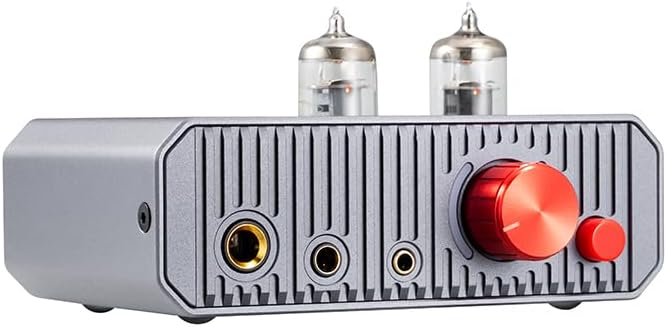
This image displays the front panel of the MH-02, highlighting the dual vacuum tubes, the prominent red volume control knob, the smaller red gain selection button, and the three distinct headphone output jacks.
- 6.35mm Headphone Output: Standard headphone jack.
- 4.4mm Balanced Headphone Output: Balanced headphone jack for compatible headphones.
- 3.5mm Headphone Output: Standard headphone jack.
- Volume Knob: Controls the output volume for headphones and line out.
- Gain Button: Toggles between low and high gain settings.
- Vacuum Tubes: Dual 6J1 tubes for pre-amplification.
4.2 Rear Panel

This image illustrates the rear panel of the MH-02, featuring the RCA input and output connections, the USB-C port for digital audio, the DC 12V power input, and the main power switch.
- RCA L/R IN: Analog audio input.
- RCA L/R OUT: Analog audio line output.
- USB IN (Type-C): Digital audio input for USB DAC function.
- DC 12V: Power input jack.
- Power Switch: Toggles the unit on or off.
5. Setup
5.1 Connecting to a USB Audio Device

This diagram illustrates two primary connection methods: USB for digital sources like laptops, and RCA for analog sources such as CD players, both leading to headphone output.
- Use a USB OTG cable (not included) to connect the MH-02's USB IN port to your computer (Windows, Linux, Mac OS X), iOS device, Android device, or HiFi player.
- Connect your headphones to one of the headphone output jacks on the front panel.
- Ensure the MH-02 is powered on.
- Select the MH-02 as the audio output device in your source device's sound settings.
5.2 Connecting to an Analog Audio Device
- Use an RCA audio cable to connect the AUX/Line output of your player (e.g., CD player) to the RCA L/R IN ports on the rear panel of the MH-02.
- Connect your headphones to one of the headphone output jacks on the front panel.
- Ensure the MH-02 is powered on.
5.3 Power Connection
- Connect the provided DC 12V power adapter to the DC 12V input jack on the rear panel of the MH-02.
- Plug the power adapter into a suitable wall outlet.
6. Operating Instructions
6.1 Power On/Off
Flip the power switch on the rear panel to the 'ON' position to power on the unit. Flip it to 'OFF' to power off. A built-in relay mutes the circuit during power-on to prevent 'POP' noise and ensure optimal tube operation.

This image shows an internal relay, which is part of the built-in protection circuit designed to prevent 'POP' noise during power cycles.
6.2 Volume Control
Rotate the large red knob on the front panel clockwise to increase volume and counter-clockwise to decrease volume. Start with a low volume setting before playing audio to avoid sudden loud sounds.
6.3 Gain Switch Operation

This diagram explains the function of the gain switch: pressing the button activates 'LOW' gain, while leaving it unpressed selects 'HIGH' gain.
The small red button on the front panel is the gain switch. Press it gently to toggle between two gain settings: Low Gain (button pressed) and High Gain (button unpressed). Select the appropriate gain setting based on your headphones' impedance and sensitivity to achieve optimal sound and prevent over-driving or under-driving.
6.4 Using as a Pre-amplifier
The MH-02 features a volume-controlled line output (RCA L/R OUT) that routes audio through its tube stage. This allows the unit to function as a pre-amplifier for other audio amplifiers or active speakers, potentially enhancing their sound quality.
7. Specifications
| Parameter | Value |
|---|---|
| Power Supply | DC 12V/2A |
| Compliant OS | Windows, Linux, Mac OS X, iOS, Android |
| Sampling Rate Support (PCM) | 16-32Bit/44.1k-384kHz |
| Sampling Rate Support (DSD) | DSD64-256 |
| Output Power | 1300mW (32Ω load) |
| Frequency Response | 10Hz-60KHz (±0.5dB) |
| Gain | +12dB / +18dB |
| THD+N | 0.8% (1KHz, 32Ω load) |
| S/N Ratio | 113dB |
| Crosstalk | 70dB |
| Unit Dimensions (L x W x H) | 12 x 10 x 6.4 cm (approx. 4.7 x 3.9 x 2.5 inches) |
| Unit Weight | 0.42 Kg (approx. 14.8 ounces) |
| Item Weight (as listed) | 14.4 ounces |
| Manufacturer | LEAUDIO |
| Date First Available | May 20, 2024 |
8. Troubleshooting
- No Sound:
- Ensure the unit is powered on and the power adapter is securely connected.
- Check all audio cables (USB, RCA, headphones) are correctly and securely connected.
- Verify the volume knob is turned up.
- If using USB, ensure the MH-02 is selected as the default audio output device on your computer or source device.
- Test with different headphones or source devices to isolate the issue.
- Distorted Sound:
- Reduce the volume on both the MH-02 and your source device.
- Check the gain setting. If using sensitive headphones, try the 'Low Gain' setting.
- Ensure audio cables are not damaged or loose.
- Test with different audio files or sources.
- Intermittent Connection:
- Check all cable connections for looseness.
- Try a different USB or RCA cable.
- Ensure the power supply is stable.
9. Maintenance
- Cleaning: Use a soft, dry cloth to clean the exterior of the unit. Do not use liquid cleaners or solvents.
- Tube Replacement: The 6J1 vacuum tubes have a finite lifespan. If you notice a significant degradation in sound quality or tube failure, contact the manufacturer or a qualified technician for replacement instructions. Ensure the unit is powered off and unplugged before attempting any tube replacement.
- Storage: When not in use for extended periods, store the unit in a cool, dry place away from direct sunlight and dust.
10. Warranty and Support
For warranty information, technical support, or service inquiries, please refer to the documentation provided with your purchase or contact the seller/manufacturer directly. Keep your proof of purchase for warranty claims.