
1. Introduction
This manual provides essential information for the proper installation, configuration, and operation of your Srutueo F4V3S Flight Controller Board. Designed for FPV racing drones, this flight controller integrates advanced features to enhance flight performance and user experience. Please read this manual thoroughly before use to ensure safe and optimal performance.
2. Key Features
- Microcontroller: STM32 F405 MCU for high-performance processing.
- Gyroscope/Accelerometer: IC268G SPI Gyro & Accelerometer (appears as MPU6500 in INAV configurator).
- Barometer: Integrated BMP280 for accurate altitude holding.
- On-Screen Display (OSD): Drag and Drop OSD configurable via Betaflight Configurator.
- ESC Protocol Support: Dshot compatible for precise motor control.
- Video Transmitter Control: SmartAudio v2 support for VTX configuration via transmitter.
- Receiver Support: SBUS/PPM and Spektrum DSM-X ports.
- Data Logging: SD card slot for blackbox flight data recording.
- Power Supply: Integrated 5V 3A SBEC.
- Video Filtering: On-board video filter (provides 5V to VTX and Camera).
- ESC Layout: 4x3 pin ESC pin layout.
- Lap Timing: IR pins for lap timing transponder integration.
3. Setup and Installation
3.1 Hardware Installation
Mount the F4V3S Flight Controller securely onto your drone frame using the provided standoffs and screws. Ensure proper isolation from vibrations. Observe the orientation of the board as indicated by the arrow on the PCB, which typically points forward.

Image: Srutueo F4V3S Flight Controller mounted on standoffs, showing the typical installation method with included hardware.
3.2 Wiring Connections
Carefully connect your ESCs, receiver, VTX, camera, and other peripherals to the appropriate pads and connectors on the flight controller. Refer to the pinout diagram (if available from the manufacturer's official documentation) for precise connections. Below are general connection areas:
- ESCs: Connect motor signal wires to the designated PWM/Dshot pads (e.g., M1-M4).
- Receiver: Connect SBUS, PPM, or DSM-X receiver to the dedicated receiver port or UART.
- VTX & Camera: Connect video input/output and power. The on-board video filter provides 5V for these components.
- Battery: Connect main battery voltage (VBAT) to the designated pads.
- Buzzer: Connect a buzzer to the BZ+ and BZ- pads.
- LEDs: Connect programmable LEDs to the LED strip pad.

Image: Top view of the F4V3S Flight Controller, highlighting the STM32 F405 MCU and various solder pads for peripheral connections.
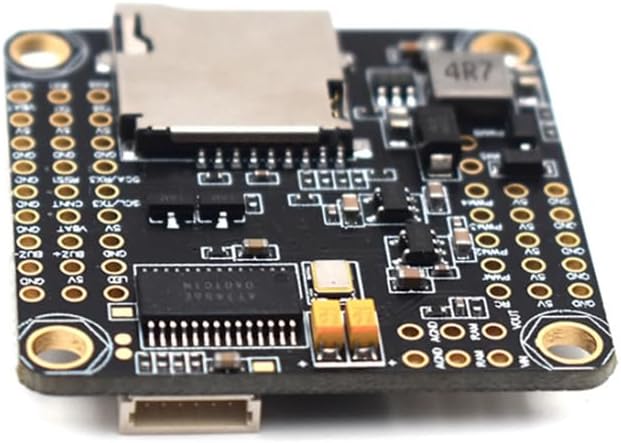
Image: Bottom view of the F4V3S Flight Controller, featuring the SD card slot for blackbox logging and additional component details.
3.3 Software Configuration (Betaflight/INAV)
The F4V3S Flight Controller supports both Betaflight and INAV firmware. You will need to flash the appropriate firmware and configure the board using the respective configurator software.
- Install Drivers: Ensure you have the necessary USB drivers installed on your computer.
- Connect FC: Connect the flight controller to your computer via a micro USB cable.
- Flash Firmware: Open Betaflight Configurator or INAV Configurator. Select the correct target (e.g., OMNIBUSF4SD for Betaflight, or a similar F4 target for INAV) and flash the latest stable firmware.
- Initial Setup: Follow the configurator's setup wizard to calibrate the accelerometer, set up your receiver, ESCs, OSD, and other flight parameters.
- OSD Configuration: Utilize the 'Drag and Drop OSD' feature in Betaflight Configurator to customize your on-screen display elements.
- SmartAudio Setup: Configure SmartAudio v2 settings to control your VTX channels and power levels directly from your transmitter.
4. Operating the Flight Controller
Once installed and configured, the flight controller manages the drone's flight characteristics based on your settings. Key operational aspects include:
- Arming/Disarming: Use your configured switch on the transmitter to arm the motors for flight and disarm them after landing.
- Flight Modes: Select various flight modes (e.g., Acro, Angle, Horizon) via your transmitter switches as configured in Betaflight/INAV.
- OSD Information: Monitor critical flight data (battery voltage, current, flight time, RSSI, etc.) displayed on your FPV goggles or monitor via the OSD.
- Blackbox Logging: Flight data is recorded to the SD card, which can be analyzed later for tuning and troubleshooting.
5. Maintenance
Regular maintenance ensures the longevity and reliability of your flight controller.
- Firmware Updates: Periodically check for and update to the latest stable Betaflight or INAV firmware versions to benefit from new features and bug fixes.
- Physical Inspection: Regularly inspect the board for any signs of damage, loose connections, or corrosion.
- Cleaning: Keep the board free from dust, dirt, and debris. Use compressed air or a soft brush. Avoid liquids unless specifically designed for electronics cleaning.
- SD Card Management: Format the SD card periodically and ensure sufficient free space for logging.
6. Troubleshooting
If you encounter issues, consider the following common troubleshooting steps:
- No Power: Check all power connections, battery voltage, and ensure no shorts are present. Verify the 5V SBEC output.
- No Gyro/Accelerometer Data: Ensure the board is correctly recognized in the configurator. Re-flash firmware if necessary. Check for physical damage to the gyro chip.
- OSD Not Displaying: Verify OSD settings in the configurator. Check video input/output connections to VTX and camera. Ensure the video signal is clean.
- Receiver Not Responding: Check receiver wiring (signal, ground, power). Verify UART settings and receiver protocol (SBUS, PPM, DSM-X) in the configurator. Ensure receiver is bound to the transmitter.
- Motors Not Arming: Check pre-arm safety features in the configurator (e.g., accelerometer calibration, minimum throttle, failsafe settings). Ensure your transmitter arm switch is correctly configured.
- Unstable Flight: Review PID tuning settings. Check for vibrations affecting the gyro. Ensure motors and propellers are balanced and undamaged.
- SD Card Not Logging: Ensure the SD card is properly inserted, formatted (FAT32), and not full. Check blackbox logging settings in the configurator.
7. Specifications
| Component | Detail |
|---|---|
| Microcontroller | STM32 F405 |
| Gyroscope/Accelerometer | IC268G (SPI) |
| Barometer | BMP280 |
| OSD | Integrated, Drag and Drop configurable |
| ESC Protocol | Dshot support |
| VTX Control | SmartAudio v2 |
| Receiver Support | SBUS/PPM, Spektrum DSM-X |
| Blackbox | SD card slot |
| BEC Output | 5V 3A SBEC |
| Video Filter | On-board (5V to VTX and Camera) |
| ESC Layout | 4x3 pin |
| Special Features | Advanced Flight Control, Data Logging, Specialized Racing Features, IR pins for lap timing |
| Material | PC+metal |
8. Safety Information
Operating FPV drones involves inherent risks. Always adhere to the following safety guidelines:
- Always remove propellers when working on the drone or connecting to a computer.
- Never arm the drone indoors or near people/animals.
- Ensure proper ventilation when soldering to avoid inhaling fumes.
- Double-check all wiring before applying power to prevent damage to components.
- Be aware of local regulations and laws regarding drone operation.
9. Warranty and Support
For warranty claims, technical support, or further assistance, please contact the seller or manufacturer directly. Retain your proof of purchase for warranty purposes. Specific warranty terms and conditions may vary.